


Welcome to my food journal! This is officially on the net as of Oct. 24th 2011! I will try to put new entries in my journal once a week if possible – some of them may take a little longer. My journal is where I will be writing about anything going on in my culinary world. This includes recipes from my home, restaurant and event reviews, some basic culinary information that I want to share with you, and whatever else may come to mind. The food journal will always have the last ten things I put on the site in it, just not categorized. Everything will be in it’s own category on the menu bar as well. This is the best place to look if you want to see my latest post, because it will always be at the top. You can use the search tool to look for a specific subject by typing key words into the search bar. You can also go to the index on the menu bar for a list of everything on the site. If there is something you would like to know about that I haven’t posted or if you have a question, please feel free to contact me and I will try to answer as soon as possible. I love to share my food and knowledge, and I put this site up for us!
Here are my 5 most recent entries!
If you would like to see a list of all of my recipes, lessons and reviews, please go to the index on the menu bar.
Pastelon
Apple Crisp – How to Make Apple Crisp

Apple Crisp – Learn How to Make Apple Crisp with this super simple recipe. IMHO this old fashioned Apple Crisp is the best apple crisp recipe I’ve ever made. I use Granny Smith Apples for a bit of tartness to go with the sweet, lots of melted butter and an oat topping – yum! Also, we served this with vanilla ice cream and a drizzle of maple syrup on the plate.
Apple Crisp Ingredients
Filling
1/2 cup brown sugar
1 Tablespoon Flour
1 teaspoon cinnamon
1/2 teaspoon coriander
1/2 teaspoon cardamom
1/8 teaspoon cayenne
6 cups Granny Smith Apples sliced 1″ thick
Topping for Apple Crisp
1 cup flour
1 cup brown sugar
1/2 teaspoon baking powder
1/2 stick butter (salted)
Also to assemble
1 stick butter, melted
2 Tablespoons brown sugar
1/4 cup buttermilk
Where to get a cast iron skillet –
*The above product links are affiliate links. This means that if you click on them I get a small commission (at no additional cost to you) from the seller. This helps to support my channel so that I can continue to bring you more recipes :) Thank you for your support! I really appreciate it :)
Chicken Cordon Bleu Mac and Cheese

This chicken cordon bleu mac and cheese recipe is easy to make and is a great way to use up leftover ham. In this recipe, I’m using my leftover ham from Easter dinner. I had chopped up some of the leftovers into bite size pieces and froze them for various uses like soup and fried rice which made this dish even quicker and easier to make. Please make sure to enjoy the video at the bottom of this page before getting started :)
Ingredients
12 ounces elbow macaroni
1/4 cup butter
1/4 cup flour
1/2 teaspoon Kosher salt (or to your taste)
2 cups milk
8 ounces Swiss cheese
12 ounces ham (I’m using leftover ham from Easter)
1 pound chicken tenders (tendons removed)
Instructions for Chicken Cordon Bleu Mac and Cheese
1. Start off by bringing a pot of well salted water to a boil. I use about 1/4 cup of iodized salt for 7 quarts of water. I also used 1 bay leaf in the water for extra flavor. Once the water comes to a boil, cook your noodles according to package instructions. I cooked mine for 8 minutes and then drained them.
2. In a separate large pot, melt the butter then add the flour (and Kosher salt) and combine them with a whisk. Cook for about 2 minutes until your mixture has a golden color and a slightly nutty scent.
3. Add you milk a little at a time whisking as you go so you don’t get lumps. Once all of your milk is added, bring the mixture to a boil stirring often with a rubber spatula making sure to scrape the bottom as you go so nothing is sticking or burning. Your sauce should thicken once it hits a boil.
4. Lower the heat to medium – low and add in the Swiss cheese. Stir until it is melted in.
5. Add the ham and stir until combined.
6. Set up your “breading area”. To do this I combine 1 1/2 – 2 cups of flour, 1 Tablespoon of cornstarch and 1 teaspoon of Kosher salt into a gallon bag. Next, I crack about 3 eggs into a container large enough to dip my chicken strips into. Then I put 1 1/2 cups of bread crumbs in a second gallon baggie.
7. In a separate pan or deep fryer, heat canola oil. Dip your chicken into the flour mixture followed by the eggs and then the bread crumbs. Fry you chicken on both sides until it’s golden brown.
8. Serve your beautiful cordon bleu mac and cheese with some of the fried chicken and a garnish of spicy mustard and green onions if desired. Please make sure to enjoy the video below before getting started.
Please enjoy this video tutorial!
Waffle Recipe

Waffles Recipe – This quick and easy recipe will have you eating waffles that are crisp on the outside and fluffy, chewy goodness on the inside in no time. Be sure to check out the video tutorial down below. Also, I have a few upcoming videos/recipes that will show you how to take these waffles up a notch. Also, waffles make a really good Valentine’s Day breakfast in bed, just sayin’.
Dry Ingredients for Waffles
2 cups A.P. flour
1 teaspoon Kosher Salt
1 teaspoon baking powder
1/2 teaspoon baking soda
3 Tablespoons sugar
Wet Ingredients for Waffles
1 1/4 cups milk (warmed up)
1 cup buttermilk (warmed up)
3 eggs
1/2 cup melted butter
2 teaspoons vanilla
1. Combine all of the dry waffle ingredients into a large bowl. Mix them and make a well in the center.
2. Add the wet ingredients into the dry and use a whisk to combine. Scrape the sides and bottom of the bowl to make sure that the waffle batter is well mixed.
3. Add the waffle batter into your heated and oiled waffle maker and cook until done. There is a video tutorial down below if you’d like more detailed instructions :)
Lasagna

Lasagna
Lasagna Ingredients
3 – 4 Tablespoons olive oil
1 1/4 cup onion diced
5 garlic cloves, minced
Add a little of your salt and pepper with the onions and garlic
1 1/2 – 2 pounds ground beef (I use 85/15 or you can use 93/7 if you’re trying to make it lower fat)
Add a little of your salt and pepper on top of the meat.
2 (14 ounce each) cans diced tomatoes
2 – 3 teaspoons dried oregano
1 bay leaf (optional)
2 (6 ounce each) cans tomato paste
1 cup water
1 – 1 1/2 teaspoons sugar (taste to decide, it depends on the ripeness/sweetness and amount of acid in the tomatoes)
2 teaspoons Kosher salt (I add in a small amount after each ingredient totaling about 2 teaspoons but you can adjust this to your own taste, see video for how to properly add the salt).
1 teaspoon pepper
lasagna noodles (I use and recommend whole wheat, not only for the flavor but I feel they give a better texture in the finished lasagna)
It is at this point that I have realized that there are no measurements for any of the cheeses in my lasagna, so these are my best guesses.
1 1/2 pounds mozzarella (shredded)
6 ounces ricotta cheese
1 – 1 1/2 cups Parmesan cheese
Instructions for the Lasagna
1. Saute the onion and garlic with a bit of salt in the olive oil. Once the onions start to become translucent, add the beef along with 1 teaspoon of Kosher salt and a bit of black pepper, mix it in with the onions and garlic and cook until it’s browned.
2. If you did not use a lean meat you may want to drain the grease but you don’t have to, if you used the 93/7 this is not necessary.
3. Add the tomatoes, oregano, the bay leaf if you’re using it, a pinch of salt and pepper, a cup of water and the sugar. Allow to simmer.
4. Start your noodle water – use a large pot (mine is 8 quarts) and a lot of salt (I use 7 quarts of water to 1/4 cup iodized salt (read my salt article to learn how to properly use salt)).
5. When your water is at a rolling boil, add the noodles. Reduce the heat slightly and stir the noodles for the first 30 seconds (this will help them not stick together).
6. Boil the noodles for 8 minutes. Drain them in a colander and dunk in an ice bath or run cold water over them until cool. Drain well and toss with 1 teaspoon of olive oil.
7. In a large baking pan begin layering your lasagna – a thin layer of sauce goes down first – there is a how to video at the end of this recipe that will show you how I layer mine.
8. Here’s the order from the bottom – sauce, then noodles, sauce, *ricotta cheese, **mozzarella. Now start over at the noodles, then sauce, ricotta cheese, mozzarella, and repeat starting with the noodles until you have three layers, finish with parmesan on the top.
*For the ricotta cheese drop small spoons (about 1/2 teaspoon) here and there but do not cover the sauce- you just want to get a bite of it sometimes.
**For the mozzarella cheese, just try to use equal amounts in each layer.
9. Bake at 350° F for about an hour, up to an hour and a half – just watch for the top to turn those beautiful shades of gold and brown.
*Just as a side note, I make a larger version of this. I use 12 noodles and double the sauce and add some extra cheese. I always end up with a little extra sauce, but the kids like to eat it while the lasagna cooks with buttered bread. Also, Grandma puts sauce as her top layer, I like cheese on top-it’s up to you, both ways are good!
Christmas Vacation Inspired Eggnog

What is up everyone? I’m super excited to share today’s recipe with you because today’s recipe is inspired by one of my very favorite Christmas movies, Christmas vacation. For this recipe, I really wanted to channel my inner Griswald and get inside of Clark’s head and try to figure out what he would have asked Ellen to make for him. Because I don’t really feel like Clark would be in the kitchen busting this out but I do feel like he had a special little Christmas idea in his head and I think that Ellen would make it for him. So after days of thinking about this, I came up with what I think would have been Clark’s ideal eggnog. I can’t wait for you to try it!
Christmas Vacation Inspired Eggnog a.k.a. Clark’s Eggnog
Ingredients
5 cups milk
1/2 teaspoon cinnamon
1/2 teaspoon nutmeg
12 egg yolks
1 1/4 cups sugar
pinch of salt (1/8 – 1/4 teaspoon)
1 1/2 teaspoons vanilla extract
3 cups heavy cream
2 1/2 cups Malibu Pineapple Rum
1.Place 5 cups of milk along with your spices into a pot and onto the stove and bring it to a simmer. Cool to 140°F.
2. In a large bowl, place your egg yolks, sugar and salt. Mix them together until they are thick. I use my hand mixer for this.
3. Place your milk mixture (or part of it) into a something you can pour from like a measuring cup. Slowly add your milk mixture into the egg yolks while mixing. See video.
4. Return milk and egg mixture to the stove and bring it up to 160°F – you can go up to 180°F if you want to live on the edge but don’t go any higher or you’ll have scrambled eggs :)
5. Remove from the heat and add your cream, vanilla, and alcohol. Chill for at least 3 hours and serve.
Seafood Paella

Paella is an amazing and flavorful dish that originates in Spain. In this Seafood Paella Recipe, I am using shrimp, mussels and clams. Seafood Paella is not the original Paella, but believe me, it is delicious! Please be sure to check out the video tutorial down below before you get started.
Ingredients for Seafood Paella
3-4 Tablespoons olive oil
1 shallot
2-3 cloves garlic
3.5 ounces Spanish Chorizo 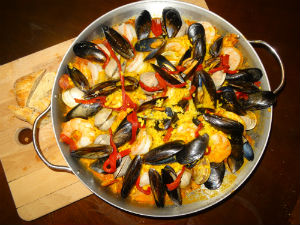
1 c dry white wine
pinch Spanish saffron
Saffron I used – https://amzn.to/2PtL7F3
1/4-1/2 teaspoon smoked paprika
32 ounces seafood stock
1/4 – 1/2 cup crushed tomatoes (I grated tomatoes on my box grater)
2 cups bomba rice
Bomba rice that I used – http://amzn.to/2CPteZH
1 pound extra jumbo shrimp
1 pound mussels
1 pound hard shell clams (I used Quahog, middlenecks)
roasted red peppers
Instructions and video tutorial down below :)
These videos and links are a few little helpers for this recipe :)
How to tell if saffron is real – https://youtu.be/x4b9XBJBA6o
How to Clean Mussels – https://youtu.be/Vf_-58G_o68
How to roast peppers – https://youtu.be/rG7CEnzudfY
Bomba Rice – http://amzn.to/2CPteZH
Saffron I used – https://amzn.to/2PtL7F3
Instructions – Please watch the instructional video down below before getting started.
1. Heat the olive oil in your paella pan and sweat the shallots and garlic with a pinch of salt. (To “sweat” means sauté them until they are translucent).
2. Next add your sliced Spanish Chorizo in a flat layer to allow it to get some color.
3. Add the wine, scrape any bits on the bottom of the pan and then add a pinch of saffron, stir and reduce the wine by half. Saffron is one of the main flavors of your paella. Try to find one that is high quality. It is worth the extra few bucks for a good saffron because not only is the flavor much better but it’s stronger. Getting a less expensive saffron will result in a less flavorful paella.
4. Add the seafood stock, tomatoes, rice, about 2 teaspoons of Kosher salt and the paprika. Give it one good stir and then resist the urge to stir it again through the rest of this recipe ;)
*If you are cooking your paella in the traditional way (over a wood fire) the smoked paprika is not necessary. I added the smoked paprika to give my paella that traditional smokiness.
5. When your liquid is almost cooked down to the rice, it is time to start adding in your seafood. I started with my shrimp and arranged it into a nice pattern. Then, I added my mussels, clams and roasted red peppers. I usually roast my own red peppers when I make paella but you can also use a good quality roasted pepper from a jar.
6. Turn the heat to low and place a foil tent over your paella. I use 2 sheets of foil to make sure that it is covered well. Cook your paella on low heat for about 25 minutes until all of the liquid has been absorbed by the rice and you have a slight caramelization on the bottom. This caramelization is also a traditional part of paella. Once the liquid is absorbed and you have your caramelization, your paella is ready to enjoy :) *Please watch the instructional video down below before getting started.
Would you like a list of some of my favorite kitchen gadgets?
This link will take you to my Amazon page where you will find just that – https://www.amazon.com/shop/bestbitesforever
Please enjoy this video tutorial before getting started :)
Asian Meatballs Appetizer

These Asian Meatballs make a perfect appetizer and are great served over rice too. Plus, they were a huge hit at my last get together. I put the meatballs directly into the pot that I made the sauce in and let them cool. Then, I covered the pot with plastic wrap and put it in my fridge. That way, when it was almost time for my guests to arrive, all I had to do was put the pot on the stove, reheat them and plate them up.
Ingredients for Asian Meatballs
1 pound ground beef (I used 93/7 ground sirloin)
1 pound ground pork (I used 93/7)
1 teaspoon Kosher salt (2 if you’re not putting them in a sauce)
1/2 teaspoon fresh ground black pepper
2 teaspoons sesame oil
1 Tablespoon minced ginger
1 Tablespoon minced garlic (about 3 cloves)
1 cup chopped green onions (about 6, green and white parts)
2 eggs
1/2 cup Panko bread crumbs
green onions and furikake for garnish
Get furikake here – https://amzn.to/2NiukmV
Instructions for Asian Meatballs – Please enjoy the video tutorial (below the instructions) for some extra hints and tricks before you get started.
1. Combine all of your ingredients into a large bowl. Mix the ingredients by pushing down and folding – resist the urge to squeeze the meat. This heats the fat and can create a tough, dry meatball.
2. Roll your meatballs into the desired size. I made mine just larger than a cotton ball. Place them on a sheet pan. I lined mine with aluminum foil (for easy clean-up) and also sprayed the foil with cooking spray.
3. Bake your meatballs at 400°F turning halfway through the cooking time. Mine took 14 minutes.
4. Remove your meatballs from the oven and add them to your desired sauce or serve them over rice. I have left a link below to my homemade teriyaki sauce. I also garnished mine with furikake and green onions.
Those green onions were really burning my eyes and made me wish I was wearing some onion goggles – https://amzn.to/2P7PHb7
Check out my homemade teriyaki sauce recipe here – https://youtu.be/HDdkUh5khVc
Would you like a list of some of my favorite kitchen tools, ingredients and gadgets? Click here – https://www.amazon.com/shop/bestbitesforever
Please enjoy this video tutorial before you get started :)
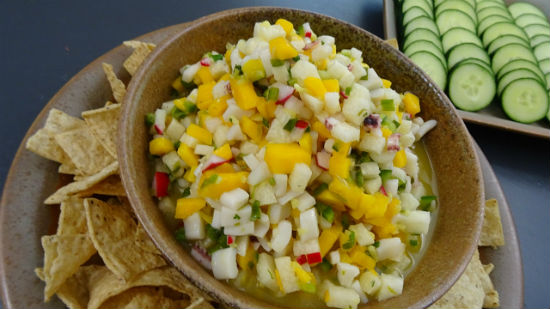
Asian Inspired Ceviche

I made this Asian inspired ceviche for a friend’s health and wellness party recently. In it, sweet and tangy mangoes combine with crunchy jicama in the ginger infused orange and lime juices. It’s an explosion of flavors – yum! Check out the video for a how-to tutorial and lots more info including some cool nutrition facts.
Ceviche Ingredients
2 mangoes, diced
1 pound of jicama, diced
2 inch segment of Daikon Radish, diced
3 red radishes, diced
zest from 1 lime
6 green onions, thinly sliced
1/4 – 1/2 cup ginger, minced (I used 1/2 cup – see video)
2 -3 shishito peppers, diced
1 jalapeño pepper, diced
1 pound calamari, chopped
1 Tablespoon chopped cilantro
1 cup fresh lime juice
1 cup orange juice
1 teaspoon Kosher Salt
1/2 teaspoon black pepper
2 Tablespoons rice wine vinegar
1/2 teaspoon sugar
Start by cooking your calamari/squid in boiling water for 3 minutes. Drain and place in an ice bath to stop the cooking. Next, combine all ingredients in a large bowl and stir. In order to let the flavors come out and combine properly, do not serve for at least 3 hours. Keep chilled. Please enjoy the video tutorial below :)
Asian Inspired Ceviche Video
Bacalaitos

This recipe for bacalaitos is from my Father in Laws brother in Puerto Rico…my Uncle in Law :) His bacalaito recipe is the best I’ve ever had so I know that you will love it. I do suggest watching my YouTube video “How to Make Bacalaitos – Puerto Rican Cod Fish Fritters” before you begin because it will make some of the directions more clear. I will leave a link below the recipe.
Ingredients
1/4 pound bacalao
DRY
2 cups flour
1/2 – 1 package sazzon
1/2 teaspoon baking powder (1 teaspoon if you like them fluffy)
2 teaspoons Kosher Salt
WET
8 leaves recao, chopped
2 Tablespoons garlic, minced
1/2 white onion, chopped
4-6 black peppercorns
2 cups of water (added 1/3 at a time)
1. Prepare the fish by soaking overnight (change the water 2-3 times). Keep the fish refrigerated during this. Next, simmer the fish for 15 minutes and then “flake it” and set it to the side.
2. In a medium sized bowl combine the dry ingredients and set them to the side.
3. Starting with the peppercorns, smash your wet ingredients in a pilón – a mortar and pestle :) until they are well combined – be sure to chop or mince them first according to the list above.
4. Add the wet ingredients into the dry ingredients and stir them to combine.
5. Add the water 1/3 at a time until you reach the desired consistency.
6. Use a measuring cup to prepare the bacalaito batter for the oil. To do this, add a small amount of batter into the cup measure, then add a bit of fish and then cover with the batter. Pour into the hot oil. Turn the bacalaito over once during cooking and drain well before serving. You could also use a ladle to prepare the batter for the oil. Doing this way insures that there is fish in each bacalaito.
Link to the YouTube video
https://youtu.be/u125GTW_IAg
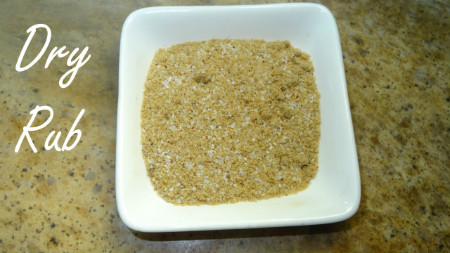
Dry Rub

1 Tablespoon Kosher Salt
2 teaspoons chili powder
1/2 teaspoon black pepper
1/2 teaspoon onion powder
1/2 teaspoon garlic powder
2 Tablespoons brown sugar
1. Place all of the ingredients into a bowl and stir to combine. Store in a tightly sealed container.
Please enjoy this how to video!
 Local Business Directory, Search Engine Submission & SEO Tools