


I know that there are a lot of sites that you could go to with thousands and thousands of recipes. You won’t find that many here, yet ;D, but these are my personal recipes. I developed and cooked each one, and there is a lot of love behind them. Also, I won’t post anything that I haven’t made, so I know that these recipes will actually come out if you follow the instructions. If you find that you have a question about one of them, please feel free to contact me! I hope you love these recipes as much as my family and I do! I will add lots more recipes, so check back often. Happy Cooking!
For a complete list of recipes on the site so far, check the index.
Recipes
Pastelon
Creamy Chicken Rotini with Swiss Chard
Roast Chicken with Baby Bella Mushroom Stuffing
Rosemary, Thyme and Balsamic Glazed Ribs
Grilled Chicken – Also, a Little Extra About Brines
Slow Roasted Pulled Pork – Can you Say Slaw Burger – MMMM!
Pernil – Or In This Case, Roasted Pork Loin – Puerto Rican and Yummy!
The Best Lean Hamburgers Ever with Swiss Cheese and Sauted Mushroom Sauce
Chicken Cordon Bleu Mac and Cheese

This chicken cordon bleu mac and cheese recipe is easy to make and is a great way to use up leftover ham. In this recipe, I’m using my leftover ham from Easter dinner. I had chopped up some of the leftovers into bite size pieces and froze them for various uses like soup and fried rice which made this dish even quicker and easier to make. Please make sure to enjoy the video at the bottom of this page before getting started :)
Ingredients
12 ounces elbow macaroni
1/4 cup butter
1/4 cup flour
1/2 teaspoon Kosher salt (or to your taste)
2 cups milk
8 ounces Swiss cheese
12 ounces ham (I’m using leftover ham from Easter)
1 pound chicken tenders (tendons removed)
Instructions for Chicken Cordon Bleu Mac and Cheese
1. Start off by bringing a pot of well salted water to a boil. I use about 1/4 cup of iodized salt for 7 quarts of water. I also used 1 bay leaf in the water for extra flavor. Once the water comes to a boil, cook your noodles according to package instructions. I cooked mine for 8 minutes and then drained them.
2. In a separate large pot, melt the butter then add the flour (and Kosher salt) and combine them with a whisk. Cook for about 2 minutes until your mixture has a golden color and a slightly nutty scent.
3. Add you milk a little at a time whisking as you go so you don’t get lumps. Once all of your milk is added, bring the mixture to a boil stirring often with a rubber spatula making sure to scrape the bottom as you go so nothing is sticking or burning. Your sauce should thicken once it hits a boil.
4. Lower the heat to medium – low and add in the Swiss cheese. Stir until it is melted in.
5. Add the ham and stir until combined.
6. Set up your “breading area”. To do this I combine 1 1/2 – 2 cups of flour, 1 Tablespoon of cornstarch and 1 teaspoon of Kosher salt into a gallon bag. Next, I crack about 3 eggs into a container large enough to dip my chicken strips into. Then I put 1 1/2 cups of bread crumbs in a second gallon baggie.
7. In a separate pan or deep fryer, heat canola oil. Dip your chicken into the flour mixture followed by the eggs and then the bread crumbs. Fry you chicken on both sides until it’s golden brown.
8. Serve your beautiful cordon bleu mac and cheese with some of the fried chicken and a garnish of spicy mustard and green onions if desired. Please make sure to enjoy the video below before getting started.
Please enjoy this video tutorial!
Lasagna

Lasagna
Lasagna Ingredients
3 – 4 Tablespoons olive oil
1 1/4 cup onion diced
5 garlic cloves, minced
Add a little of your salt and pepper with the onions and garlic
1 1/2 – 2 pounds ground beef (I use 85/15 or you can use 93/7 if you’re trying to make it lower fat)
Add a little of your salt and pepper on top of the meat.
2 (14 ounce each) cans diced tomatoes
2 – 3 teaspoons dried oregano
1 bay leaf (optional)
2 (6 ounce each) cans tomato paste
1 cup water
1 – 1 1/2 teaspoons sugar (taste to decide, it depends on the ripeness/sweetness and amount of acid in the tomatoes)
2 teaspoons Kosher salt (I add in a small amount after each ingredient totaling about 2 teaspoons but you can adjust this to your own taste, see video for how to properly add the salt).
1 teaspoon pepper
lasagna noodles (I use and recommend whole wheat, not only for the flavor but I feel they give a better texture in the finished lasagna)
It is at this point that I have realized that there are no measurements for any of the cheeses in my lasagna, so these are my best guesses.
1 1/2 pounds mozzarella (shredded)
6 ounces ricotta cheese
1 – 1 1/2 cups Parmesan cheese
Instructions for the Lasagna
1. Saute the onion and garlic with a bit of salt in the olive oil. Once the onions start to become translucent, add the beef along with 1 teaspoon of Kosher salt and a bit of black pepper, mix it in with the onions and garlic and cook until it’s browned.
2. If you did not use a lean meat you may want to drain the grease but you don’t have to, if you used the 93/7 this is not necessary.
3. Add the tomatoes, oregano, the bay leaf if you’re using it, a pinch of salt and pepper, a cup of water and the sugar. Allow to simmer.
4. Start your noodle water – use a large pot (mine is 8 quarts) and a lot of salt (I use 7 quarts of water to 1/4 cup iodized salt (read my salt article to learn how to properly use salt)).
5. When your water is at a rolling boil, add the noodles. Reduce the heat slightly and stir the noodles for the first 30 seconds (this will help them not stick together).
6. Boil the noodles for 8 minutes. Drain them in a colander and dunk in an ice bath or run cold water over them until cool. Drain well and toss with 1 teaspoon of olive oil.
7. In a large baking pan begin layering your lasagna – a thin layer of sauce goes down first – there is a how to video at the end of this recipe that will show you how I layer mine.
8. Here’s the order from the bottom – sauce, then noodles, sauce, *ricotta cheese, **mozzarella. Now start over at the noodles, then sauce, ricotta cheese, mozzarella, and repeat starting with the noodles until you have three layers, finish with parmesan on the top.
*For the ricotta cheese drop small spoons (about 1/2 teaspoon) here and there but do not cover the sauce- you just want to get a bite of it sometimes.
**For the mozzarella cheese, just try to use equal amounts in each layer.
9. Bake at 350° F for about an hour, up to an hour and a half – just watch for the top to turn those beautiful shades of gold and brown.
*Just as a side note, I make a larger version of this. I use 12 noodles and double the sauce and add some extra cheese. I always end up with a little extra sauce, but the kids like to eat it while the lasagna cooks with buttered bread. Also, Grandma puts sauce as her top layer, I like cheese on top-it’s up to you, both ways are good!
Seafood Paella

Paella is an amazing and flavorful dish that originates in Spain. In this Seafood Paella Recipe, I am using shrimp, mussels and clams. Seafood Paella is not the original Paella, but believe me, it is delicious! Please be sure to check out the video tutorial down below before you get started.
Ingredients for Seafood Paella
3-4 Tablespoons olive oil
1 shallot
2-3 cloves garlic
3.5 ounces Spanish Chorizo 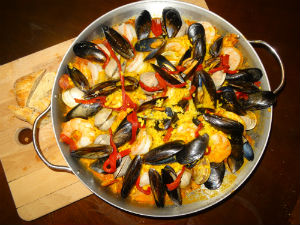
1 c dry white wine
pinch Spanish saffron
Saffron I used – https://amzn.to/2PtL7F3
1/4-1/2 teaspoon smoked paprika
32 ounces seafood stock
1/4 – 1/2 cup crushed tomatoes (I grated tomatoes on my box grater)
2 cups bomba rice
Bomba rice that I used – http://amzn.to/2CPteZH
1 pound extra jumbo shrimp
1 pound mussels
1 pound hard shell clams (I used Quahog, middlenecks)
roasted red peppers
Instructions and video tutorial down below :)
These videos and links are a few little helpers for this recipe :)
How to tell if saffron is real – https://youtu.be/x4b9XBJBA6o
How to Clean Mussels – https://youtu.be/Vf_-58G_o68
How to roast peppers – https://youtu.be/rG7CEnzudfY
Bomba Rice – http://amzn.to/2CPteZH
Saffron I used – https://amzn.to/2PtL7F3
Instructions – Please watch the instructional video down below before getting started.
1. Heat the olive oil in your paella pan and sweat the shallots and garlic with a pinch of salt. (To “sweat” means sauté them until they are translucent).
2. Next add your sliced Spanish Chorizo in a flat layer to allow it to get some color.
3. Add the wine, scrape any bits on the bottom of the pan and then add a pinch of saffron, stir and reduce the wine by half. Saffron is one of the main flavors of your paella. Try to find one that is high quality. It is worth the extra few bucks for a good saffron because not only is the flavor much better but it’s stronger. Getting a less expensive saffron will result in a less flavorful paella.
4. Add the seafood stock, tomatoes, rice, about 2 teaspoons of Kosher salt and the paprika. Give it one good stir and then resist the urge to stir it again through the rest of this recipe ;)
*If you are cooking your paella in the traditional way (over a wood fire) the smoked paprika is not necessary. I added the smoked paprika to give my paella that traditional smokiness.
5. When your liquid is almost cooked down to the rice, it is time to start adding in your seafood. I started with my shrimp and arranged it into a nice pattern. Then, I added my mussels, clams and roasted red peppers. I usually roast my own red peppers when I make paella but you can also use a good quality roasted pepper from a jar.
6. Turn the heat to low and place a foil tent over your paella. I use 2 sheets of foil to make sure that it is covered well. Cook your paella on low heat for about 25 minutes until all of the liquid has been absorbed by the rice and you have a slight caramelization on the bottom. This caramelization is also a traditional part of paella. Once the liquid is absorbed and you have your caramelization, your paella is ready to enjoy :) *Please watch the instructional video down below before getting started.
Would you like a list of some of my favorite kitchen gadgets?
This link will take you to my Amazon page where you will find just that – https://www.amazon.com/shop/bestbitesforever
Please enjoy this video tutorial before getting started :)
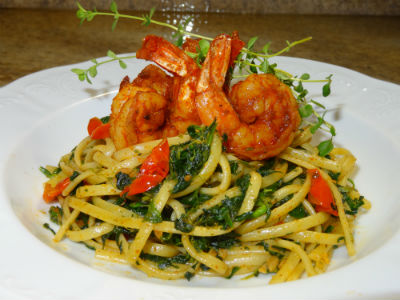
Spicy Cajun Shrimp over Linguini

This is one of my husband’s very favorite dinners and it can be made in 20 to 30 minutes. I make my own Cajun Seasoning, (recipe at this link https://youtu.be/F0QfO3Mgw7o ) but you can use one bought from the store….although it may not come out quite the same. As with most of my recipes, there is a tutorial on my YouTube Channel – and it can be found at this link https://youtu.be/GIGgoivMIzE
Ingredients
2 Tablespoons Cajun Seasoning
20 Shrimp (peeled and deveined)
3 Tablespoons Olive Oil
1/4 cup white wine
1 Tablespoon garlic, minced
1 small shallot, sliced thin (about 1 -2 Tablespoons)
15 Cherry Tomatoes
water if needed
1 teaspoon lemon zest
2 Tablespoons butter
9 ounces frozen spinach (thaw and squeeze out excess liquid)
8 ounces linguini
Instructions
1. Start a large pot of well salted water to boil. I use an 8 quart pot with almost 1/4 cup of iodized salt in it just to give you an idea.
2. Sprinkle the shrimp with the Cajun Seasoning and toss them around until they are well coated. Set them to the side. Also, while you’re waiting on your water to come to a boil, get all of your other ingredients ready.
3. Place the 3 Tablespoons of olive oil into a large braiser pan or a saute pan if you don’t have a braiser.
4. When your water comes to a boil, add the noodles and also put your shrimp into the hot olive oil. Cook the shrimp on both sides (about 2 minutes per side depending on the temperature of your pan and shrimp) DO NOT OVERCOOK!
5. Remove your shrimp from the pan and deglaze it with the white wine, be sure to scrape up any bits left from the shrimp or seasoning.
6. Add the garlic, shallot and tomatoes to the pan and saute until they are fragrant, about 1 minute. If the pan gets too dry add a bit of water to prevent burning.
7. Add one teaspoon of lemon zest, stir and remove from the heat.
8. Add in the butter stirring constantly, then add the spinach. The spinach should be at room temperature. Also, make sure to super squeeze out all of the excess water.
9. Add the linguini and toss.
10. Serve with the shrimp on top. I garnished mine with a sprig of thyme too. Enjoy!
Fig, Goat Cheese, and Prosciutto Pizza

Friday night in our house is pizza night. We sometimes have the more traditional pizzas like pepperoni, but sometimes, we like to get a little creative. This is one of those times. This pizza is so delicious. It is piled with fresh figs, creamy goat cheese, thinly sliced prosciutto and then garnished with a drizzle of balsamic reduction and wilted arugula. Enjoy! Oh, I almost forgot, give it a little mist of olive oil at the end to give it a nice shine :)  Ingredients
either a store bought or homemade crust (I’ll share my crust recipe soon)
for the white sauce
4 ounces cream cheese, softened
1/2 cup sour cream
2 garlic cloves, minced
1 teaspoon Kosher Salt
1/2 teaspoon white pepper (optional)
top with
mozzarella cheese (2-3 cups depending on what you like)
6 figs cut into eighths
4 ounces goat cheese
4 ounces prosciutto
2 cups arugula
balsamic reduction (store bought or homemade (I have a video recipe))
1. Cream the sauce ingredients together until well combined. Cover and refrigerate for at least an hour (overnight is fine too).
2. Par-bake your crust for 7 minutes on 400°F. *I use a pizza stone for this.
3. Spread white sauce on warm crust.
4. Add mozzarella, then figs, and goat cheese and then a little sprinkle of mozzarella (to hold it together and to be pretty :).
5. Return to oven until golden and beautiful.
6. Remove from oven and add the arugula then the prosciutto. I also like to add a little arugula over the prosciutto to make it prettier.
7. Bake for 1-2 more minutes – no more! Remove it from the oven. If you have a spray oil give it a little spray on the top to make the arugula shine. Olive oil is best but canola is fine too.
8. Let it cool for about 5 minutes. Add the balsamic reduction and enjoy!
Bacalao

Bacalao is one of my favorite Puerto Rican dishes. I hope you love it too!
Ingredients
1 1/2 pounds Bacalao (salted cod fish, frozen)
*You can use any combination of these root vegetables, the amount is dependent upon the number of people you’re serving.
yucca 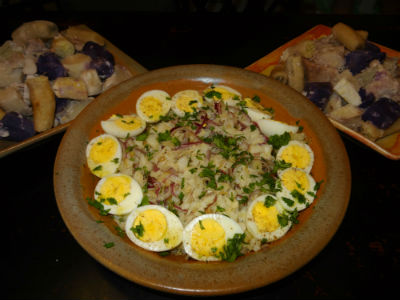
yautia
taro
Purple yam (not traditional, but yummy)
green bananas
red OR white onion (I use red)
olive oil
Kosher and iodized salt
pepper
12 eggs
sea salt for garnish (you can use Kosher salt if you don’t have any)
cilantro (for garnish)
Instructions
1. The bacalao needs to soak overnight. You also have to change the water at least two times. There is a fine line when soaking this. If you don’t change the water enough, it will be way to salty. If you change it too much, it will not be salty enough. Don’t worry though. You can taste it before you cook it and adjust the seasoning accordingly. But let’s just say on average, you will need to change it twice.
2. So, pretend this is the next day and you have soaked your bacalao. Put a large pot of water on the stove to boil. I use a 7 quart pot with about 3-4 Tablespoons of iodized salt.
3. Prepare your root veggies to be boiled. Each one of them needs to be peeled and chopped. The yucca also needs to have the stem removed from the center. If you are unsure on how to perform any part of this step, I have a video on YouTube (bestbitesforever) that shows you how. Also, I cut them in the order that they take to cook. So the yucca is first and then I add it to the pot followed by the taro (and add to the pot), then the yautia and lastly the purple yam. I boil them all in one pot instead of having four different pots on the stove. I just keep an eye on them and remove them as they’re finished cooking. If you do them in order though, they should finish around the same time.
4. Place your eggs into a pot of cold water and bring them to a boil.
5. Bring another large pot of water up to a simmer. I use a shallow pot large enough to lay my bacalao in. Simmer the bacalao for 15 minutes (do not boil). Pull the bacalao out and allow to cool enough for you to handle it.
6. While your bacalao is simmering, peel your green bananas and add them to the pot of root veggies. *Tip – They are easier to peel if you soak them in very hot water first. Check on other veggies while you’re there :)
7. Once you can handle the fish, follow the natural separation to break it into pieces. You can remove any of the “white skin” as you go (again, see video if needed).
8. By now, your root veggies should be ready to remove from the water. Remove them and set them to the side.
9. Add olive oil into the fish. I use about one cup.
10. Slice one red (or white) onion. I like mine sliced thin, but you can slice them thick if you’d like. Add the onion to the fish. Stir gently so you don’t break the fish up. I actually use my hands for this part. Place the fish into a serving dish. I also like to cut my boiled eggs in half and put them around the dish. Sprinkle with a little sea salt, pepper and chopped cilantro.
11. Serve with the root veggies. Enjoy!
Pasteles

Hi everyone, this is the recipe for pasteles. I will add the pictures and such later, but I’ve had a lot of people contact me for this one and I want to get it out for everyone before Christmas. This recipe should be made in advance and it is better if you have helpers. Enjoy!
This recipe makes 60 pasteles but can easily be divided into thirds (20 or 40 pasteles).
Ingredients for the Filling
6 1/2 pounds pork shoulder
2 Tablespoons achiote oil
6 cups sofrito (my fresh sofrito recipe)
2 Tablespoons Kosher Salt
1 teaspoon black pepper
2 Tablespoons capers
45 chopped olives (I used Spanish Olives)
2-3 Tablespoons oregano
2 bay leaves
32 ounces veggie stock
1/4 cup + 2 Tablespoons currents (optional)
2 large diced potatoes or 1 can chickpeas (or both)
Extra Salt to taste
15 ounce can tomato sauce
Instructions for the Filling
1. Trim the fat off of the pork. Cut it into cubes that are about 1×1.
2. In a large pot, heat 2 Tablespoons of achiote oil over medium high heat.
3. Add the sofrito to the pot. Then add the meat, 2 Tablespoons of Kosher Salt and the black pepper. Stir. (You can do this in smaller batches if you want to brown the meat, it is up to you).
4. Add the capers, olives, oregano and bay leaves.
5. Add enough veggie stock to cover the meat. I used 32 ounces. Add the currents and stir.
6. Simmer for 2 1/2 hours.
7. Add your potatoes or chickpeas. Just as a side note, if you wanted to use dried chickpeas instead of canned, use 1/3 cup and add them in the beginning (after soaking in salty water overnight).
8. When your potatoes are done, taste your filling and decide if you want more salt or pepper.
9. Once your potatoes are done (about 20 minutes), add the tomato sauce. Set your filling to the side. You will need some of the liquid for your masa. I also let my filling set overnight.
ingredients for the Masa
There are several ingredients that can be used to make masa including calabaza yautia, yucca, Tarro root, green plantains, green bananas or potatoes. Feel free to mix and match these ingredients to come up with your own unique masa. For this recipe you will need 15 pounds total of the ingredients.
4 1/2 pounds Tarro root
3 pounds green plantains
5 pounds kabocha squash or calabaza
2 1/2 pounds of yucca
1 Tablespoon Kosher salt
liquids
32 ounces of the cooking liquid from the filling
14 ounces of coconut milk
1 cup milk
1/4 cup achiote oil
you will need to make adjustments to your liquid measurements according to how ripe your masa ingredients are. The liquid measurements are just a guideline and what I used.
1. shred all of your masa ingredients. If you are using a box grater you will use the small holes. If you are using a food processor, you will first use the large hole shredder blade and after you have everything shredded you will go back and use the blade inside of your food processor while you add the liquid ingredients until you get the correct consistency.
2. if you used a box grater, add a small amount of the liquid of your choice at a time until the desired consistency is reached. If you are using the food processor, after shredding, fit your food processor with the blade and begin processing in small batches slowly adding the liquid of your choice while running the food processor until the desired consistency is reached.
3. Wrap your pasteles in banana leaves following the video instructions. Boil for 1 hour 10 minutes and up to 1 hour and 30 minutes until your massa is at the desired consistency.
the video can be found on my YouTube channel youtube.com/bestbitesforever
Pastelon

Pastelon – (recipe and video tutorial follow) – This recipe is one that I had a ton of fun making because we had family in town from Puerto Rico (Tia Lucy and Joey). I had never actually had Pastelon until we made it together, I had only heard how delicious it was. I have also had quite a few requests for this recipe to my site and to my YouTube channel. So, I’m really glad that I was finally able to make it. Tia Lucy and Joey are super fun to cook with too. And it’s extra cool because Tia Lucy was a professional cook in Puerto Rico for almost 35 years – she’s retired now. Anyway, this Pastelon recipe is awesome and I just want to say thank you to Tia Lucy and Joey for teaching me how to make this super yummy dish. Xavier thanks you too – that’s one more Puerto Rican dish that I get to make for him ;)
Ingredients
8 plantains – very ripe
olive oil 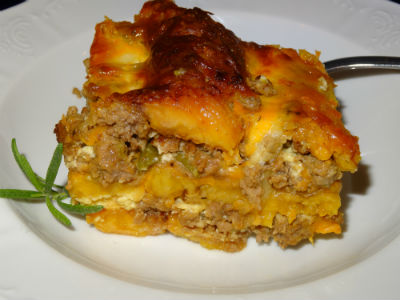
2 cups sofrito, my recipe
2 pounds ground beef
2 Tablespoons garlic, minced
Kosher Salt
Pepper
Achiote Oil (recipe follows)
3/4 – 1 pound green beans
1/2 pound mozzarella cheese, shredded
1/2 pound chedder cheese, shredded
8 eggs
1/2 cup heavy cream
1/2 cup milk (preferably whole)
canola oil
Instructions
1. Begin by peeling you plantains and slicing them into strips long ways. You should try to get four strips per plantain. Set these to the side when you are done. I put them on a sheet pan so that they don’t break up and they have plenty of room. I also put them back onto the same pan after I fry them.
2. Place about 2 Tablespoons of olive oil in a large pan then saute the two cups of sofrito with 1/2 teaspoon salt and 1/4 teaspoon pepper for a couple of minutes. Add the beef, garlic, 1 1/2 teaspoons salt and 1/4 teaspoon pepper and continue cooking until the meat is almost brown. While you are cooking your meat, begin frying the plantains in canola oil. They should be fried until they are golden but not a dark brown.
3. Add the Achiote Oil to the beef mixture. Also, mix the cheeses together in a seperate large bowl.
4. Once the beef is brown (done), add the green beans and continue cooking until they begin to get tender. Taste the mixture and decide if it needs more salt or pepper.
5. In a small bowl, combine the eggs, heavy cream and whole milk along with a about 1/2 teaspoon of salt and a little pepper.
6. Once everything is done, it is time to assemble your Pastelon.
7. Begin by buttering the pan. Then build the layers in this order – first, 1/3 of the egg mixture, then a layer of plantains, then cheese mixture, beef, another layer of plantains, another 1/3 of the egg mixture, then more cheese, more beef, next, one last layer of plantains. Finish with a layer of cheese and then the remainder of your egg mixture.
8. Bake at 350°F for about 20 minutes or until it’s all melty and good.
9. Allow to cool for a few minutes and enjoy!
Achiote Oil
1 cup canola oil
1/2 cup achiote seeds (annoto seeds)
1. Combine the seeds and the oil in a small saute pan (skillet). Place on medium heat and stir frequently. Allow to cook until you have a deep orange color. Do not allow to boil.
Chili Mac

Chili Mac -(Recipe with video tutorial follow)- This is one of those dinners that everyone in the family loves, from our 18 year old (our oldest) to our 3 year old. It’s comfort food, food that fills your tummy and makes it all warm and yummy feeling. You know, comfort food. It’s also a great recipe for busy mom’s (or busy anyone for that matter). It’s fairly quick and easy to make, pretty nutritious (I can’t call it totally nutritious, after all, it has mac and cheese in it :), but still) and really delicious. What more can you ask for? So, enjoy!
Ingredients 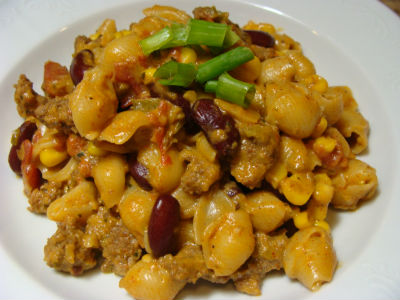
1 family size package of the creamy style mac and cheese
iodized salt (regular table salt will work)
2 Tablespoons olive oil
or
2 cups sofrito
1 teaspoon dried thyme
1 Tablespoon chili powder
1 (16 ounce) can dark red kidney beans (drained and rinsed)
1 (15 ounce) can diced tomatoes with the juice
10 – 12 ounce frozen corn
Optional Garnishes
sour cream
green onions
Instructions
1. Prepare the mac and cheese according to the package instructions except, add 1 Tablespoon of salt (preferable iodized) to the water.
2. While the mac and cheese is cooking, in a separate pan, heat 2 Tablespoons of olive oil.
3. Add your minced veggies/sofrito to the hot oil. Sauté for about 1 minute.
4. Add one pound of ground beef. I use a lean ground beef for this so that the fat does not have to be drained. If you look at the package of beef, you will see a number like 85/15 or 90/10. These numbers represent the fat to meat ratio. So if you are buying 85/15, you have 85% meat and 15% fat and you will end up with a lot of grease in the pan. If you use a lower fat meat like the 90/10 or the 93/7, you will have a lot less fat and it will not be necessary to drain the fat out of the pan.
5. When your meat is brown, sprinkle it with the thyme and the chili powder. Stir it to evenly coat the meat.
6. Once the meat is evenly coated, add the kidney beans and the tomatoes. Stir until everything is well combined and allow the beans and tomatoes to get heated through.
7. Add the frozen corn, stir, and allow the corn to get heated all the way through.
8. Gently fold in the prepared mac and cheese, being gentle is important so that you don’t tear your noodles (it will be prettier if you don’t tear them).
9. Serve your delicious chili mac with your favorite garnish. I prefer to use sour cream and green onions. My husband and son like to spice it up with some hot sauce. Enjoy!
Please enjoy this how to video!
Creamy Chicken Rotini with Swiss Chard

Creamy Chicken Rotini with Swiss Chard – (Creamy Chicken Rotini with Swiss Chard recipe along with a video tutorial (coming soon)follows) – So, I was walking through the produce section of the grocery store yesterday when I noticed the absolute most beautiful Organic Rainbow Swiss Chard. I had no real plans on making Swiss Chard for dinner, but man, it was soooo pretty I just couldn’t help myself. So I bought it. Then as I was driving home, I was thinking to myself, “wait a minute, I’m making Pizza tonight”. But that’s beside the point. Because once I remembered that I was making pizza for dinner, that gave me a whole day to decide what to do with the Swiss Chard. Then, my husband said that he wanted to have chicken for dinner (the next day). So, now I had two things to put in our dinner, chicken and Swiss Chard……..and tomatoes thanks to my wonderful little girl Tia, who had convinced me at the store to buy two pints of organic plum tomatoes. Which just kind of made everything else fall into place – at least for me. So, I got out my little note pad and jotted down all of the things that may be tasty in my pasta dish. The next day, (last night), I started cooking, glancing over at my list now and then to remind me of some of my ideas. I ended up adding a few extra things and of course omitting a few things too and this is what I came up with. My husband said that this is the best pasta dish he has ever tasted which is quite a complement coming from him. I was happy to tell him that not only did I write everything down, but I also videoed it – just in case something super wonderful happened so that I could share it with all of you. Oh, I guess I should tell you that I love to create in the kitchen (obviously), but I have a hang up about writing and measuring while I’m creating – Chefs, go figure. So anyway, here it is, enjoy and happy cooking everyone!
Noodles
13.5 ounce box whole wheat Rotini
1 Tablespoon Olive Oil
In a Separate Pan
1 Tablespoon olive oil
1 onion, medium dice
4 cloves garlic, emince (sliced thin)
1/2 pound Apple-wood Smoked Bacon
1 1/2 pounds chicken
1/4 teaspoon chili flakes
2 Tablespoons red wine vinegar
1/2 cup chicken stock
1 bunch Swiss chard (stalks and leaves separated)
*I used rainbow Swiss chard
1 1/3 cups grape tomatoes, cut in half
6 ounces cream cheese (by weight)
1/2 cup Parmesan Cheese
1 cup pine nuts
Options (you can use one,two or all three – I recommend adding at least one of the options)
1 Tablespoon fresh lemon juice
1 teaspoon lemon zest, minced
a few leaves of basil for garnish
Instructions
1. To start your noodles, fill a large pot with water and add salt. I use an eight quart pot with seven quarts of water and about 1/4 cup of iodized salt. You want your water to taste like the ocean. This helps in the final taste of your dish. If you don’t properly salt your water, your noodles will have a “flat” taste. For more information on this, see my article “Table Salt, Strangely not Just for the Table“. Put the pot on high and bring the water to a rolling boil.
2. While your’re waiting for your water to boil, you can work on the rest of the dish. Make sure to check your noodle water from time to time. When it is at a rolling boil, add the noodles and cook them for 8 minutes. Drain them, then put them into an ice water bath to cool them and drain them again. After you drain them, put them back in the pot you cooked them in and toss them with a little bit of olive oil so they don’t stick to each other. Put them to the side.
3. In a large pan, add one Tablespoon of olive oil. Turn the heat on medium -high and add your onion. Sprinkle the onion with a little Kosher Salt and black pepper. Sweat your onion. That means you saute it until it starts to get a translucent look. Lower the heat to medium – low. Allow the onions to caramelize.
4. Emince your garlic – that means cut it into thin slices (peel it first of course). Set it to the side.
5. Rinse and then Slice your tomatoes in half long ways (see video for a time saving tip). Set them to the side.
6. Rinse your Swiss Chard and drain it. Chop off the very ends of the stalks if they are brown. Remove the leaves of the Swiss Chard by tearing them off. You can also cut them off, but this is not necessary. We are removing the leaves from the stalks because they do not cook at the same rate and if you put them in together, either the stalks would have to be under-done, or the leaves would have to be over-done, so, we will add them at seperate times. Set the leaves to the side.
7. Slice the thick parts of the stems into 1/4 – 1/2 inch slices. Set to the side.
8. Slice the leaves of the Swiss Chard. It is easiest to do this if you work with a few leaves at a time and roll them together before you slice them. Set the leaves to the side.
9. At this point, your onions should be good, go over and check on them and then remove them from the pan and set them to the side.
10. Turn the heat up to medium-high and add the chicken to the pan (that you had your onions in). Sprinkle it with Kosher Salt and pepper. Stir your chicken. Allow the chicken to cook for two to three minutes.
11. When you chicken is about half way done, add the bacon to the pan. Stir.
12. Saute the chicken and bacon together until they are almost done. Add the chili flakes (red pepper flakes). Stir.
13. Deglaze with the red wine vinegar. That means you scrape any of the fond (the brown bits that are stuck to the bottom) off of the pan. I use a wooden spatula for this. Stir.
14. Add your chicken stock. Then, add your garlic. Stir.
15. Add the stems from your Swiss Chard. Allow them to cook for about one minute. Reduce the heat to medium – low.
16. Add your tomatoes. Then your cooked onions. Stir.
17. Add the cream cheese in chunks. Stir. You have to be a little patient with the cream cheese as it starts to melt, but it will, and then it will stir in easily.
18. Once you have the cream cheese melted in, sprinkle in the Parmesan Cheese and stir to combine.
19. Add the Swiss Chard about 1/2 at a time along with a sprinkle of Kosher Salt and pepper and stir in between each addition. It will look like you have way too much but don’t worry because it cooks down.
20. After your Swiss Chard is stirred in, turn off the heat and add the pine nuts. Stir.
21. Add your cooked and drained noodles. Fold them in to combine and serve hot.
Please enjoy this “how to” video!
