


Here are some really yummy side dishes! Some of these also make great appetizers or can be eaten as a meal :D!
Recipes
Tostones con Salsa de Mojo – Fried Plantains with a Garlic Oil – sort of
Puerto Rican Rice and Beans (Brown Rice)
Arroz con Gandules-Puerto Rican Rice and Pigeon Peas
Coleslaw

Coleslaw Recipe
5 cups cabbage, shredded
1 cup carrots, shredded
3 Tablespoons sugar
1 cup mayonnaise
2 Tablespoons vinegar (I like apple cider vinegar best)
1. Shred your cabbage and carrots using either a food processor fitted with the large shredder attachment, or a box grater (large hole side)
2. Combine your cabbage and carrots into a large bowl.
3. In a seperate bowl, combine the sugar, mayonnaise, and vinegar. Stir well to combine.
4. Pour the mayonnaise mixture over the cabbage/carrot mixture and fold to mix.
5. That’s it, you’re done. This is best if served about one hour after making.
Anything Pasta Salad

Anything Pasta Salad (Recipe and instructions follow) – I have been making this pasta salad this way for a number of years, but it didn’t start out as an exact science :D. Pasta salad to me in the past was more like clean out the refrigerator and cabinet salad, but not in a gross way. You see, I often shop at Sprout’s farmers market (maybe you’ve been there). Anyway, they sell stuff in loose bulk bins like nuts, dried fruit, candy, chocolate, granola, trail mix, rice, beans, lots of different flours and sugars. Dry goods, you get the idea. So, I always find myself in the loose bulk isle thinking mmmmm, what can I put that in. Then I end up with all these little bags of random foods. I get home and play in the kitchen making everything from cookies to bread to main dishes and pretty much anything in between. So, I always have this cabinet full of fun ingredients to add to whatever I feel like, including my pasta salad of course. OK, anyway, one day I was making pasta salad and decided to open my cabinet and see what would make it a little different then usual. I can’t really remember exactly what I put in it that day, but I can say that I started opening my special cabinet from then on to make my pasta salad, and one day, I found the perfect combination that I had been looking for. That day, Anything Pasta Salad was born. I’m going to give you the recipe the way I have come to love it, but I’d also like to encourage you to try other ingredients in it. I’ll give you a list of the things that I still sometimes add. Also, I serve this chilled and it’s super awesome for picnics and potlucks and that sort of thing. It also makes a nice side for burgers or grilled chicken. If you happen to have left over chicken (grilled or roasted or whatever), you can add that in also to make your pasta salad a full meal. Enjoy!
Ingredients
1 pound Rotini Pasta (I use whole wheat) 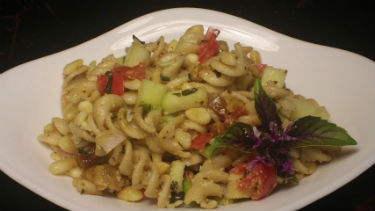
iodized salt (for the noodle water)
1/4 cup extra virgin olive oil
4-5 garlic cloves, minced
1 small shallot, finely chopped
1 Granny Smith Apple, small dice
1/2 cup golden raisins
1/2 cup pine nuts
1 tomato, I prefer Heirloom, seeds removed
1/2 cup Parmesan cheese, grated
1 Tablespoon Italian Seasoning
1 teaspoon black pepper
1 1/2 teaspoons Kosher Salt
fresh basil, I add about ten large leaves, cut chiffonade (that means into “little ribbons”)
Juice of 1 lemon (2 Tablespoons or so)
Awesome extras to try that I sometimes put in.
Feel free to substitute or change ingredients – that’s why it’s Anything Pasta Salad.
walnuts, cherries, dried cherries, grapes, red onion, chives, feta, pecans, almonds, dried cranberries etc…..
Instructions
1. Add your pasta to well salted, rapidly boiling water. I use an eight quart pot with about 1/4 cup of Iodized salt. See my salt article for an explanation on properly salting your water.
2. Stir your noodles for the first ten seconds or so after you add them into the water. This helps prevent them from sticking together. Cook the noodles until they are “al dente”. This literally means “to the tooth”. You don’t want them to be squishy, they should be soft on the outside and still have a little firmness in the middle. This takes about eight minutes.
3. As soon as the pasta is done, drain it and either put it in an ice bath, or run cold water over it until it is cooled. This stops the cooking process. If you let you noodles sit there hot. They will continue to cook and get squishy. That is one of the big things that you learn in Culinary School – control your cooking. That means that you only let stuff cook when you want it to and you stop the cooking when you don’t want it to.
4. After cooling and draining your pasta, place it in a large bowl.
5. Add the olive oil. Stir the pasta to coat it in the oil. The 1/4 cup should coat it well, but if it seems like it needs a little bit more, you can add a little more one teaspoon at a time until the pasta is coated.
6. Add all of the other ingredients (except the lemon juice) in order and stir your pasta salad to combine everything. Just as a side note, if you’re using iodized or table salt instead of Kosher salt, start with only 3/4 of a teaspoon and taste it. Then decide if you need more salt or not. Remember, you can always add more salt, but you can’t really take it out once it’s in there.
7. Add the lemon juice to the pasta salad and stir it up well.
8. Let the pasta salad stand for at least two or three hours before you serve it. Overnight is even better. This gives all of the flavors time to develop.
9. Garnish the pasta salad if you want, I garnished mine with purple basil leaves. Enjoy!
Potato Salad – The Good Kind :)
")
Potato Salad – Yep, I said it, the good kind. That’s because I have not cared for most of the potato salad that I have ever tried. It seems like there is always some weird ingredient that doesn’t belong, or that the potatoes aren’t cooked all the way, or they’re cooked too much. I don’t know, sometimes there’s some over-powering something or other in it. I know that I probably sound like a big whiner baby, but I’ve always been a big girl about it and tried every potato salad that I’ve come across. I’m really glad too because one day – (think this sound like something glorious is happening) aaaaaaaaaaahhhhhhhhhhhhhhh – that’s right, delicious, perfect potato salad. Guess who made it – my mother- in- law. Go figure, my Puerto Rican mother-in -law is awesome at making the whitest food on Earth. And the award for the whitest food on Earth goes to – da da da daaaa – potato salad – hmmmm, I guess you could argue that it should have went to the Apple Pie. The apple pie is at it’s table at the awards dinner all angry, the other pies whispering – “Dude, you totally should have won”. Maybe not. Anyway, she always brings her yummy potato salad to Easter, which is held at my house. This year however, she ditched out :D and ran off to San Diego for the weekend and didn’t have time to make her wonderful potato salad in time. So, it was left up to me. I called and asked her for the recipe, but I guess most people don’t take their potato salad recipes on vacation and neither does she. What I got was “well, I put potatoes, and celery and onions and mayo, and hmm what else – oh, mustard and sometimes vinegar and eggs” . With that to go on, this is what I came up with. It’s really yummy :D! I hope you love it! Happy Cooking!
 Ingredients
5 pounds red potatoes, cleaned and diced “big bite size”
1/4 cup or so iodized salt (for the potato water)
2 bay leaves
1 shallot, minced
3 stalks of celery, sliced into 1/4 inch thick pieces
6 eggs
3/4 cup mayo
1 Tablespoon red wine vinegar 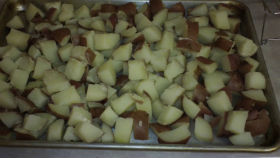
1 Tablespoon mustard
1 teaspoon Kosher Salt
1/2 teaspoon Black Pepper
Instructions
1. The first thing I start is the eggs. To make a perfect boiled egg every time, follow these instructions exactly. OK – put your eggs into a pot of cool water and let them set for about 10 minutes. You do this to help the temperature come up a little so they don’t crack as soon as you turn on the heat. Next, put them on the stove on high and bring them to a boil. As soon as the water starts to boil look at the clock. Let them boil for 10 minutes – take them out of the water and put them into an ice bath. If you’re not quick at this then start at 9 and 1/2 minutes, it’s better to have them a tiny bit under done than the green yolk grossness that happens when boiled eggs are over cooked. 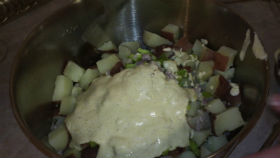
2. On to cooking the potatoes (which you have already cleaned and diced right(?)). The best way to do this is in a big pot, especially with this kind of potato because it is high in starch and has a tendency to boil over. What I do is when I’m chopping my potatoes, I put them into the pot filled with water. When I’m all done chopping, I drain them, this helps to get rid of some of the starch. Next I put the potatoes back in the pot (I use my 8 qt stock pot) and fill it with water . I then add a ton of salt – about 1/4 cup of iodized salt (see my article on salt) and the bay leaves. You should be starting with cool/cold water to help the potatoes cook evenly. Put them on the stove on high heat and bring them to a boil. Again, these boil over easily, it helps to skim the white fluffy stuff that you’ll see come to the top. Don’t bother putting oil into the water, this does nothing except waste your oil (don’t get upset, I used to do it too). A trick I learned that does help a little is to run a tiny bit of butter around the rim of your pot. If you use enough water and a big enough pot though, it shouldn’t boil over anyway. I don’t mean to dwell on this, I’m just trying to save you that “oh no the pot is boiling over adrenaline rush”. When your potatoes are “fork tender” – like, you can easily stab them with a fork, they’re done. Taste one to make sure (yummy right?) and then drain them and put them on a sheet pan to cool. I let mine set on the counter for about 15 minutes and then I move them to the fridge to get super cool. 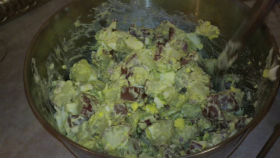
3. While your potatoes are boiling, go ahead and chop your celery, and shallots and if your eggs are done and cooled, peel and chop them too. Chill everything.
4. When everything is nice and cold, it is time to put it together. So, put your potatoes, eggs, celery, and shallots into a bowl.
5. In a small separate bowl, combine the mayo, vinigar, mustard, and Kosher salt and pepper. You have to decide the amount of salt and pepper on your own based on how your potatoes tasted earlier. If they really needed salt, add more then is in the recipe, just don’t over salt. Remember, people can add salt at the table but, they can’t take it out :).
6. Add the sauce into the potato mixture and gently fold it, be gentle or the potatoes will lose their shape and you’ll have mashed potato salad.
7. Enjoy!
Please enjoy this “how-to” video!
Amazing Cornbread

Cornbread – Cornbread, to sweeten or not to sweeten, that is the question! To some people, I have found out, this is a very serious question. You see, I posted this recipe on my FB page (in the form of the YouTube video) last week and wow, what a response. I had no idea that cornbread was so serious! But now that I do know, I’d like to just say a few things. OK everyone, picture me smiling, ready – first, I like cornbread both sweetened and not sweetened. I think that you have to consider what you will be serving it with to decide which way to go. Second, it is always a good thing to try new foods. If you’ve always eaten your cornbread sweet, try it the other way and vice versa. We are not two years old turning our noses up at what’s been put down on our high chair tray. The only way to grow in your cooking and in your eating habits is to be willing to try everything. This is coming from someone who’s eaten everything form balut to rattlesnake to a tequila-lime flavored cricket (which tasted like crunchy air sprinkled with tequila-lime flavored powder, in case you’re wondering). Anyway, I really never thought I’d be writing these things on a cornbread article, but than like I said, I was surprised at the FB response. And third (and last), I like my cornbread sweetened better. There, I said it :D! But I’d also rather sit down to a pile of cookies then a bag of chips. So, with all of that said, here is my recipe for a sweetened cornbread. I served this with a delicious ham (which was salty), fried apples, green beans sauteed in shallots and white wine and a five cheese mac and cheese. The decision for a sweetened cornbread comes from the fact that the main dish – the ham, is salty, salty and sweet are friends. Happy Cooking!
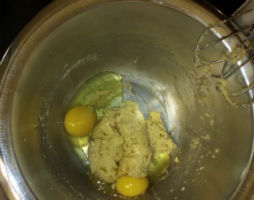 Ingredients
1 stick of butter at room temperature – try to use a good butter, I like plugra, the Irish butter is good too
1/4 cup light brown sugar
1 cup splenda (you can also use sugar)
2 eggs
3/4 cup sour cream (you can substitute fat free yogurt if you want)
dry mix 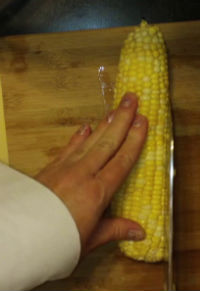
1 1/2 cup cornmeal
1 cup whole wheat pastry flour
2 teaspoons baking powder
1 1/2 teaspoons baking soda
1 1/2 teaspoons Kosher salt
1 cup milk
3 cups fresh corn, cut from the cob
*For a short cut, you can substitute frozen corn kernels, just make sure they are thawed out and drain any extra water!
Instructions
1. Pre-heat your oven to 350°F.
2. Mix all of your dry ingredients together in a small mixing bowl.
3.Cream your butter, brown sugar and splenda (or sugar) together in a large mixing bowl.
4. Scrape the bottom and sides of the bowl with a rubber spatula.
5. Add the eggs and mix until combined. 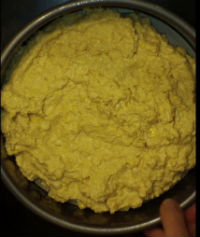
6. Scrape the bottom and sides of the bowl with a rubber spatula.
7. Add the sour cream and mix until well combined, scrape the bowl.
8. Add 1/3 of the dry ingredients and mix, scrape the bowl.
9. Add 1/2 the milk and mix until combined.
10. Continue to alternate the dry ingredients with the milk until they’re all mixed in, make sure to scrape the bowl now and then between additions.
11. Stir in the corn kernels.
12. Pour the batter into two, eight inch cake pans that you have either sprayed with cooking spray or buttered and floured.
13. Bake at 350°F for about 30 minutes, rotate half-way through cooking time, they’re done when a toothpick inserted in the center comes out clean.
Please enjoy this how-to video!
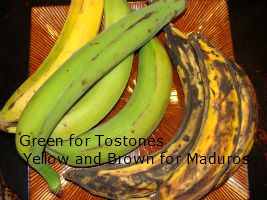
Tostones con Salsa de Mojo – Fried Plantains with a Garlic Oil – sort of

Tostones – Tostones or fried plantains are to Puerto Rican food what french fries are to American food. Wait, wait, wait, I don’t want to offend anyone. I’m not saying that they are the same food, or that they taste the same, just that they are generally served with the same kinds of foods. They are also a tasty replacement for fries in a lot of cases. At home, we eat them with hamburgers, our Cuban sandwiches, pernil, Puerto Rican Rice and Beans, fried eggs, and other stuff too (but do you really want to read a list right now), you get the idea. Here in the states, when I’m at home, I never really eat fast food, but when we go to Puerto Rico, I love to go through McDonald’s because they have tostones – are you listening McDonald’s? Can we get some tostones added to the menu here in AZ :D? Anyway, I think once you try these, you’ll be hooked because they are super delicious. Happy Cooking!
 Ingredients
*There are no measurements for this recipe, just read the explanation for each one and you’ll know how much to use.
green plantains – Each plantain will make four or five tostones, to give you an idea of how many you need – my husband eats like four, my older girls and I eat around three each, the little ones have one or two, and my 16 year old eating machine eats like seven or eight or 15 :) or really until we tell him “chill out on the tostones and save some for everyone else”!
water – Use enough to cover the sliced plantains.
salt – It can be iodized or Kosher salt, but iodized is best to sprinkle on the tostones when they’re done.
garlic, minced – Again, the amount is up to you, I use one garlic clove per plantain.
oil – for frying, I use canola oil which is fairly healthy as far as oil goes, it’s made from canola seed (as if you didn’t know that already :D)
iodized salt – for salting at the end
 Instructions
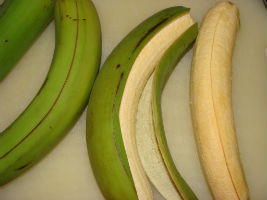
1. Peel the plantains, this can be a little tricky if you’ve never done it before, they do not peel the same as a banana, what you want to do is lay the plantain down on a cutting board, cut off the very top and the very end, then slice down the plantain lengthwise just through the peel, then use your fingers to kind of pull the peel away.
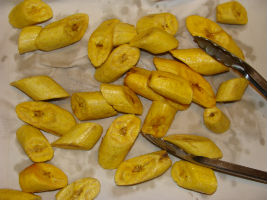
2. Slice the plantains on a diagonal about one inch thick, (you should get four or five slices) it is important to slice them on a diagonal because you will be mashing them later and it will make it easier. 
 3. Place the plantains into a large bowl and cover them with salt water – how salty should your water be? Well, you want it to taste like the ocean (see my salt article), then add the garlic cloves and stir them around a little, instead of making your salt water separately, you can also just add the water, salt and garlic right on top of the plantains and hope for the best (that’s what I do) – but if it’s your first time making this, I recommend making the water separate so that you have a good idea of how much salt to add next time
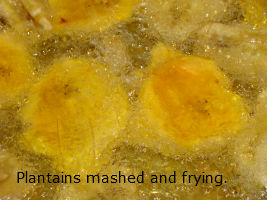 .
.
4. Let them soak for 15 minutes.
5. Drain them and dry them well-SAVE THE WATER-I do this by taking them out with tongs and putting them on a sheet pan lined with a cloth napkin, I then use another cloth napkin to dry them, remember, you are going to be frying these and water and oil are not friends, the water will make your oil pop out at you – aaaahhhhhh, and it will also make the oil break down faster.
6. Fry in the canola oil, heated to 350°F, for about seven minutes, if you don’t have a thermometer, look for the plantains to get bubbles all around them when you add them to the oil, they should also make that Kssssshhhhhh frying sound when you put them in, if your oil starts to smoke at all, it is way to hot, turn off the heat and let it cool off, do not move the pan unless you absolutely have to, if you are deep frying, you don’t have to mess with them while they’re frying, if you are pan frying them (they should still be covered in oil), turn them over half way through the frying time (it’s easier to use tongs then a spoon for this).
7. Remove them from the oil and place them on either absorbent paper towels, or a cloth napkin, I like to use a cloth napkins because some paper towel brands stick to the plantains.
8. OK, this is the mashing step, you can do this a few different ways, you can either place the plantains into a tostonera and close it which is the easiest way and the way I do it, if you do not have a tostonera though, you can use a paper bag, just place the paper bag on a flat surface, lay the plantain on top, fold the bag over it and push down at an angle with the heel of your hand, you can also use a cloth napkin in the same way, I have also seen this done using two plates but I think that way seemed the most difficult. If you are not using a tostonera, make sure you are super careful because they are hot, don’t forget, they were just in hot, hot oil. You can let them cool down for a few minutes if you want, it won’t hurt anything. 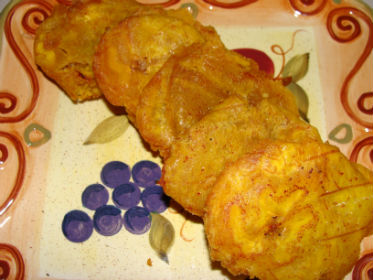 9. Dip them in the salt/garlic water that you saved, dip quickly, not like you would do a cookie into milk but like a fast dip.
10. Dry them off really good again like we did in step five.
11. Return them to the cooking oil, this time you want your oil at 375°F.
12. Cook them until they are crisp and golden, remove them from the oil and sprinkle them lightly with iodized salt, iodized is better for fried foods, again, if you haven’t read my salt article, now’s as good a time as any.
13. Garnish with mojo (my favorite), or hot sauce or ketchup and enjoy!
Mojo Sauce – Mojo is the delicious sauce that you put on top of the tostones. There are lots of different versions, the most important things to have in there are the oil and the garlic. I think beyond that you can use your imagination. I have tried adding cilantro, lime juice, orange juice, and olives just give you a few ideas. Here is the way I make it most often. This makes enough for around 20 tostones, depending on how much you use.
 Ingredients for Mojo
1 teaspoon red wine vinegar
1/2 cup olive oil
15 cloves of garlic, minced
1/2 teaspoon Kosher salt
1 teaspoon oregano dry or 1 Tbsp fresh oregano
Instructions for Mojo
1. Place the vinegar into a small mixing bowl.
2. Slowly drizzle in the olive oil while whisking.
3. Add the garlic, salt and oregano and stir.
4. Garnish your tostones and enjoy!
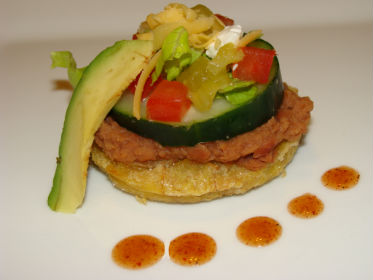
*Just as a kind of little end note here, tostones make great bottoms to appetizers, I like to put “taco toppings” on them, but stack them nice and pretty. You can use them in place of crackers, or bread in your favorite tapa or canape recipes too.
**Also, you can make extra of these and freeze them, just do steps 1-10 and then freeze them individually. When you are ready to eat them you can put them into the hot oil (still frozen) and just continue with step 11.
Please Enjoy this How-To Video!
Do you want more info on the health benefits of Canola Oil?
Puerto Rican Rice and Beans (Brown Rice) – Recipe
 – Recipe")
Puerto Rican Rice and Beans – You know how there are certain foods that warm you up inside and make your tummy happy? They’re usually foods that you grew up eating, things Mom or Grandma or someone you love made for you. They’re the foods that we refer to as “comfort foods”. Well, I didn’t grow up Puerto Rican, nor did I grow up eating this dish, however, over the years, it has become one of my comfort foods. This is another one of those dishes that my wonderful Puerto Rican in-laws introduced me to and I have to say once again that Puerto Rican Food is some of the best tasting stuff on Earth. I love it! There are a lot of main dishes you can serve this with like roast pork loin, or even a nice fish dish done with Caribbean flavors, it also makes a nice main course just as it is. If you would like you can also spice it up with some hot sauce. Everyone in my house does except for me and the babies but I’m kind of a wimp when it comes to spicy food. I hope you love this dish and it warms your tummy! Happy cooking!
Sofrito -This will make way more then you need, I make a huge batch in my food processor and freeze it in one cup portions. Feel free to scale this way down (divide by like 4 or so) especially if you don’t have a food processor. I do recommend making the extra and saving it if you have a food processor though. You are going to want to make this again and it will save some time. If you only want to make enough for this recipe, just divide it by eight. Don’t worry, I’ll do the math for you. :)
Ingredients for the Sofrito
2 onions
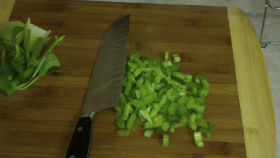
5 green bell peppers 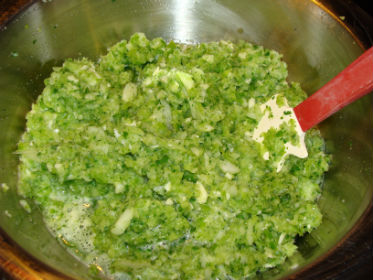
2 heads garlic
1 bunch cilantro
*If you are only making enough sofrito for this recipe use 1/4 onion, 1/2 bell pepper, 4 cloves garlic, 2 sprigs cilantro. Chop everything fine and mix it together.
Instructions for the Sofrito
1. Peel the garlic and pulse it in a food processor until it’s minced. Put it in a large bowl.
2. Slice the bell peppers down the sides. Be careful of the seed packet (throw those away) and pulse in the food processor until minced.
3. Add to your garlic.
4. Peel and quarter the onions. Pulse them in a food processor just a few times and add the cilantro. Pulse them until they’re minced.
5. Add this to the garlic and bell pepper mixture.
6. Stir everything up to combine it.
You now have the beginning of tons of Island Dishes. Beautiful Sofrito. At this point I freeze it into one cup portions in baggies for future use. It’s a great time saver. Keep two cups out for the recipe though.
Ingredients for the Rice and Beans 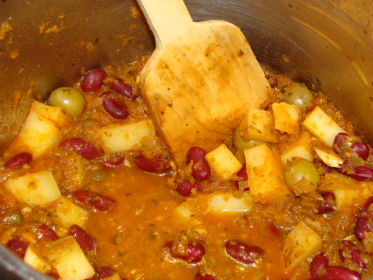
2 Tablespoons olive oil
1 cup sofrito *(or follow the measurements above for “enough for just this recipe)*
10 olives (you can add more if you want)
1 teaspoon capers
1 potatoe, medium diced (about 1 1/4 cups diced)
1 (16 oz) can dark red kidney beans *see note
2 cup chicken stock (it’s ok to used canned stock or broth, just make sure it’s low sodium)
2 teaspoons Kosher salt
1/2 teaspoon black pepper
1 bay leaf
1/4 pack sazon (Goya makes this), or replace your olive oil with achiote oil (annoto oil)
1/8 teaspoon thyme
1 1/2 teaspoon oregano (dried, or 3 tsp fresh)
1/8 teaspoon cumin
1/4 cup tomato sauce
*For the beans you can use light or dark kidney beans or pinto beans or any other you choose. I usually double the recipe and use one can of kidney beans and one can of pinto beans. I don’t recommend black beans though.
Instructions 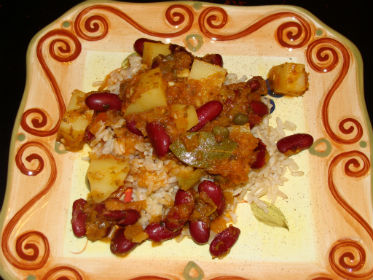
1. Place the olive oil in a medium sauce pot.
2. Saute the sofrito in the olive oil for about two minutes.
3. Add the olives and capers then saute for another minute.
4. Add the potatoes and beans and stir.
5. Add the chicken stock, salt and pepper, and herbs and spices, then stir.
6. Add the tomato sauce and stir.
7. Bring everything to a boil.
8. Reduce the heat. Allow your beans to simmer for about a half an hour, stir every five or ten minutes or so scraping the bottom to keep it from sticking.
9. As it thickens, you may need to stir more often.
10. Allow the beans to cook until you have a nice thick sauce.
11. Serve your beans over rice (I use brown rice and I cook it in my rice cooker, you will need 2 or 3 cups of cooked rice for serving depending on how you portion it).
Please enjoy this “how to” video!
Spiced Cranberry Sauce – Recipe

Spiced Cranberry Sauce (recipe and instructions with video tutorial follow) - Cranberry sauce is one of those things that for some reason most people don’t make at home from scratch. I’m not quite sure why though so I’ve thought it through and tried to understand. So, I think these may be some of the reasons. Reason one, you’re being bullied by relatives who like the can shaped cranberry sauce and are afraid to show up at their house with something that doesn’t hold it’s shape and also doesn’t need to be sliced. Or reason number two, maybe you’ve just never had fresh cranberry sauce so you don’t know what you’re missing. OOOrrrr reason number three, maybe the reason for this is that you don’t realize how easy it is to make cranberry sauce from scratch. Or, reason four, maybe you have some kind of Thanksgiving contest to see who can build the most interesting cranberry sauce sculpture. Kind of like the “Gummy De Milo”. If you’re being bullied, or haven’t had it, I think you should just go for it. If you are one of those who is afraid to attempt the cranberry sauce – don’t worry, help is here, fear not the cranberry sauce, it’s so simple. If you can sculpt something – well, that’s pretty cool and I think I want to encourage you to continue – I’ve always been a supporter of the Arts. You should save it for the center piece though and not for eating. Not to mention that when everyone shows up at Thanksgiving dinner with their homemade dish do you really want to be the one in the kitchen asking where the can opener is so you can open the cranberry sauce that you were supposed to bring? Then later, after everyone has eaten too much they all give you a hard time about what you brought. Except some of them who are in the other room talking about it behind you r back :) I think not. No, not really everyone, they won’t be talking bad about you – they’ll be too busy wishing they hadn’t eaten so much and watching “the game” right. So anyway, here we go everyone, a holiday tradition that is easy to make at home and will not be in the shape of a can sitting on a plate! Happy cooking!
Ingredients
1 cup sugar
1 cup water
3 cup fresh cranberries
1 Tablespoon orange zest chopped fine
1/4 teaspoon coriander
1/4 teaspoon cardamon
1/4 teaspoon cinnamon
1 clove
Instructions
1. Combine the sugar and water in a sauce pot. 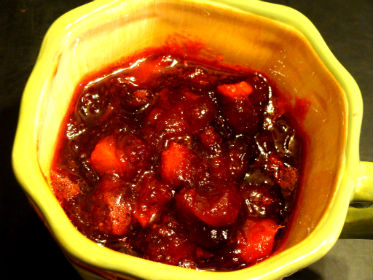
2. Bring them to a boil.
3. Add the cranberries and stir.
4. Add the orange zest and spices and stir.
5. Return it to a boil.
6. Reduce the heat to medium.
7. Keep it at a slow boil for 10 minutes stirring often. Make sure to scrape the bottom as you stir.
8. When the cranberry sauce is thickened remove it from the heat and place it in a dish.
9. Cover the cranberry sauce and allow it to cool.
10. Refrigerate the sauce after cooling it until you are ready to serve it.
*The cranberry sauce can be made 1 or 2 days ahead of serving so you have one less thing to worry about on Thanksgiving. It is also really great as a spread for turkey sandwiches the next day. I like to take the left over cranberry sauce (I double the recipe so there will be left over) and mix it like half and half with cream cheese in the food processor and then use that as the spread for our turkey sandwiches. It’s also great with butter on toast and muffins and stuff like that. Use your imagination, go wild ;).
yield 2 1/2 cups
Check out this “how-to” video! So simple!
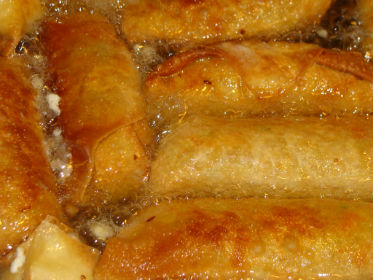
Egg Rolls – Recipe

The egg roll story/recipe (recipe follows)- I don’t think I’ve mentioned it before, but my step mother is from Thailand. I bring this up now because she is the one who taught me how to make egg rolls. It was the summer after 8th grade. I was living in Los Angeles with my mom and flew to my Dad’s for summer break. I had eaten egg rolls a number of times in the past, I am from Earth after all and was living in L.A., but this is the first time I remember having a homemade egg roll. Not the same. Don’t get me wrong, I have had some delicious egg rolls at various restaurants, but these were authentic and fresh. That summer, my Dad’s side of the family went on an egg roll binge. We had them at least once a week. My Dad even started taking them to work and selling them to his co-workers for one dollar each. I think my step mother,Van, was making over 100 a week for him to sell. This is where I came in. I,once again, got to become the helper in the kitchen. I learned how to make the filling, spicy or mild, and how to roll the perfect egg roll. I also got plenty of practice with the frying. Over the years, I have made egg rolls using her recipe over and over. About three months ago I decided to start playing with the recipe. I don’t know what took me so long, I guess I never messed with it because it was so good to begin with. I got a new CD – Asian Lounge, to inspire me in the kitchen. I firmly believe that the environment you cook in effects the flavor of the food and my egg rolls wanted to taste authentic. Anyway, I don’t want to brag or anything, but seriously, I have achieved egg roll perfection. Here is the recipe, put in some nice Asian and have some fun!
Ingredients
8 – 8 1/2 cups green cabbage, shredded
4 carrots, shredded
*quick tip – To make this recipe faster, use 10 cups of pre-shredded coleslaw mix to replace your cabbage and carrots.
1/4 cup ginger, minced or shredded
2 Tablespoons sesame oil, I use black
1/4 cup, oyster sauce
2 Tablespoons Sherry Wine
1 1/2 teaspoons Kosher Salt
3 Tablespoons A.P. flour
3 Tablespoons sriracha, optional (only if you want these to be spicy)
Instructions
1. In a large bowl, combine all the ingredients together in order except the flour and salt. Mix them well.
2. Stir the flour and salt together and then sprinkle them over your cabbage mixture. Stir well to combine.
3. Put an egg roll wrapper in front of you so that it’s like a diamond.
4. Measure about cup of the filling, squeeze out the excess liquid. Place the filling in the center of the egg roll wrapper.
5. Fold the bottom of the wrapper up to cover the filling. Then “tighten it” around the filling.
6. Fold over each side then roll upwards until the egg roll is almost all the way rolled up. Place some egg wash along the edges and continue rolling. Repeat with all the remaining filling.
7. Fill a large pan about one inch high with canola oil. Heat the oil to 350°F. If you don’t have a thermometer, you will have to use your best judgement. You should be looking for bubbles to form when you add an egg roll into the pan. There should be a lot, but if your egg roll seems to be browning super fast, turn the heat down. If your oil starts to smoke, it’s way too hot. Turn off the heat and wait for it to cool before you do anymore egg rolls.
8. Fry the egg rolls on each side to a golden brown. You should only turn them once.
9. When they are a golden brown, remove them from the pan and place them on a plate or sheet pan lined with cloth napkins or paper towels to drain the excess oil. I always use cloth napkins for this because I have found that certain paper towel brands stick to the egg rolls.
10. Enjoy!
Yield 11-12 egg rolls

Please enjoy this “how-to” video!
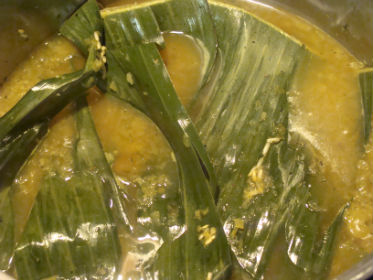
Arroz con Gandules-Puerto Rican Rice and Pigeon Peas – Recipe

Arroz con Gandules – (Arroz con Gandules recipe and video tutorial) – Arroz con Gandules or, translated into English, Rice with Pigeon Peas is a traditional and delicious Puerto Rican dish. It is a beautiful example of how Mediterranean food combines so well with Caribbean food. The dish has olives, and capers along with several other ingredients, and is cooked under a banana leaf which adds such a nice flavor! The first time I ever tried this dish was at my in-laws house. My Mother-in-Law, Mirta, is a wonderful cook and made a very tasty dinner of Pernil (pork roast), Arroz con Gandules, and Tostones (fried plantains). It was my first real taste of this style of food and I wasn’t quite used to it and at first, I didn’t know what to think. After dinner we all hung out for awhile and visited. Mid-conversation I noticed my Father-in-Law, Carlos, was missing. I then noticed a scraping sound coming from the kitchen. I went in to investigate, knowing he would have something delicious going on. This is something he is famous for. When I got into the kitchen there he was along with two others scraping what appeared to me to be the burnt rice from the bottom of the pan. “Alicia, you have got to try this” he said as he waved my over to the stove. My first taste of the coveted pegau. This is the caramelized rice deliciousness at the bottom of the pan that everyone fights for. YUM! It is sooo good, and that was the moment I knew that I was in total love with Puerto Rican Food and arroz con gandules. Since that night I literally crave some type of Puerto Rican dish once a week. Perfect for my husband, Xavier, because he could eat it every night! So here it is, how to make Arroz con Gandules or for those of us lacking in our Spanish skills (like me) how to make rice and pigeon peas! Oh, I should mention, that this is my healthier take on the traditional, but I will add notes to show the other way too.
Arroz con Gandules Ingredients
2 Tablespoons achiote oil or 2 Tablespoons of olive oil and 1/2 pack of Sazzon *see note
2 cups sofrito
 1 teaspoon Kosher salt
1/2 teaspoon pepper
15 – 20 green olives (any kind, I use Spanish, pit them first)
1 Tablespoon capers
3 cups dry brown rice (traditionally white)
6 cups water
1 Tablespoon Kosher salt
1 teaspoon pepper
1/8 teaspoon smoked sea salt (traditionally one ham hock (I do use these for holiday dinners))*see note
1 bay leaf
1 Tablespoon oregano
1/4 teaspoon dried thyme
30 ounces gandules
1 banana leaf (available frozen in most Asian markets)
Instructions
1. Place achiote oil into a 8 quart pot on medium heat.
2. Add the sofrito, 1 teaspoon of salt, 1/2 teaspoon pepper, olives and capers and saute for about 3-4 minutes. You want most of the liquid to be gone, but don’t let it get dry on the bottom.
3. Add the rice and saute, stirring until the rice gets chalk spots (they look like someone took a piece of chalk and made tiny lines on your rice).
4. Add the water, gandules, 1 Tablespoon Kosher salt, 1 teaspoon pepper, smoked sea salt, bay leaf, oregano, and thyme.
5. Stir around 3 times (if you stir too much you will release starch from your rice, in this case, we don’t want that).
6. Place the banana leaf on top, you only need a piece as big as your pan, don’t use a whole leaf.
7. Bring to a boil and allow to boil for about 10-15 minutes, until the top of the liquid is almost touching the rice.
8. Lift the banana leaf with a pair of tongs and fold the rice twice (don’t be tempted to do more).
9. Place the banana leaf back on top and cover with a lid. Put the heat on low and allow to cook 20 more minutes.
10. With a spoon, gently check on the rice. If it is dry and there is some browning on the bottom, it is done. If not re-cover it and check again every few minutes. It is very tempting to mess with the rice and stir it and keep checking on it. DON’T do this. It will make your rice sticky and gooey and not delicious.
I like to serve this with Pernil and Tostones!
Please enjoy this video tutorial.
Sofrito -This will make way more then you need. I make a huge batch in my food processor and freeze it in one cup portions. Feel free to scale this way down (divide by like 4 or so) especially if you don’t have a food processor. I do recommend making the extra and saving it if you have a food processor though. You are going to want to make this again and it will save some time.
2 onions
5 green bell peppers
2 heads garlic
1 bunch recao (or cilantro if you can’t find recao)
1. Peel the garlic and pulse in a food processor until it’s minced. Put it into a large bowl and set it to the side.
2. Hold the stem of the bell peppers and place the bottom of it on the cutting board. Slice the bell peppers down the sides, be careful of the seed packet (throw those away). Take the side pieces that you just cut off and pulse them in the food processor until minced.
3. Add the minced bell pepper to the bowl with your garlic.
4. Peel and quarter the onions. Pulse in a food processor just a few times and add the cilantro. Pulse them together until they’re minced.
5. Add this to the garlic and bell pepper mixture.
6. Stir to combine everything.
You now have the beginning of tons of Island Dishes. Beautiful Sofrito. At this point I freeze it into one cup portions in baggies for future use. It’s a great time saver. Keep two cups out for the recipe though.
*About the achiote oil - You can substitute 1/2 pack of sazzon (look for an orange and white box in the hispanic section of the grocery) and olive oil or you can make it as follows;
1. Cover 1/2 cup achiote seeds (annotto seeds) in olive or canola oil by about an inch.
2. Place on high heat.
3. At the first sign of bubbles and foam take them off the heat (if you wait too long your oil and everything its in will be bitter).
4. Strain the oil into a glass or metal container.
5. You can keep this in the refrigerator for a few weeks.
*Note on the smoked sea salt – I normally would say don’t cook with sea salt. Flavored sea salts are an exception to this rule. Plus, I don’t think smoked Kosher salt exists, that doesn’t even make sense. So you have the option of using either some smoked sea salt or a ham hock.