


There is something that is inherently wonderful about soup. It makes you feel all warm and cozy inside, especially in the fall and winter. It’s makes a great first course, a nice lunch or can even be served for dinner. Ahhhh, soup, so versatile, so yummy. So, anyway, :) these are some of my favorite soups!
Recipes
Garlic and Ginger Chicken Soup – AKA – Get Well Soon Soup
Caldo Gallego – Yummy Stew!

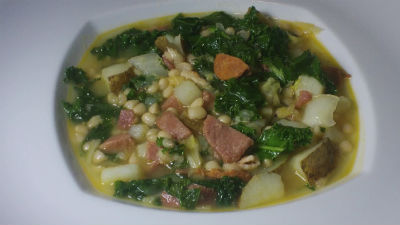
Caldo Gallego – (Caldo Gallego recipe follows along with instructions and video tutorial) – Caldo Gallego is another one of those dishes that I am addicted to as a direct result of my mother-in-laws’ fabulous cooking. She makes this every year as soon as the weather starts to get cold - well, cold for us here in Phoenix. I know you Northerners are laughing when I say cold and it’s 70°F out. Anyway, Caldo Gallego is a beautiful Spanish Soup which is also very common in Puerto Rico. It traditionally is made with cabbage, potatoes and beans and can also have meat. Which meat varies slightly by family. I would say the most usual meats used though would be pork, ham and chorizo. Actually, to me, the chorizo is kind of mandatory. First of all because it is soooooo good. And second, because it adds a ton of flavor. You need to know that we’re talking about Spanish Chorizo here though. No, Chorizo is not all the same, at all. You see, Spanish Chorizo is made from chopped (not ground) pork and pork fat, which has been seasoned with smoked paprika and salt, using smoked dried red peppers and white wine. Yummy! It is also usually dry – cured and doesn’t require further cooking (although we are going to cook it for this recipe). Of course, there are tons of regional variations of chorizo if you’re lucky enough to be in Spain or travel there including smoked and un-smoked, cooked and raw and garlic and so on, but what we need to know about is what we can get easily here right? 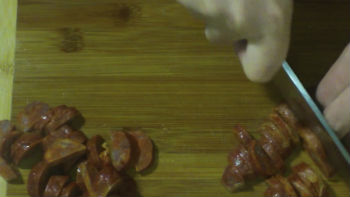 You should also know that I’m not using a spicy chorizo, you can , but I”m not. You can tell if they are sweet or spicy by the shape of the sausage. If it is long and thin, it is sweet, if it is short and fatter, it is spicy. Again this is a general rule and not every sausage maker follows this general rule (sausage making is an art too ya know). And actually, you’ll notice that the chorizo I use is short and fat and doesn’t follow the rule. OK, I told you about Spanish Chorizo, so I just want to make a quick comparison for you to Mexican Chorizo even though this is not an article about chorizo (Is it turning into one?) Anyway, Mexican Chorizo is generally made without the smoked paprika and the white wine is usually replaced by vinegar. Oh, and the pork is ground, not chopped and is not cooked or cured. So, you’re getting a raw meat (usually) if you buy Mexican Chorizo. Which by the way is also yummy, just not necessarily in this soup. So back to the name – Caldo Gallego. Well, Caldo Gallego translates to Galician Broth. Galicia is located in the Northwestern corner of Spain. It is historically one of the poorest areas of Spain. In Spanish the Galacians are called “Gallegos”. One of the dishes they are famous for is – you guessed it, Caldo Gallego. There it is made with cabbage, potatoes and beans. They may also add the meats pork, chorizo, or ham, but not always. Like I said, it is one of the poorest parts of Spain. Today, we will be adding meat :D Last but not least, as I mentioned earlier, my mother-in-law makes this. This is not her recipe, but definitely is inspired by it (I’m a Chef after all, I can’t help but make some changes) so she deserves some of the credit. So, thank you Mirta for introducing me to this delicious soup. I think you’ll be proud.
 Ingredients
3/4 pound dried white beans
1 pound of ham
3.5 ounce package links of Spanish Chorizo
1/4 pound bacon (not traditional, but yummy)
1 medium onion, sliced
1 ham bone
2 quarts chicken or vegetable stock
water
1 bay leaf
3/4 teaspoon Kosher Salt 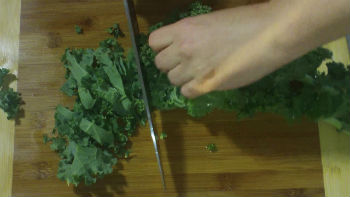
1/4 teaspoon black pepper, fresh ground
1 pound potatoes, small dice (cut bite size)
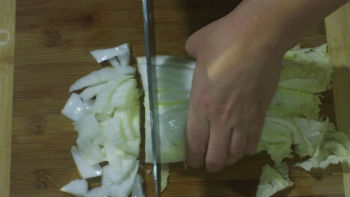
1 pound Napa cabbage (green cabbage is fine too)
1 bunch Kale (you can also use turnip greens or collard greens)
Instructions
1. Spread the beans out on a plate or sheet pan and look through them for any pebbles (yep, sometimes they get in there), and any bad beans. Soak your beans in water over night. It is better if you can change the water at least once. I changed mine like five times. *See note after the recipe.
2. Drain the beans and rinse them thoroughly. Drain them again and set them to the side.
3. In a large pot, saute the bacon until it’s about half way done. 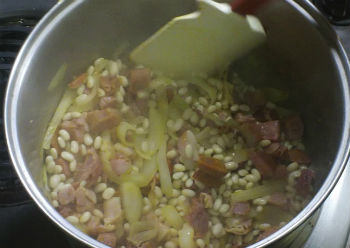
4. If needed, add a little of the stock or water to deglaze the pan and scrape up the fond (that means you add maybe 1/4 cup of the stock to the hot pan and scrape the bottom of the pan to remove all the little brown bits that may have formed there, they’re full of flavor and we want them in the stew). If you don’t have anything sticking to the bottom of the pot, just move on to the next step.
5. Once you have deglazed the pan, add the ham and chorizo and saute for about one minute. Then add the onion. “Sweat the onion”. That’s Chef talk for cook the onion until it’s translucent.
6. Add the beans and stir. Then add the ham bone and the rest of the stock. If your ham bone isn’t covered, add some water until it is (up to two cups). Add the bay leaf, salt and pepper.
7. Bring this to a boil and then reduce the heat and cover the pot with a lid. Let it simmer for two hours.
8. Add the potatoes and return the stew to a boil.
9. Reduce the heat and allow the stew to simmer for about another 20 minutes partially covered.
10. Add the cabbage and simmer for 15 more minutes, uncovered.
11. Add the chopped Kale. When the Kale is done, so is the stew. You want the Kale to have a nice bright color and it shouldn’t take more then five minutes.
 Why do you soak and drain your beans (and change the water and all that)?
The answer is simple and not so simple. The simple answer-you don’t want to give everyone gas. The not so simple answer-beans contain oligosaccharides. This is a sugar that, because of its large molecular size, our bodies don’t break down. It makes its’ way through our small intestines where most sugars are absorbed and into our large intestine. When it makes its way into our large intestine, the bacteria that live there have a small party (they never get sugar, so it’s a treat). They process the oligosaccharide, this produces gas-not so good. The sugar is water soluble though – Yay! That means that if you soak your beans and change the water, you pour the oligosaccharide down the drain. This is also why it’s important to change the water. The water can only “hold” so much. It’s kind of like when you dissolve salt in water for a brine, if you put in too much, it doesn’t all dissolve. Also, don’t cook the beans in the soaking water. It defeats the purpose!
Please enjoy this how-to video!
Southwestern Pumpkin Soup

Southwestern Pumpkin Soup (recipe follows) – I decided to make Southwestern Pumpkin Soup for two very simple reasons. One, because I love, love, love pumpkin. Like a lot. Including pumpkin soup. I wait the whole year for Fall to roll around so I can get some pumpkin. One year I even thought I’d be smart and buy a bunch of pumpkin while it was around and then I could have it all year. Guess what, it didn’t work. All that happened is that I thought “Yay, I have a huge supply of pumpkin and now I can eat all I want”. Then I did. Then I ran out really fast. Don’t get the wrong idea, I know I’m making it sound like I bought like 20 cases of canned pumpkin, but it was more like eight cans. I thought that seemed like plenty, easily one pumpkin thing a month. But, like I said, it didn’t work out the way I had planned. That’s OK anyway, I’ve kind of since figured out that the anticipation is half of the fun. Who was it that said “Hunger is the best sauce”? Cervantes maybe? Anyway, that’s the first reason for the pumpkin soup. And the second reason explains why it’s “southwest” pumpkin soup. Simple really, I live in the Southwest. I found the inspiration for the “southwest” part of the pumpkin soup in my beautiful surroundings. Plus, every year for Thanksgiving, I’ve always done the more traditional dishes – well, traditional American along with a little mix of traditional Puerto Rican (for my hubbie and kiddies). But I think I’m going to do a fun Southwest theme this year and use this for the first course. I’m still thinking about the rest of the meal. I think it’s going to involve chipotle in some way. I’ll let you know. Enough about that though, let’s concentrate on the recipe at hand – delicious Southwest Pumpkin Soup!
 Ingredients
1/2 teaspoon olive oil
3 strips bacon (apple-wood smoked preferred)
1/2 large shallot, minced
3 cups chicken stock (you can also use canned broth)
1 (15 ounce) can pumpkin puree
1 cup heavy whipping cream
1/2 teaspoon chili flakes
1 teaspoon cumin
1/2 teaspoon coriander 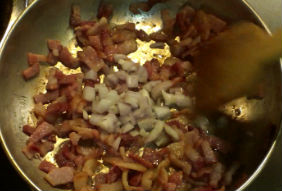
1 teaspoon chili powder
1/4 teaspoon nutmeg
1/2 teaspoon Kosher Salt
1/4 teaspoon black pepper
3 tablespoons brown sugar (dark is better)
garnish options
cilantro
creme fraiche (or plain yogurt or sour cream)
cheddar cheese 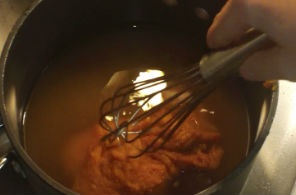
Instructions
1. Slice the bacon into small pieces. Saute it until it’s almost done the way you like it, then add the shallot. I like the bacon to be crispy for this, but I know some people don’t like crispy bacon, so, to each his own. If you like your bacon super crispy, cook it a little longer before you add the shallot so you don’t burn your shallot. Make sure your shallot gets at least a minute or two in the pan though. If it’s getting too dark too quick, turn the heat down or off.
2. When the bacon and shallot are done, remove them from the pan and put them to the side. They will be garnish later. Pour the grease out of the pan, but don’t worry about the tiny bit that’s left behind. This is a good and yummy thing and it’s going to add flavor. Return the pan to the heat.
3. Add about 1/4 cup of the chicken stock into the saute pan. Scrape up all of the brown goodness that the bacon left behind. Pour this liquid into a small bowl and place it in the freezer to cool. The idea here is that we are going to kind of “extract” the bacon flavor without putting the grease into our final product. So when you put the small bowl of the 1/4 cup of chicken stock with the fond (that’s the brown goodness) into the freezer to cool, the bacon grease will separate and be easy to remove when we’re ready for it. Just as a note here, you can skip this step entirely and just move on to the next step. However, you will be missing out on a beautiful smoky background flavor in your soup. It really adds a nice richness. 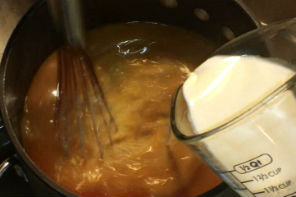
4. In a separate pot, bring the rest of your chicken stock to a simmer. Reduce the heat to medium.
5. Whisk in the can of pumpkin.
6. Whisk in the chili flakes, cumin, coriander, chili powder, nutmeg, black pepper and the brown sugar.
7. Allow the soup to simmer for 15 – 20 minutes.
8. Remove the soup from the heat. Whisk as you add in the heavy whipping cream. Do not do this if your soup was above a very light simmer. It can make your soup “break”. That means it will separate and curdle and it won’t be pretty. Also, once you add the cream, do not take it above a light simmer. If your soup was boiling or simmering like crazy, just let it cool for a few minutes. Ideally, it will be under 190°F. But, like I said, as long as it was only simmering, don’t worry about it, just take it off the stove and add your cream. This really isn’t as difficult as I think I may be making it sound, I just want you to understand what happened if your soup should curdle so you know what to correct for next time. 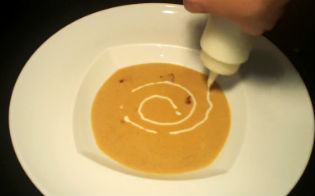
9. Check on your small bowl of chicken stock and bacon goodness from earlier. Remove as much grease as you can and add it into the soup.
10.If necessary, return the pot to the stove and place the heat on low to bring the soup up to serving temperature. This generally won’t be needed, but just in case :). Remember, don’t take the soup above a simmer at this point because it may “break”.
11. Taste the soup and decide if it needs some more salt or pepper but keep in mind that you’ll be garnishing with the bacon and that will add more salt flavor.
12.Place your soup into the serving bowls with a spoon of the bacon and shallot from earlier then add any of the extra garnishes that you choose.
How to video coming soon!
Garlic and Ginger Chicken Soup – AKA – Get Well Soon Soup

Garlic and Ginger Chicken Soup – AKA – Get Well Soon Soup – There is little worse then being sick, like sick sick. It is no fun at all. Today in my house, both my husband and my son are sick, sick. It is so very sad and pitiful to me to see them this way. There’s not a whole lot you can do for them. That makes it even worse. The one thing I can do though that always helps is make my “Get Well Soon Soup“. Colds and flu run when they see this soup coming-LOL :D! Why, because of the main ingredients – garlic, onions, and ginger. They have serious healing ability :D! Garlic and onions are in the Allium family, (the lily family) and are full of antioxidants and phytonutrients. Garlic has been shown to be a natural anti-biotic. It fights colds and flus, because it contains allicin which is anti-viral, anti-bacterial and anti-fungal. Garlic also kills pathogenic microbes and promotes sweating. It is known not just for eliminating harmful bacteria, but also worms and yeasts in the digestive tract while promoting healthy intestinal flora. Onions are also a natural antibiotic and even have anti-inflammatory properties. Studies also show onions to be an effective expectorant. So, they are helpful if you have a cough. Both Garlic and onions maintain more of their healing benefits when eaten raw or only lightly cooked. We are cooking this soup, so if you want more healing properties, add a little raw garlic in at the end along with some raw green onions or shallots. Ginger is a perennial herb native to China and India. Ginger treats nausea and morning sickness and has been shown to prevent and treat motion sickness. It also induces sweating, which helps fevers run their course. And, it boosts the immune system. Ginger can be cooked and still maintain it’s healing properties (ginger tea is awesome :D)! And what about the chicken? Plain old boiled chicken has been shown to inhibit neutrophil activity. Neutrophil activity stimulates the release of mucous (gross I know, but I thought you may want to know), which may be the cause of the coughs and the stuffy nose caused by colds. Now that I’ve told you all of the disgusting unappetizing stuff, I’d like to say that this soup is also super yummy when you’re not sick – I’ll be having a bowl myself here shortly! Happy Cooking!

Add the Chicken, Carrots, Ginger and Onion into a Pot.
Ingredients
18 garlic cloves (15 are for the soup and the rest are to mince and put in raw (see explanation above))
2 carrots
2 celery stalks
1 white onion
3 Tablespoons ginger
1 Tablespoon coconut oil
2 Tablespoons olive oil
1 teaspoon Kosher salt
dash pepper
1 whole chicken
1 quart of chicken stock (preferably homemade)
1 bay leaf
1 box whole wheat noodles
Optional
1 Tablespoon green onions, sliced, per bowl (optional, see explanation above)
or
1 teaspoon shallots, minced, per bowl (optional, see explanation above)
or
1 teaspoon garlic, minced, per bowl (optional, see explanation above)
Cook until the Chicken is Done.
Instructions
1. Peel and mince the garlic (or pulse them in a food processor).
2. Peel and chop the carrots, celery, onion and ginger.
3. Heat the oils in a large sauce pot.
4. Saute the garlic, carrots, celery, onion and ginger in the oil along with a teaspoon of Kosher Salt and pepper until the onions are trasnlucent.
5. Add the chicken to the pot.
6. Add the chicken stock to the pot along with enough water to almost cover the chicken. Also, add the bay leaf.
7. Bring the pot to a simmer and cook for 30 minutes.
8. Flip the chicken over and continue cooking until the chicken reaches an internal temperature of 165°F in the thickest part of it’s thigh.
9. Remove the chicken and bring the liquid to a boil, then add the noodles and cook them for 8 minutes.
10. While the noodles are cooking, shred your chicken using a fork and tongs. Be careful, it’s hot.
11. Add about 1/3 of the chicken back into the soup and it’s ready to serve. Save the other 2/3 of the chicken for another meal. I will add some links for some suggestions. It was important to use the whole chicken because the bones and fat have germ fighting goodness :)
12. Place in bowls with any of the extra garnishes like the garlic, green onions, or shallots and enjoy!
Sources for further info on the healing properties of onions, ginger, and garlic.
http://archives.cnn.com/2000/HEALTH/diet.fitness/10/17/chicken.soup.reut/
http://www.amritaveda.com/learning/articles/ginger.asp
http://www.whole-body-detox-diet.com/leeks.html
http://cmcmurray.wrytestuff.com/swa547629-The-Powerful-Healing-Properties-Of-Onions.htm
French Onion Soup Gratinée

French Onion Soup – I had never had French Onion Soup until I went to culinary school. It was one of the dishes we learned how to make in Basics – the first class you take. This is because it is a great example of how to caramelize onions, and of the effects of caramelizing. In Basics, I had to make enough to feed two people. About half way through school, we got to work in the restaurant that is located on campus. In the restaurant, each student works a different station everyday. The day I had the French Onions Soup station was a tearful day to say the least. It wasn’t that I was sad or upset in any way, it was the onions I had to cut up at the beginning of the day. In my memory, it was like 100 pounds of onions, in reality, it was only 50 or so. Still a hefty amount. After chopping them all up, I cooked them in a giant tilt skillet. You can google “tilt skillet” if you’d like to see what one looks like. They are kind of like, if you can picture, a stove but instead of burners, it has a big metal box on top with no lid that tilts forward to empty it. They’re big and they’re for cooking huge amounts at a time and they’re awesome :D! At the end of the day, after all the tears, and work in the kitchen. You get to see the result of your labor, someone enjoying the food you made. It’s an amazing feeling. I love this soup :)! I hope you love it too! Happy Cooking! 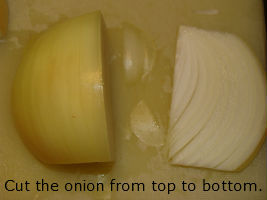 Ingredients
1 Tablespoon olive oil
3 pounds onions, (I use 2 brown, 1 yellow, and 1 red) sliced with the grain
1 Tablespoon Kosher Salt
1 teaspoon pepper
1/4 cup sherry (something inexpensive please :D)
2 quarts of beef stock (if you use cans, they come in 14.5 oz cans, just use four and don’t worry about those few extra ounces, no big deal)
croutons (recipe follows)
Swiss or Gruyere Cheese (I use Tillamook Swiss in these pictures, I love the Gruyere too, I just don’t usually have it in the house-like when I decided to make this yesterday) 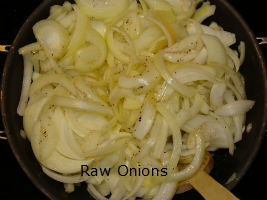
6 croutons (recipe follows)
Special Equipment
oven safe bowls, or crocks of some sort (available in my “foodie shop“)
Instructions
1. Peel and slice onions with the grain about 1/4 inch thick – How do you keep your eyes from watering? The only solution I’ve found for this is to cut them under my vent fan with it on high. Also, only breath through your mouth.
2. Place the oil in a large wide bottom pot or saute pan and turn it on medium high heat.
3. Add the onions, salt, and pepper, stir to coat evenly. 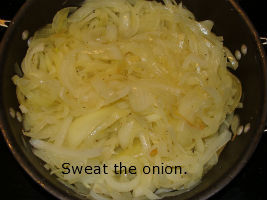
4. Sweat your onions, you are looking for them to begin to get a translucent appearance (see my article on caramelizing onions).
5. Reduce the heat to medium low.
6. Let your onions cook. You will have to stir them about every ten minutes to start and more often as they cook down, make sure you scrape the bottom as you stir. If they start to stick, add a little water, scrape the bottom, and stir (check out my article “How to Caramelize an Onion“).
7. Once your onions have cooked down to a beautiful, dark golden brown, add the sherry.
8. Stir and let it cook for 30 seconds or so.
9. Add your stock.
10. Bring it to a boil.
11. Place the soup into oven safe bowls.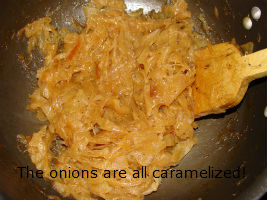
12. Put a crouton on top of each one and cover it with cheese. You can use shredded or sliced or a combination, it is also OK to use provolone, Swiss, Gruyere, or even Parmesan if you want. I put my bowl on a sheet pan to make it easier to get them in and out of the oven.
13. Place your soups in the oven under the broiler until the cheese gets melty, brown and bubbly – Mmmmm YUMMY!
14. Remove the soups from the oven – BE CAREFUL!
15. Enjoy your beautiful French Onion Soup Gratinée!
Ingredients for Croutons
6 slices of whole wheat bread, or 6 slices of french bread
2 Tablespoons olive oil
Kosher Salt
pepper 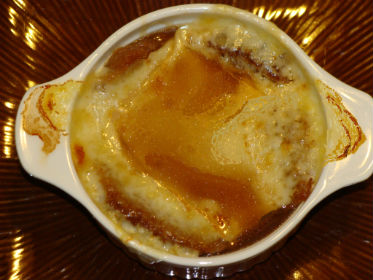 Instructions
1. Pre-heat your oven to 300°F.
2. Cut the bread to fit the top of the bowls you will be using. I put the rim of the bowl on my bread and push down to cut it out or to make a little circle print to follow.
3. Brush the bread lightly with olive oil.
4. Sprinkle the bread with Kosher salt and pepper.
5. Place it in the oven on a sheet pan at 300°F until toasted, about 10 minutes or so.
6. Remove it from the oven and go to step 12 above.
Please enjoy this “how-to” chop an onion video!