


These are some of my favorite lunch recipes including some really awesome sandwiches – there are lots of other yummies coming soon!
Recipes – more to come:D!
Cuban Sandwiches – Soooooooooo Gooood!
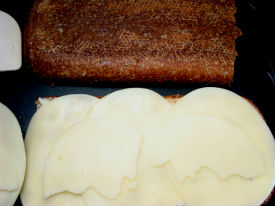
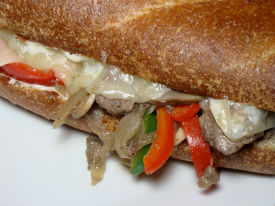
Philly Cheese Steak Sandwich

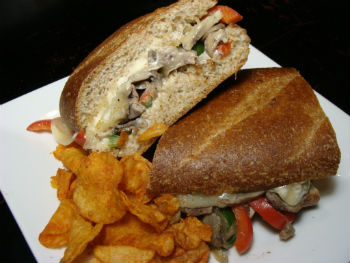
Philly Cheese Steak Sandwich – Being a food nerd, I am very interested in food history/origin. Who isn’t though right :)? So, today, I want to share with you a sandwich with a history – The Philly Cheese Steak. The Cheese Steaks’ story starts back in the 1930′s. Well, I guess technically, all sandwiches start back in the 18th century with the Earl of Sandwich – he was the first person to decide to put food between bread and call it a sandwich. Or at least he’s the one credited for it. But, were going to start in the 1930′s, because that is when the Philly Cheese Steak Sandwich was born. I have heard a few different versions of this story but they all have some things in common. In South Phillidelphia, there was a hot dog cart owned by two guys by the names of Pat and Harry Olivieri. One day, Pat was working and got hungry. He decided to cook some beef on his hot dog grill (one story says his wife sent the beef to work with him that day the other says he got it from the butcher (I’m not sure why there’s a debate – it’s the 1930′s not the 1430′s but anyway). He then placed the beef, along with some onions onto a roll – I’ve heard Italian or Hoagie roll. So, one of his regular customers, a cab driver happened along and saw Pat eating his new creation and asked if he could make him one as well. Pat did and the cabbie liked it and asked if he could make it again for him the next day (or sometime in the future) and the Philly Steak Sandwich was born which eventually led to Pat’s restaurant, Pat’s King of Steaks. Notice that I didn’t say Philly Cheese Steak yet. That’s right, there was no cheese on the first one. The cheese came a short time later. According to Oliveri, the first cheese was added by a guy named Joe “Cocky Joe” Lorenza. He was the manager of the Ridge Avenue location of Pat’s and made the choice to add Provolone Cheese. So what about the American Cheese and Cheese Whiz? Those are also later additions. The Cheese Whiz actually didn’t come until the 1950′s. Which is obvious if you think about it since Cheese Whiz wasn’t invented until 1952. And the American, well I haven’t heard any definitive year for that one, only that it is now commonly served on the sandwich including at the restaurant Pat’s King of Steaks. They also serve the Cheese Whiz there in case you’re wondering. So, what officially makes a Cheese Steak Sandwich? Well, I guess it depends on who you ask. There are several versions at this point which have added everything from the cheeses to bell peppers, mushrooms, mayonaise, ketchup and hot sauce. Oh, a nice Amoroso Sandwich Roll – if you can get one, also makes a welcome addition and is common in Philidelphia with the Cheese Steak. Generally, you saute the meat with the other ingredients you’ve choosen, place the cheese on top, and then scoop it onto your bread. Very yummy. I do mine a little different though – I also encourage you to give the Cheese Steak your own little twist. Don’t forget, cooking is an art! Enjoy and happy cooking everyone! Oh, this recipe makes two large sandwiches – enough for 8 people, but you can easily just cut it in half.
Ingredients (for 2 large sandwiches)
1 Tablespoon Olive Oil
1 onion, sliced (I used a brown onion, white is good too)
1 1/4 teaspoons Kosher Salt
3/4 teaspoon black pepper
2 1/2 pounds mushrooms (white button or crimini *see note), sliced
2 pounds Steak (I used Sirloin), partially frozen – I’ll explain later :D
1 Green Bell Pepper, sliced 1/4 inch thick, seeds removed
1 Red Bell Pepper, sliced 1/4 inch thick, seeds removed
2 Loaves French Bread
butter – enough to spread on the bread
mayonaise – the amount depends on your taste, 1/2 cup or so
1 pound Provolone Cheese
American Cheese (optional (I don’t use it))
Cheese Whiz (optional (I don’t use it))
Instructions
1. Saute your sliced onions with a little bit of Kosher salt (about 1/4 teaspoon) and black pepper (also about 1/4 teaspoon) in the olive oil for about 30 seconds. Reduce your heat and stir the onions one time really good making sure they’re not sticking anywhere. Leave the onions cooking on low for now (we’re going to caramelize them lightly).
2. Slice your bell peppers about 1/4 inch thick. Remove all of the seeds and throw them out. They taste bitter when you cook them so we don’t want any on our sandwich. Put the bell peppers to the side.
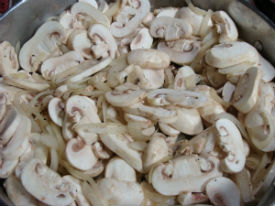
3. Slice your mushrooms. Make sure you wash them first. It is OK to get your mushrooms wet. I put them all in a bowl together and fill the bowl with water, then I swirl them around, drain them and repeat the process. If you do this, you will notice how dirty those mushrooms actually are because you can see the dirty water. So, the point is, wash your mushrooms, you don’t really have to worry about them absorbing a bunch of water. It’s cool.
4. Add your sliced mushrooms to the onions and add a little more Kosher Salt (1/2 teaspoon or so) and pepper (1/4 teaspoon or so).
5. Stir the mushrooms in with the onions. Allow the mushrooms to “cook down”. Please check out my how-to video if you’re not sure what to look for.
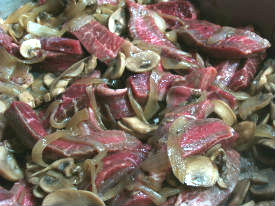
6. Once the mushrooms are cooked down, it’s time to add the beef. Now, let’s have a little talk about the beef. Often, when I have had a Philly Cheese Steak, the meat has been well done. That’s fine I guess and I’m not downing it or anything, but I like my steak to be somewhere between mooing and medium rare depending on what I’m cooking it for. In this case, I like to have my meat medium rare. So, to accomplish this while still getting the flavors right and that kind of saucey-ness that you end up with at the end, I freeze my steak. SSSSSSSSSSS (that’s the sound of everyone doing that suck in through your teeth sound in a tisk tisk manner – I wasn’t sure how to spell it :D), I know. I normally would not tell you to freeze your steak, especially all the way through (but that’s another lesson). This time, for this sandwich, I freeze my steak all the way through. 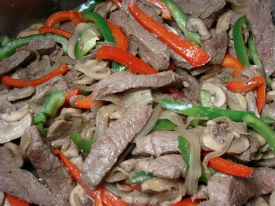 Then, I let it thaw a little. “What?” You may be asking, why would you freeze, then thaw. Well, that’s the only way I know to start with the middle totally frozen and the outside thawed. Do you follow me? So, what’s going to happen when we add the steak to the pan is we can cook the outside enough to get the flavor and sauceyness and the inside stays medium rare – Yay! If you want your meat to be well done, just don’t freeze it. The other thing is, when your meat is slightly frozen, it’s easier to cut into those nice even beautiful slices. So, even if you’re going for well done, you may want to freeze the steaks for an hour or so, just to make them easier to slice. And just in case you’re wondering why I don’t just cook the steak for less time, well it’s because I think you get better flavor this way because you can cook the outside of the slices further then if they weren’t frozen in the middle.
7. Moving on, sprinkle the meat with Kosher salt (1/2 teaspoon or so) and a little pepper (1/4 teaspoon or so), then, add the beef to the pan.
8. While your beef is starting to cook, slice your french bread in half long ways. Butter each side well, then lay them buttered side down onto a griddle or pan to toast them. Go back to your beef.
9. Saute the beef around until it is starting to brown. This should be happening by the time you butter your bread and everything. When the beef starts to brown, add your bell peppers. Stir everything around. Allow this to cook while you check on your bread (that is toasting).
10. When your bread is golden brown, add the mayonaise, then the cheese to the bread. I put mayonaise on both pieces of bread and then cheese on the top slice.
11. Add the beef mixture on top of the cheese (yep, it’s upside-down), put the two sides together, flip it :) and enjoy!
*A note on mushrooms-You may not know this, but Button Mushrooms, Crimini Mushrooms, and Portabella Mushrooms are all the same mushroom in different states of maturity. They are the variety Agaricus bisporus. The white button and the crimini are the youngest and therefore the softest. Why are the crimini brown? Well, they are bred to be brown, but the only real difference between them and the button is color….and price. Sometimes I like to use the crimini anyway because even though I know they’re the same, they somehow seem “nicer” to me. I don’t know why – maybe because they cost more :). 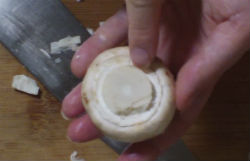 The Portabellas are the most mature in the family and have the “meatiest” texture and the most flavor. Look for mushrooms that have a membrane covering the gills. Those are the freshest. If you can’t find any that are still “closed” (that means the membrane is there), then make sure the cap is still turned down. If the cap is turning up, that’s a sign of an old mushroom. There, now you’ve learned something today :).
Please enjoy this how-to video!
Cuban Sandwiches – Soooo Gooood!

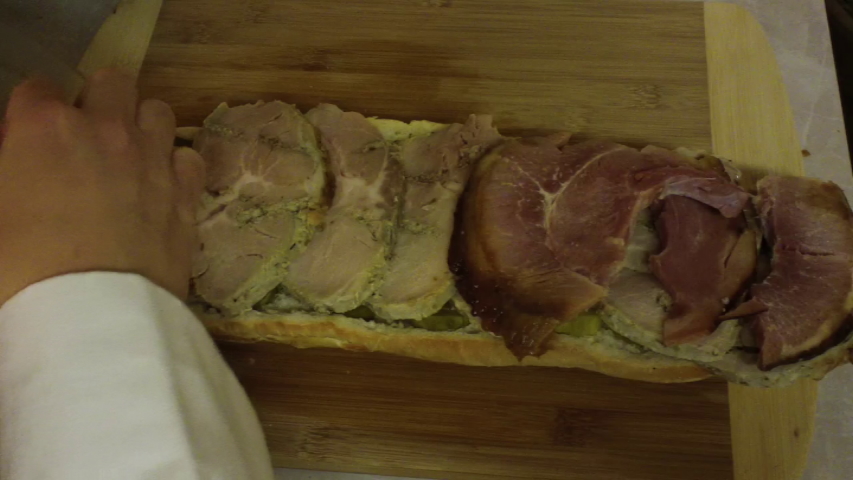
Cuban Sandwiches – I remember the first time I ever had a Cuban Sandwich. It was with my husband, Xavier. He had been excited for days about having one of these sandwiches. It was the first Christmas we spent out here in AZ. You see, in his family, and I suspect in most Puerto Rican Families, they eat Pernil (a roasted pork dish) for Christmas Eve Dinner. At this point I had never had Pernil either, so I was pretty excited for my first traditional Puerto Rican Christmas meal. Don’t worry, I’m going somewhere with this. So anyway, we went to his parents and had the Pernil, which is amazing by the way. Well, after dinner was done and the festivities were all over and it was time to say good-bye, we were all called into the kitchen for our “take-home” plates. What I didn’t know is that Xavier’s mother makes enough Pernil for everyone to take a plate home – so that everyone can have Cuban Sandwiches the next day. Yay! So, the next day was Christmas. We got up and had our traditional Christmas which at the time involved panettone french toast and white wine! Then, when lunch time rolled around, it was time for the greatly anticipated Cuban Sandwiches. My husband went off into the kitchen to make them while I got to relax on the couch and do nothing – aaahhhhhh, so wonderful! About 15 minutes later, he returned to the living room carrying a tray. He sat down next to me and put the tray on my lap and then began to explain what he had made. The sandwich has pernil, baked ham, pickles, Swiss cheese, spicy mustard, and mayo all pressed together on french bread. He also handed me a glass of wine and a bouquet of flowers and gave me a fat kiss and wished me a Merry Christmas – again. He’s so romantic! :D My first taste of a Cuban Sandwich was incredible! Just so you know, Christmas is not the only time of year that we have Cuban Sandwiches, it just happened to be the first time I tried one. Also, it is traditional to do these sandwiches on “Cuban Bread”. French Bread is the next closest substitute in my opinion and it is what I use – mainly because I can buy it anywhere. I also read that mayo is not part of the original sandwich, but I like it, so I use it. Keep in mind that food is like art and it is up to the artist creating the meal to add or subtract to make their creation their own. With that in mind, feel free to prepare this to your own liking and more importantly – enjoy! Happy Cooking!
 Ingredients
1 French Bread loaf (Cuban Bread if you have it)
spicy mustard (yellow or dijon if you prefer)
mayonnaise (optional)
Pernil (about one pound), sliced about 1/4 inch thick
baked ham (about one pound, we don’t use lunch meat for this), sliced
Swiss Cheese, 1/4 pound or so
dill pickles, sliced
Instructions
1. Slice your french bread long ways down the middle.
2. Spread the top slice with mayo and then mustard.
3. Place cheese slices over the mayo and mustard spreads.
4. Slice your pickles and place them on the bottom slice of bread.
5. Slice the pernil and warm it up either in the microwave for about 30 seconds (covered), or in a saute pan. Don’t skip the warming part because then your sandwich won’t be nice and warm in the middle unless you overcook the outside.
6. Lay the warm pernil down on the pickle side.
7. Warm your ham for just a few seconds (it dries out easy so be careful) then put it over the pernil.
8. Close up your sandwich, slice it in half and put it in the press – I use a panini press but you can also use a flat sandwich press or a saute pan. If you use a saute pan, you’ll need to put something heavy on top to press it while it cooks (like a heavy sauce pot), also, we put our press on high to start and lower it to medium-high while the Cubans cook, it’s just going to depend on your press.
9. When the cheese is melty and the outside is crispy, your beautiful Cuban Sandwich is done. Take it off of the press and enjoy! Oh yeah, we serve ours with chips or tostones – preferably tostones!
Please enjoy this “how-to” video!
Tuna Melts – Recipe

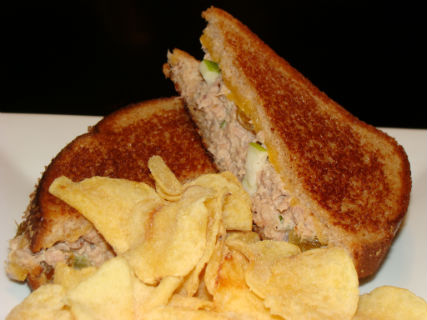
Tuna Melts (recipe and instructions follow) – I have loved tuna sandwiches ever since I can remember. Plain old, not fried, no cheese, only mayo and pickle relish added to the tuna -tuna sandwiches. It wasn’t until I was around 12 years old that I was introduced to the idea of a tuna melt. I can still remember the day I tried them (no, I don’t remember the first time I tried everything). My wonderful mother was in the kitchen cooking and I could smell them. It was a new smell to me, a weird combination of something sweet with fish :). I wandered in to see what she was making. When she told me what she had done to my beloved tuna sandwich, I was completely grossed out and offended – as often happens when you’re 12. My mom assured me I would like it but all I could think of was how disgusting warm tuna was going to be. She somehow convinced me to try it-bribery in the form of a dollar and the promise of a treat after if I didn’t like it. I was a pretty good negotiator at that age ;D at least in my head. Of coarse it was delicious and it turned out that I wasn’t as good at negotiating as I thought (should have left out the if I didn’t like it part). Now I had to face the tough choice of saying I didn’t like it to get my treat and my dollar and prove my mom wrong-always fun at that age. Or I had to suck it up and walk away with my tuna melt. I made the right choice and took the sandwich-that’s because they’re awesome-like my mom :). I have since taken that basic tuna melt and turned it into one of my favorite sandwiches. I hope you love it too! Happy Cooking!
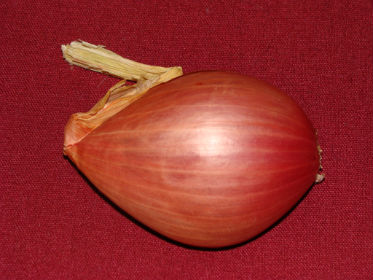
This is a shallot - isn't it beautiful? :)
Ingredients
5 cans chunk light tuna packed in water, well drained (not the all white-I’ve read it’s higher in Mercury)
1/4 cup shallots, minced
1/2 cup golden raisins
1 Granny Smith Apple, small dice
1/3 cup mayo or more if needed (you can use low-fat or half it with yogurt to make this a little healthier)
1/4 cup sweet pickle relish
1/4 cup celery, small dice
1/2 teaspoon salt
1/2 teaspoon pepper (or more to your taste)
4 ounces cheddar cheese (I use Tillamook Sharp Cheddar)
whole wheat bread (this will make 5 or 6 sandwiches depending on how thick you make them)
Instructions
1. Mix all of the ingredients (except the cheese and bread) together in a medium mixing bowl.
2. Butter one side of each slice of bread (like you’re making grilled cheese).
3. Place one piece of bread in the pan, butter side down, turn the heat on medium.
4. Add a layer of cheddar cheese.
5. Spoon some tuna on top and mash it down gently so it’s even.
6. Place the second piece of bread on top.
7. Place a lid on top of the pan – this helps it heat all the way through.
8. When the bottom bread is golden brown, flip the sandwich * see note.
9. Cook the other side, remove it from the pan and enjoy-we eat these with salt and vinegar kettle chips or pasta salad (recipe coming soon).
*When I flip these, I slide my spatula under the bottom side and lift the sandwich out of the pan. With my other hand, I lift the saute pan and turn it upside down and put it on top of the “top side” of the sandwich. I then flip the whole thing back over. I hope this doesn’t sound confusing, it’s kind of hard to describe. I’m just trying to explain an easy way to flip them so that you don’t dump everything out of the sandwich ;D !