


It seems to me that there are two different kinds of people in this world. Those who love salty, snacky foods like potato chips or whatever and those who love sweets. I am without a doubt a sweets lover! I can honestly say that I would sit down and eat a whole cake if it wouldn’t make me sick – and of course if it wasn’t so bad for us to do so :(. OK, maybe not a whole cake, I think I’d get too full, but you know what I mean. I tend to have a slice, and then go back for “just another small piece”, and then “just a bite and maybe the icing that’s stuck to the plate”. Am I alone here? You all do that too – right? Anyway, here are some of my favorite desserts! I hope you love them and don’t worry :D there are lots more to come!
Just keep scrolling down to see more!
Dessert Recipes
Cherry Cheesecake Wonton Bites
Pumpkin Pecan Bread Pudding with a Sherry Cream Sauce
Carrot Cake – Only the Best You’ll Ever Have (and Grandma’s recipe)
Butterscotch Apple Upside Down Torte (whole wheat)-Recipe
German Chocolate Cake (whole wheat) with Coconut Pecan Frosting
Chocolate Espresso Cake with an Espresso Glaze and Espresso Butter Cream Frosting (Whole Wheat)
Apple Crisp – How to Make Apple Crisp

Apple Crisp – Learn How to Make Apple Crisp with this super simple recipe. IMHO this old fashioned Apple Crisp is the best apple crisp recipe I’ve ever made. I use Granny Smith Apples for a bit of tartness to go with the sweet, lots of melted butter and an oat topping – yum! Also, we served this with vanilla ice cream and a drizzle of maple syrup on the plate.
Apple Crisp Ingredients
Filling
1/2 cup brown sugar
1 Tablespoon Flour
1 teaspoon cinnamon
1/2 teaspoon coriander
1/2 teaspoon cardamom
1/8 teaspoon cayenne
6 cups Granny Smith Apples sliced 1″ thick
Topping for Apple Crisp
1 cup flour
1 cup brown sugar
1/2 teaspoon baking powder
1/2 stick butter (salted)
Also to assemble
1 stick butter, melted
2 Tablespoons brown sugar
1/4 cup buttermilk
Where to get a cast iron skillet –
*The above product links are affiliate links. This means that if you click on them I get a small commission (at no additional cost to you) from the seller. This helps to support my channel so that I can continue to bring you more recipes :) Thank you for your support! I really appreciate it :)
Cherry Cheesecake Wonton Bites

Cherry Cheesecake Wonton Bites with a Cherry Balsamic Reduction – (recipe and video tutorial follow) – The other day I was walking through the produce isle at the market and there was this huge display of cherries and…….they got me. I just couldn’t resist, they were so beautiful and of course you know that they’re going to be amazing because they’re in season right now. So, anyway, I ended up going home with like five pounds of cherries which seemed like a great idea until I got home and remembered that I had just bought a ton of mangos, blueberries and plums. What can I say, I get excited at the grocery sometimes – it’s a Chef thing I think. I decided to rinse and pit my cherries and just let the kids have at them, but then, I had an idea. What was the idea? Well, I’m glad that you asked. I decided to try stuffing some wontons with a mixture of cherries and cream cheese and while I was at it, I figured I might as well make some kind of yummy sauce. So, I went into the kitchen and started playing and my beautiful creation of cherry cheesecake wontons was born. My family and I absolutely loved them and I hope that you will too. Enjoy and happy cooking!
Ingredients
To Start 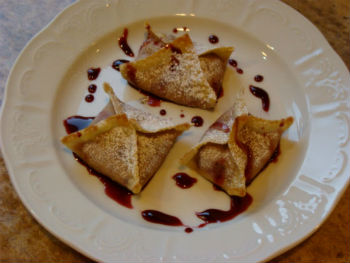
2 cups fresh cherries
1/4 cup sugar
For the sauce
juice from cherries
2 Tablespoons balsamic vinegar
1/4 cup sugar
For the Wonton Filling
12 ounces cream cheese
2 Tablespoons sugar
1/2 teaspoon nutmeg
pureed cherries
35 – 40 Wonton skins
Instructions
1. Place your cherries into a food processor along with the 1/4 cup sugar and pulse until you have small pieces (like you minced them (see video)). If you don’t have a food processor, this recipe will be slightly more difficult. You can mince your cherries on a plate and reserve the juice or if you have a potato masher, you could mash them with that in a bowl. However, the food processor is your friend and will give the best results with this recipe. Which ever way you decide to chop your cherries, make sure that you don’t lose any of the juice, we need it to make the sauce :)
2. Once your cherries are chopped, transfer them to a strainer and place it over a bowl to catch the juice. Also, pour any remaining juice from your food processor to the bowl. Set to the side. You want your cherries to set for about ten minutes. The sugar will help pull some extra juice out of them.
3. Rinse and dry your food processor and place the cream cheese along with the two Tablespoons of sugar and the 1/2 teaspoon of nutmeg in it. Pulse the cream cheese mixture a few times and then turn the food processor on for about 20 seconds to make the cream cheese, sugar and nutmeg form into a smooth mixture.
4. Place the cream cheese mixture into a medium sized mixing bowl. Set to the side.
5. Set up your oil on the stove that you will be frying your wontons in, but do not turn on the heat yet. Also, this is a good time to set up your “wonton station”. I use a sheet pan for my “station”. You will need to have your wonton wrappers, one egg – mixed up in a small bowl, and your cream cheese mixture. Getting this stuff set up now is allowing your cherries to set for the proper amount of time.
6. Check on your cherries. The sugar should be causing a lot of their juice to come out. Gently press on them with a rubber spatula or spoon to help squeeze out the juice. Be careful not to knock any of the cherry pieces into the juice. If you do, just make sure to strain them before you put the juice into your pan later.
7. Once you have all of the excess juice out of your cherries, add them to the cream cheese mixture and gently fold them in until they are evenly combined. Set the juice to the side.
8. Place one wonton wrapper out on your station with a corner facing you. Place a small spoon of the cream cheese mixture into the center of your wonton wrapper. Put a small amount of the egg onto the edges of the wonton wrapper. Fold the wonton by first bringing up opposite corners (the top and bottom of the diamond) to touch and then bringing in the sides. Carefully seal all of the edges of the wonton. If you do not properly seal your wonton, it will leak when you cook it. Also, I recommend doing a couple of “test wontons” before you fill all of them just to get the amount of filling right. The reason I say this is because if you put too much filling, they will open when you cook them and all of the filling will pour out. This happened to me on my first test batch. I over filled them and over half of them opened. It was very sad. So, just to give you an idea, I made 24 fat wontons in my first batch and 40 smaller wontons in my second. My second batch only had a few casualties which made me happy :)
9. Heat your oil. I don’t have a temperature gage on mine, but I would guess my oil is between 325° and 350°F. I look for bubbles to form around the edges of what I’m cooking to know that my oil is ready – as a side note, if your oil starts smoking, if is way too hot. You will also need your oven heated to 350°F.
10. Grab your cherry juice, add the 1/4 cup of sugar and the two Tablespoons of balsamic. Stir to combine. Put the juice into a small pan and put it on the stove on medium heat. I don’t recommend starting the reduction until you are at the stove frying your wontons because it needs to be watched. Stir the sauce every few minutes with a high heat spatula making sure to scrape the sides and the bottom. It will slowly start to thicken. When it is slightly thicker, turn off the heat. It will thicken more as it cools. You want it to be thick enough when it cools so that it doesn’t run all over the plate when you pour it, but thin enough to pour it with a spoon. It is better to turn it off early and check it because you can always heat it and reduce it more but once you over-reduce it, it is harder to deal with. Set it to the side when it’s done. Also, you should be frying your wontons while it is reducing – oh and you may want to turn on your vent fan if you have one for the frying and the reducing.
11. Now it is time to cook your wontons. Normally when you cook wontons (like crab wontons) you would just cook them in the oil. However, these are a bit more temperamental and need special treatment. So, we are going to fry them just until they float and them finish them in the oven. This is because these guys get a lot of steam build up as they cook – especially in the oil and once again, they will open if you have them in the oil for too long. I know I keep mentioning them opening, and I don’t want to scare you into not making this recipe, I just want you to be aware so that you are careful and you don’t end up with a bunch of open wontons and a sad face. So anyway, fry them just until they float.
12. Remove your wontons as they start floating onto a sheet pan lined with a lint free towel (I use a cloth napkin). This allows any excess grease to drain. Move them to another sheet pan and then into the oven. Allow them to cook until they are golden brown on the edges. It will take about nine to ten minutes.
13. Remove the wontons from the oven return them to the sheet pan lined with the lint free towel. Sprinkle them with powdered sugar.
14. Place them onto the serving plates and drizzle with the cherry balsamic reduction.
15. Serve warm – enjoy!
Please enjoy this how – to video!
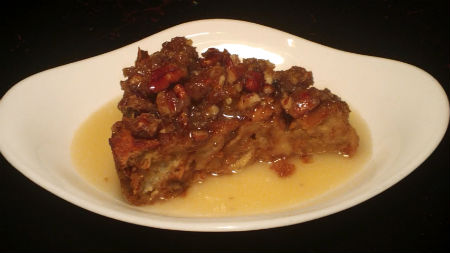
Pumpkin Pecan Bread Pudding with a Sherry Cream Sauce

Pumpkin Pecan Bread Pudding with a Sherry Cream Sauce – (recipe follows) – What can be said about Pumpkin Pecan Bread Pudding except for……YUM! I mean seriously – YUMMY! Are you guys pumpkin fans out there? I know I am, like a huge fan. I’d do a commercial for pumpkin right now (that’s supposed to be funny, you’d have to have seen the stand up where the guy is talking about doing a commercial for chicken – did you see that one? If you did then, hahahahahaha, funny right, if not then I just wasted like ten seconds that you can’t get back and well, sorry :D). Funny, I’m funny. Wow, I guess the sugar and coffee kicked in. So, anyway, this really is super yummy and you can make it as fancy or not fancy as you like depending on how you serve it. Either way, it’s going to make your house smell like the holidays while it bakes and give everyone who eats it nice warm full tummies. That’s always nice right? Not to mention that this comes out beautifully moist. Also, this is just a nice option to have instead of pumpkin pie (believe it or not, some people don’t like pie)! Yeah, I know :). Or, serve both, that’s what I’d do. Ah, yes, I love you too pumpkin pie. When I make this bread pudding, I like to add a crumb topping and also the sauce, but you can skip either or both of those because it is fabuloso on it’s own. It is also really, really good with vanilla ice cream – what isn’t? OK, enough chit chat LET’S DO THIS!
 Ingredients
For the Bread Pudding
5 eggs
2 cups half and half
1 (15 ounce) can pumpkin puree
1 cup brown sugar
1 teaspoon nutmeg
1 teaspoon cinnamon
1 teaspoon allspice
1/2 teaspoon cloves
1/2 teaspoon mace
1 1/2 teaspoons vanilla extract
1/2 cup golden raisins, optional
1/2 cup roasted pepitas, optional
10 cups cubed bread, French Bread, Italian, or challah all work well
 For the Crumb Topping
1/2 cup Brown sugar
1/4 cup butter (1/2 stick)
1 cup pecans, broken up
For the Sauce
1/2 cup butter (one stick)
1 cup sugar
1/4 cup half and half
1/3 cup Sherry
Instructions
1. Prepare your baking dish by giving it a nice coat of butter. You can also use a cooking spray, but the butter will add a little extra yumminess.
2. In a medium bowl, whisk the eggs. Add the half and half and whisk them together. Add the pumpkin and whisk it in well. Then add the brown sugar, spices, and vanilla extract and whisk it all up.
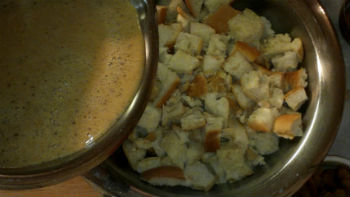
3. Place your bread cubes into a large bowl. Pour the egg mixture over the bread cubes. Add the pepitas and raisins. Fold it all together, be gentle.
4. Pour your mixture into your prepared baking dish. Smooth it out so it’s flat. Allow this to stand for about 20 minutes. This lets all the goodness soak into the bread. Also, turn your oven on to 350°F while your bread is waiting. 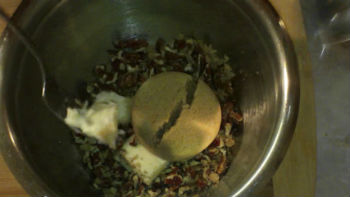
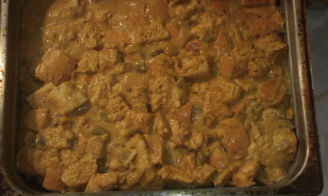
5. In a separate small bowl, combine the ingredients for the crumble topping and mash them together. You can use a fork or spoon, but I just use my hands to smash it all together. Sprinkle the crumble on top of the bread pudding.
6. Bake your bread pudding at 350°F until a toothpick inserted into it comes out clean. This will take about 30 minutes.
7. During the last five or so minutes of baking, make your sauce.
Instructions for the Sauce
1. In a small saucepan, melt your butter over low heat.
2. Add the sugar and stir, then add the Sherry and stir it with a rubber spatula.
3. Cook gently until the sugar is dissolved. This takes five to seven minutes over medium-low heat.
4. Add the half and half and stir.
5. Pour the sauce over the pumpkin pecan bread pudding and serve. You can also serve the sauce on the side so everyone can decide if they want it or not.
Please enjoy this how-to video!
Carrot Cake – Only the Best You’ll Ever Have (and Grandma’s recipe)
")
Carrot Cake - So, I’ve decided to make carrot cake for Easter. You know, Easter, bunnies, carrots, carrot cake – lol! This is another one of those great recipes that my Grandma passed down to me. I have added a few modifications, like I make mine whole wheat. Also, depending on my mood, I may add coconut, or Mandarin oranges or pineapple, or raisins, or different nuts. Like I said, it depends on my mood…… and what’s in the fridge or cabinet :D! This also happens to be one of Xavier’s (my husband’s) favorite cakes and my oldest daughter’s favorite as well. So, I get to make it a few times a year – Yummy! But, Easter is my favorite occasion to make it for, I’m not sure why I get so silly and giddy about the whole bunny/carrot thing (what a nerd, I know, it’s cool though). So, anyway, this is a really fabulous recipe. One that I’ve loved since I can remember. Oh, here’s my funny (at least to me) carrot cake story. When I was a little girl I was super anti cream cheese (I’m not sure why, I think because I’d never actually tried it (that I knew of)). Well, my grandma of course makes the cream cheese icing with the carrot cake – a fact that I was unaware of. You understand this I’m sure because when you’re little you don’t question the frosting, you’re just happy to be eating the frosting. So, anyway, my Mom took me out to a bagel shop one day. This was super exciting because it was new to me that bagel shops even existed. When we got to the front and it was our turn to put in our order, my Mom asked me what kind of cream cheese I’d like on my bagel. “Ewwww, no cream cheese, thank you!” To which my Mother responded. “That’s the best part.” I couldn’t believe she had made such a bold statement! “Well, I don’t like it” I answered back. “It’s what Grandma makes her carrot cake frosting with.” “Hhhhhh” I gasped, surely my beloved Grandma wouldn’t have tricked me like this. So, to prove my mother wrong, I agreed to try a tiny, teensy, weensy, taste of the cinnamon raisin flavored cream cheese. Upon tasting it, my eyes welled up with tears – my Grandma had been lying to me all this time. My poor mother was like “what’s wrong, are you OK?”. I managed to sob out that Grandma had lied to me about her frosting. I’m sure my Mom had to suppress a chuckle as she explained that Grandma didn’t lie, I just never asked. Kids are so cute sometimes – yes I was too. I hope you love this recipe (including the cream cheese frosting) as much as my family and I! Oh yeah, I’m putting Grandma’s version first and then my sort of healthier version. Happy Cooking!
 Ingredients for Grandma’s version
4 eggs
2 cups sugar
1 1/2 cups canola oil
1 teaspoon vanilla
dry ingredients
2 cups flour
2 teaspoons baking soda
1/2 teaspoon salt
2 teaspoon cinnamon
2 cups carrots, shredded
1/2 cup nuts (I use pecans)
Instructions
1. Prepare two 8″ round cake pans by spraying with cooking spray and lining the bottoms with parchment (or wax) paper, make sure to line the bottom or your cake will stick.
2. Pre-heat your oven to 350°F.
3. Combine dry ingredients into a small mixing bowl and stir to combine.
4. Put eggs into a large mixing bowl and beat them.
5. Add the sugar, oil and vanilla into the eggs and stir with a rubber spatula.
6. Add the dry ingredients into the egg mixture 1/2 at a time and make sure you stir it up really good in between additions (scrape the sides and bottom of the bowl with your rubber spatula too). 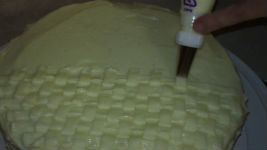
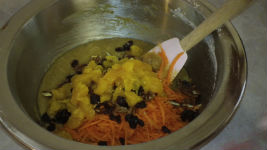
7. Stir in the carrots and the nuts.
8. Divide the batter between the two cake pans.
9. Bake at 350°F for 40 minutes to and hour.
10. It’s done when a toothpick comes out clean – DO NOT OVER BAKE! Mine usually takes about 40 minutes, Grandma says hers takes around 50 – however, she lives in Florida and I live in Arizona so I guess that makes a difference.
And now, my healthier version – I don’t change the frosting, it’s too delicious :D
Ingredients
5 eggs
1 cup canola oil 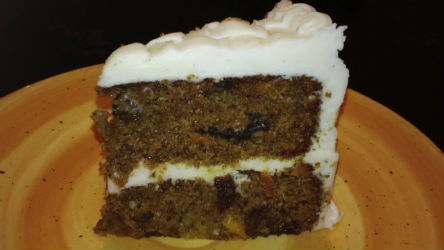
1/2 cup olive oil
1 cup Splenda
1 cup sugar
1 teaspoon vanilla bean paste
dry ingredients
1 3/4 cup whole wheat pastry flour
1/4 cup wheat germ
2 teaspoon baking soda
1 teaspoon kosher salt
2 teaspoon cinnamon
2 cups carrots
1/2 cup pecans
1/2 cup raisins
And as options you can also add any one of these – In fact, you can add all three of them if you want.
1/2 cup fresh pineapple, chopped pretty small, drain it if it’s really juicy
or
1/2 cup Mandarin oranges, drained
or
1 cup coconut
Instructions
1. Prepare 2 (8 inch) round cake pans by spraying with cooking spray and lining the bottoms with parchment (or wax) paper, make sure to line the bottom or your cake will stick.
2. Pre-heat your oven to 350°F.
3. Combine dry ingredients into a small mixing bowl and stir to combine.
4. Put eggs into a large mixing bowl and beat them.
5. Add the Splenda, sugar, oils and vanilla paste into the eggs and stir with a rubber spatula.
6. Add the dry ingredients into the egg mixture 1/2 at a time and make sure you stir it up really good in between additions (scrape the sides and bottom of the bowl with your rubber spatula too).
7. Stir in the carrots, nuts, and the raisins (and anything else you’re adding).
8. Divide the batter between the two cake pans.
9. Bake at 350°F for 45 minutes to and hour.
10. It’s done when a toothpick comes out clean – DO NOT OVER BAKE!
OK, now for the frosting!
Ingredients
*see note for measurements if your doing the additional decorating
8 ounces cream cheese, at room temperature
1 stick of butter, at room temperature
16 ounces powdered sugar
1/2 teaspoon vanilla (I use vanilla bean paste)
Instructions
1. Cream the butter and the cream cheese together, scrape the sides and bottom of the bowl.
2. Add the vanilla and mix until combined.
3. Add the powdered sugar 1/3 at a time and mix between additions until completely blended – also, scrape your bowl between additions.
*note – If you’re doing the additional decorating, you need more frosting, so follow these measurements.
12 ounces cream cheese, room temperature
1 1/2 sticks of butter, room temperature
24 ounces powdered sugar
1 teaspoon vanilla (I use vanilla bean paste)
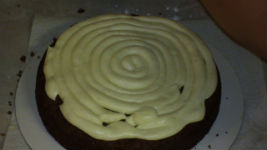
Follow the same instructions as above. I’ll show you how to frost the cake and do a basket weave on the cake in my video :D!
Please enjoy this how to video!
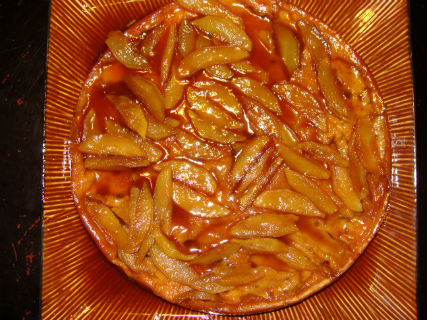
Butterscotch Apple Upside Down Torte (whole wheat)-Recipe
-Recipe")
Butterscotch Apple Upside Down Torte – I created this recipe for my favorite (and only) big sister, Julie. My Pooh Bear! She called me about a month ago telling me how she wanted to make a butterscotch dessert for her wonderful husband Andy as a surprise. She explained to me that she had tried a few recipes, but none of them came out how she expected – some of them came out a gross watery mess. My sister is a good cook and she has tons of recipes. If she doesn’t have a recipe for something she wants to make, she always checks with me and Grandma for one. The problem is that if neither of us has one, she, like many people, turns to the Internet. Now, I’m not saying that there are no good recipes on the Internet. That would be silly, after all there’s my site :). Just kidding of course. There are lots of really good recipes to be found and a lot of reputable chefs out there willing to share. The problem isn’t a lack of good recipes, it’s the ocean of bad ones. Unfortunately for her, she fell in the ocean three times on this one. So, I made this special just for you Pooh! I love you and hope you and Andy – and everyone else out there love it! Happy Cooking!  Ingredients for Torte
Dry Ingredients
1 1/2 c whole wheat pastry flour (I use Bob’s Red Mill)
1/4 c splenda
3/4 tsp baking powder
1/4 tsp baking soda
1 tsp salt
Separate Bowl for Butter
9 Tbsp butter (I use Plugra)
Wet Ingredients 
3 eggs
1/2 c yogurt – plain, fat free
1 tsp vanilla (I love the Bourbon Pure Vanilla Bean Paste – available in the “foodie Shop” on my site)
Sauce Ingredients
1 1/2 c light brown sugar
1/2 c water
4 Tbls butter
1 tsp vanilla
2 tsp apple cider vinegar
2 Tbsp milk
3 apples (I used 1 Granny Smith, 1 Gala, and 1 Braeburn) 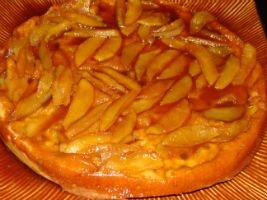 Special Equipment
9 inch Spring-form Pan (order one in the “foodie shop” on my site :D)
candy thermometer (order one in the “foodie shop” on my site :D)
Instructions
*you are going to be kind of going back and forth between the cake, the sauce and peeling/chopping apples, just trust me, the timing is important on this cake-these instructions are how I timed mine – also read this whole recipe before you start, maybe even twice – it’s not hard, there’s just a lot going on :)
1. allow all ingredients to reach room temperature, spray your spring-form pan with cooking spray and cover the outside with foil (to prevent leaks), also get out your saucepan and mixer, and move your oven rack to the bottom
2. in a medium saucepan (mine’s 2 qt), combine your light brown sugar and water for the sauce (don’t turn it on yet)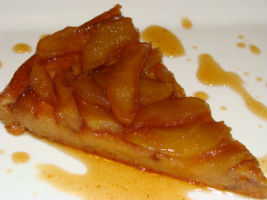
3. measure all the other sauce ingredients, you can combine the vanilla and vinegar in a small ramekin or bowl, but keep the milk and butter separate (they go in at different times) leave everything by the stove
4. in a small bowl, combine all dry ingredients for the torte
5. in a liquid measuring cup (2 cup size) measure your yogurt, then add the eggs and vanilla to the yogurt and mix it all together
6. in a large mixing bowl, cream your butter (for the Torte) for about 30 seconds
7. beat in 1/2 of your liquid mixture (for the Torte), then 1/2 of the dry ingredient mixture scrape the sides and bottom of the bowl with a rubber spatula in between additions
8. repeat step 7 using the rest of your dry and wet ingredients, leave that there for a minute
9. turn your sugar and water mixture on med-high heat (the sauce)
10. get out your apples and start peeling, remove the core and slice them into 1/4 inch slices – like you would for apple pie – do this by the stove because you have to baby-sit the temperature of your sugar/water mixture
11. when your sugar/water mixture reaches 240°, remove it from the heat and allow it to set for four minutes *the temperature is very important, if it gets too hot, you’ll have hard candy when it cools
12. put your apple slices in the bottom of your greased spring form pan
13. go back to your torte batter and mix it on medium speed for 2 minutes – this is to develop it’s structure (to give it some air bubbles)
14. go back to your sauce which should have had sat for four minutes, add in the butter and stir to melt it in
15. when the butter is all in, add the vanilla/vinegar and stir to combine
16. add the milk and stir it in- your sauce should have a beautiful, smooth texture-if it looks curdled, it is, either it didn’t reach the right temperature, it didn’t sit long enough, or the vinegar wasn’t stirred all the way in before you added the milk – try again and don’t worry, it’s happened to all of us at some point
17. pour the sauce over the apples
18. spread the torte batter over the apples and sauce using a spatula to smooth it down, put your spring-form pan on a sheet pan (cookie sheet)
19. bake at 350° for 40-50 minutes on the bottom rack of the oven until it’s golden brown on top and a toothpick comes out clean
20. allow to cool for 15 minutes
21. Place a large plate/platter on top to the pan and flip the whole thing over-it will be juicy on the bottom
22. YOU DID IT! :D remove the pan and enjoy-serve warm
*This recipe is best served the day/night it is made. The texture changes when you have it as a left-over!
German Chocolate Cake (whole wheat) with Coconut Pecan Frosting – Recipe
 with Coconut Pecan Frosting – Recipe")
German Chocolate Cake – Last week for my birthday, my kids practically shoved my husband and I out of the front door while promising to watch the little ones. They said I needed to go on a birthday date and that we should go see a movie and have some fun. What I did not know was that they had a secret plan. Tristan (age 16) and Vanessa (age 14) were making a roast turkey dinner, and Eleyna (age 12) and Tia (age 3) were making me a personal German Chocolate Cake. YUMMY :D! The picture you see here is a picture of the cake that they made. Pretty impressive in my opinion! It was beautiful and delicious with a perfect consistency throughout. The consistency, in this case, refers to the air holes-they should be uniform with no tunnels if you mixed it properly (something that as a chef, I can’t help but notice). The following recipe is my recipe for a full size cake. It is super delicious! Oh, and in case you’re wondering, dinner was awesome too! Happy Cooking!
Ingredients
2 c whole wheat pastry flour (I use Bob’s Red Mill)
3/4 c sugar
3/4 c Splenda (or another sweetener, you can also just use more sugar)
1/2 tsp baking soda
1/2 tsp baking powder
1/2 tsp Kosher salt
11 Tbsp butter (I use Plugra)
3/4 c milk
1/4 c yogurt (plain, fat free-vanilla would be fine too)
2 tsp vanilla (I like Bourbon Pure Vanilla Paste – available in the “foodie shop” on my site!)
3 eggs
4 oz melted chocolate (I use Scharfenberger Chocolate – available in the “foodie shop” on my site!)
Instructions
1. allow your ingredients to come up to room temperature
2. prepare your pans by spraying the inside with cooking spray and lining the bottom with parchment (wax) paper – the easiest way to do this is to put your pan onto the paper, trace it using a butter knife (it will scratch the line) and cutting it out along the line, then place it on the bottom (the cooking spray should hold it in place)
3. pre-heat oven to 350°
4. in a small mixing bowl combine flour, sugar, Splenda, baking soda, baking powder, salt
5. in a measuring cup combine milk, yogurt, vanilla and eggs
6. melt chocolate, set to the side (I melt mine in the microwave in a bowl at 20 second increments stirring in between, it usually only takes 40 seconds, but if it’s not melted do ten more)
7. in a medium mixing bowl cream butter
8. add 1/3 of the dry mixture and mix until combined
9. scrape the sides and bottom of the bowl with a rubber spatula
10. add 1/3 of the wet ingredients and mix until combined
11. repeat steps 7-9 adding the second 1/3 of the dry, mixing, scraping, then 1/3 of the wet, mix, scrape and so on
12. mix in the melted chocolate
13. mix the batter on medium speed for 3 minutes stopping at the 2 minute mark to scrape the bowl
14. pour batter into two well greased and lined 8 or 9 inch cake pans
15. bake at 350° for about 35 minutes until a toothpick comes out clean
16. allow to cool in the pan for 15 minutes, then remove from the pans and allow to finish cooling on cooling racks
Ingredients for Coconut-Pecan Frosting
*this makes a ton of frosting – enough to frost your cake thick, or even to cut each layer in half and make a “four layer cake” so don’t worry about laying it on thick :) if you’d like the “normal amount” of frosting, use the measurements below for “less frosting” and follow the same instructions
12 oz evaporated milk
1 1/2 c sugar
6 egg yolks (slightly beaten)
3/4 c butter
1 1/2 tsp vanilla
2 c coconut
1 1/2 c pecans (broken up)
Instructions for Frosting
1. Combine all ingredients (except coconut and pecans) into a medium saucepan
2. cook and stir over medium heat until thickened, about 10-12 minutes
3. remove from the heat
4. add the coconut and the pecans and stir to combine
5. cool until thick enough to spread, stirring occasionally
Ingredients for Less Frosting
8 oz evaporated milk
1 c sugar
4 egg yolks
1/2 c butter
1 tsp vanilla
1 1/4 c coconut
1 c pecans (broken up)
Pumpkin Eggnog – Recipe
Pumpkin Eggnog (pumpkin eggnog recipe with instructions and video tutorial follow)- Eggnog is a Christmas time tradition in our house as I’m sure it is in many of yours. It is also something that we go through by the gallon which I’m sure you can imagine with 5 children and 2 adults in the house. Everyone has their favorite too. My Son and I love the pumpkin eggnog (especially in coffee, think pumpkin latte), my oldest daughter and our three year old love traditional eggnog, our 12 year old daughter loves chocolate eggnog (difficult to find in stores), my husband needs soy for his eggnog, and the baby is just happy about this new thing in her life called eggnog – no matter what flavor she is given. Of course, everyone in the house agrees on one thing – home-made is best. So, here is my favorite flavor of eggnog, pumpkin eggnog, from my kitchen to yours. Happy Cooking!
Ingredients
4 cups whole milk
3/4 cup white sugar
1 cup pumpkin puree
1/4 teaspoon salt
1 teaspoon vanilla
1 teaspoon pumpkin pie spice *see note
6 egg yolks
Instructions
*I highly recommend watching the “how to” video on this one first!
1. Place the milk, sugar, pumpkin, salt vanilla and pumpkin pie spice in a medium sauce pot.
2. Bring the liquid up to 170 degrees, stir often scraping the bottom of the pan – while this is warming, prepare an ice – water bath.
3. Whisk the egg yolks until they are pale yellow.
4. Temper the eggs with the milk mixture-this means slowly add one cup of the hot milk mixture into the eggs while whisking (check out the video).
5. Add one more cup of the hot milk mixture into the eggs.
6. Add the egg and milk mixture into the sauce pan with the remaining milk mixture.
7. Cook over medium to medium-high until your mixture reaches 180 degrees. You have to watch the temperature. If it gets to hot, you will have milky, pumpkin flavored, scrambled eggs instead of pumpkin eggnog.
8. Pour the eggnog mixture into a bowl that is setting in your ice – water bath and allow it to cool stirring often.
9. Pour your pumpkin eggnog into cups or place it in the refrigerator.
10. Garnish your yummy pumpkin eggnog with whipped cream and nutmeg or pumpkin pie spice if desired.
*If you would like to add alcohol to your pumpkin eggnog, I recommend a Brandy or Rum. I would also recommend adding it to the individual cups and not to the whole batch unless it will all be served right away.
**Again I recommend watching the pumpkin eggnog video before you start making your pumpkin eggnog!
yields about 6 servings
Please enjoy this “how to” video!
Chocolate Espresso Cake (whole wheat) – Recipe
 – Recipe")
The Chocolate Espresso Cake story/recipe – Sometime last February, my son put in his request for his birthday cake (his birthday is in October). You see, he had fallen in love with coffee and wanted to “give me plenty of time to come up with something amazing”. After some research and a few kitchen experiments, this is what I came up with. My new favorite cake – chocolate espresso cake with a coffee glaze and an espresso chocolate butter-cream frosting. I think you get a cup’s worth of caffeine just saying the name. Oh, and it’s whole wheat! We celebrated his birthday last night and that cake will not stop calling me from the refrigerator. Say this next part in a high pitched, slow and dreamy voice – Alicia, come and eat me, I’m so yummy. And I’ve said back to it all day in a firm voice – be quite cake. Guess what though, at 6 ‘o clock tonight, while dinner was in the oven, the cake won and it was delicious! So, here’s the recipe. I hope you love it as much as we did!
For the Cake
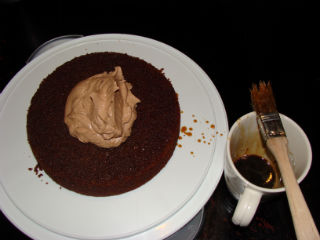
Ready to Frost the First Layer After Glazing
4 ounces dark chocolate (I use Scharfenberger Chocolate – available in the “foodie shop” on my site!)
2 cups of whole wheat pastry flour (I use Bob’s Red Mill)
1 teaspoon baking soda
3/4 teaspoon salt
1 cup dark brown sugar
1/2 cup Splenda (or another 1/2 cup of dark brown sugar)
2 sticks butter ( I use Plugra)
5 eggs
2 Tablespoons instant espresso powder
1 teaspoon vanilla (I like Bourbon Pure Vanilla Paste – available in the “foodie shop” on my site!)
1 cup plain yogurt
For the Glaze (make this when the cake is done baking and cooling)

Place the Second Layer on the Top and Glaze
1/4 cup sugar
1 1/2 teaspoons espresso powder
2 Tabelspoons water
Combine all of the ingredients, stir and then microwave for 30 seconds. Remove the glaze from the microwave. Stir it until the sugar dissolves.
Instructions for the Cake
Prepare two 8″ round cake pans with butter or non-stick spray and line the bottoms with wax paper
Pre-heat your oven to 350 degrees
1. In a small bowl combine the flour, baking soda, and salt, stir with a fork or whisk to combine.
2. Melt the chocolate (you can do this in the microwave, heat 30 seconds then stir and then heat it at 15 second intervals until it’s almost melted then stir).
3. Combine with a mixer the butter, brown sugar, splenda, eggs, espresso powder, and vanilla in a large bowl for 3 minutes (it will look a little weird with tiny butter speckles).
4. Add the melted chocolate in while mixing and then mix for one more minute.
5. Add in flour mixture and yogurt 1/3 at a time alternating them and mixing them well in between each addition. Make sure that you are also taking the time to scrape your bowl with a rubber spatula in between additions.
6. Bake your cakes until a toothpick inserted in the center comes out clean. This wil take about 30 minutes.
7. Cool the cakes on racks for 10 minutes. Then run a knife around edges (to help loosen it) and remove it from the pans. Allow the cakes to cool.
8. Use a pastry brush to brush the glaze onto the first cake layer.
9. Frost the bottom layer and add the top layer.
10. Glaze the top layer and frost the rest of your cake.
For the Butter-cream
4 ounces dark chocolate – melted (I use Scharfenberger Chocolate – available in the “foodie shop” on my site!)
2 teaspoons instant espresso powder
3 Tablespoons cream
2 sticks butter – room temperature (I use Plugra)
1 teaspoon vanilla (I like Bourbon Pure Vanilla Paste – available in the “foodie shop” on my site!)
1/2 teaspoon salt
4 cups powdered sugar
Instructions for the Butter-Cream
1. Dissolve the espresso powder into the cream.
2. Cream the butter, vanilla and salt until combined and a little fluffy- about 3 minutes.
3. While you are still mixing, add in the melted chocolate.
4. Add the powdered sugar and beat until light and fluffy.
5. Beat in the espresso/cream mixture until you reach the desired consistency.

- Chocolate Espresso Cake with Espresso Glaze and Espresso Buttercream