


Here are some really yummy appetizers! Of course, you don’t have to keep them strictly in the appetizer category. I love some of these recipes just to munch on or even to have as a side dish! The dips can also be used as some really great sandwich spreads. I secretly hope for left-over dips just for that reason. They usually end up getting completely destroyed though so if you want to have some the next day, I suggest having a secret stash :D! There are lots more recipes to come everyone!
Recipes
Goat Cheese Tartelettes with Fig Compote
The Best Eggplant Caponata Ever
Tostones con Salsa de Mojo – Fried Plantains with a Garlic Oil – sort of
Stuffed Mushrooms – (whole wheat)
Rellenos de Papa – Puerto Rican Goodness!
Asian Meatballs Appetizer

These Asian Meatballs make a perfect appetizer and are great served over rice too. Plus, they were a huge hit at my last get together. I put the meatballs directly into the pot that I made the sauce in and let them cool. Then, I covered the pot with plastic wrap and put it in my fridge. That way, when it was almost time for my guests to arrive, all I had to do was put the pot on the stove, reheat them and plate them up.
Ingredients for Asian Meatballs
1 pound ground beef (I used 93/7 ground sirloin)
1 pound ground pork (I used 93/7)
1 teaspoon Kosher salt (2 if you’re not putting them in a sauce)
1/2 teaspoon fresh ground black pepper
2 teaspoons sesame oil
1 Tablespoon minced ginger
1 Tablespoon minced garlic (about 3 cloves)
1 cup chopped green onions (about 6, green and white parts)
2 eggs
1/2 cup Panko bread crumbs
green onions and furikake for garnish
Get furikake here – https://amzn.to/2NiukmV
Instructions for Asian Meatballs – Please enjoy the video tutorial (below the instructions) for some extra hints and tricks before you get started.
1. Combine all of your ingredients into a large bowl. Mix the ingredients by pushing down and folding – resist the urge to squeeze the meat. This heats the fat and can create a tough, dry meatball.
2. Roll your meatballs into the desired size. I made mine just larger than a cotton ball. Place them on a sheet pan. I lined mine with aluminum foil (for easy clean-up) and also sprayed the foil with cooking spray.
3. Bake your meatballs at 400°F turning halfway through the cooking time. Mine took 14 minutes.
4. Remove your meatballs from the oven and add them to your desired sauce or serve them over rice. I have left a link below to my homemade teriyaki sauce. I also garnished mine with furikake and green onions.
Those green onions were really burning my eyes and made me wish I was wearing some onion goggles – https://amzn.to/2P7PHb7
Check out my homemade teriyaki sauce recipe here – https://youtu.be/HDdkUh5khVc
Would you like a list of some of my favorite kitchen tools, ingredients and gadgets? Click here – https://www.amazon.com/shop/bestbitesforever
Please enjoy this video tutorial before you get started :)
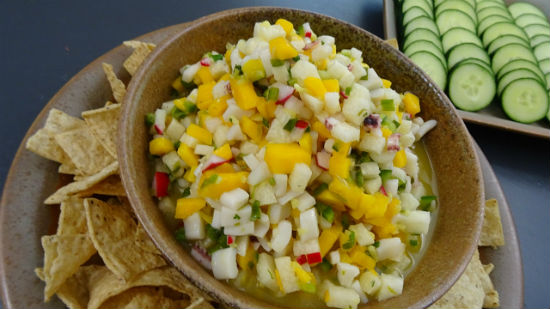
Asian Inspired Ceviche

I made this Asian inspired ceviche for a friend’s health and wellness party recently. In it, sweet and tangy mangoes combine with crunchy jicama in the ginger infused orange and lime juices. It’s an explosion of flavors – yum! Check out the video for a how-to tutorial and lots more info including some cool nutrition facts.
Ceviche Ingredients
2 mangoes, diced
1 pound of jicama, diced
2 inch segment of Daikon Radish, diced
3 red radishes, diced
zest from 1 lime
6 green onions, thinly sliced
1/4 – 1/2 cup ginger, minced (I used 1/2 cup – see video)
2 -3 shishito peppers, diced
1 jalapeño pepper, diced
1 pound calamari, chopped
1 Tablespoon chopped cilantro
1 cup fresh lime juice
1 cup orange juice
1 teaspoon Kosher Salt
1/2 teaspoon black pepper
2 Tablespoons rice wine vinegar
1/2 teaspoon sugar
Start by cooking your calamari/squid in boiling water for 3 minutes. Drain and place in an ice bath to stop the cooking. Next, combine all ingredients in a large bowl and stir. In order to let the flavors come out and combine properly, do not serve for at least 3 hours. Keep chilled. Please enjoy the video tutorial below :)
Asian Inspired Ceviche Video
Bacalaitos

This recipe for bacalaitos is from my Father in Laws brother in Puerto Rico…my Uncle in Law :) His bacalaito recipe is the best I’ve ever had so I know that you will love it. I do suggest watching my YouTube video “How to Make Bacalaitos – Puerto Rican Cod Fish Fritters” before you begin because it will make some of the directions more clear. I will leave a link below the recipe.
Ingredients
1/4 pound bacalao
DRY
2 cups flour
1/2 – 1 package sazzon
1/2 teaspoon baking powder (1 teaspoon if you like them fluffy)
2 teaspoons Kosher Salt
WET
8 leaves recao, chopped
2 Tablespoons garlic, minced
1/2 white onion, chopped
4-6 black peppercorns
2 cups of water (added 1/3 at a time)
1. Prepare the fish by soaking overnight (change the water 2-3 times). Keep the fish refrigerated during this. Next, simmer the fish for 15 minutes and then “flake it” and set it to the side.
2. In a medium sized bowl combine the dry ingredients and set them to the side.
3. Starting with the peppercorns, smash your wet ingredients in a pilón – a mortar and pestle :) until they are well combined – be sure to chop or mince them first according to the list above.
4. Add the wet ingredients into the dry ingredients and stir them to combine.
5. Add the water 1/3 at a time until you reach the desired consistency.
6. Use a measuring cup to prepare the bacalaito batter for the oil. To do this, add a small amount of batter into the cup measure, then add a bit of fish and then cover with the batter. Pour into the hot oil. Turn the bacalaito over once during cooking and drain well before serving. You could also use a ladle to prepare the batter for the oil. Doing this way insures that there is fish in each bacalaito.
Link to the YouTube video
https://youtu.be/u125GTW_IAg
Fried Pickles

Fried Pickles – (recipe and video tutorial follow) – About a year ago, I tried my first fried pickle. My husband had went out to this restaurant for a work meeting that day and brought home his left overs. He was super excited and said “you’ve got to try these, they are so good!” So I was like OK, I like trying new things and I took a big ole’ bite of my first fried pickle. And, it was delicious. A couple of bites in though, it was a little too spicy for me (yes, I’m a baby when it comes to spicy stuff). So, I decided to make my own recipe that would be more to my taste. Of course I didn’t want to totally get rid of the spiciness (my husband and kids love spicy), but I just wanted to be able to get through a whole pickle without my mouth feeling like it was on total fire. Also, we decided that we wanted to make our pickles two different ways, regular (like the restaurant served), and extra crunchy. Here is the recipe that I came up with – it works for both the regular (a little crisp) fried pickles and the crunchy fried pickles. If you want regular crispiness, stop where it says to in step five. Also, if you would like to have your pickles a little more spicy, you can adjust the cayenne in the Cajun Seasoning. I would try them this way first though so that you have a gauge of how spicy they already are. Also, I love these served with Thousand Island Dressing or Ketchup. You can also dip them in Ranch, but I think it’s a little overpowering for this recipe – do what you like best though, you’re the one eating it :)
Ingredients
1 cup A.P. Flour
3/4 cup cornstarch
3 Tablespoons Cajun Seasoning (*recipe follows)
3 eggs
1 cup milk
2 cups panko bread crumbs (if making extra crunchy)
20 pickle spears (refrigerated are best)
Instructions for Fried Pickles
1. Drain your pickles. It is easiest to do this by lining a sheet pan with paper towels and placing the pickles on the paper towels.
2. In a dish large enough to dip your pickles easily (I use an 8 x 8 baking dish) mix your flour, cornstarch and Cajun Seasonings. Stir them up well to combine evenly.
3. In a separate bowl, also big enough to dip your pickles easily, whisk your eggs and milk together (you can use a fork if you want to, no big deal).
4. On a plate, lay out the 2 cups of panko (again, if making the extra crunchy).
5. Working one pickle at a time, start by rolling your pickle in the flour mixture. From there, dip the pickle
into the egg mixture, then back into the flour mixture. Stop here and fry them if you want them to be “regular crispy”, otherwise ……… then, one more time into the egg mixture and finally, roll the pickle in the panko. To get the panko to stick better, gently press down on it as you bread your pickle.
6. Carefully place the pickles into your hot frying oil. The oil should be between 350°F and 375°F. The best way to tell if your oil is at the right temperature is to look for the bubbles. When you add a pickle, you should get lots of bubbles all around it. If your oil ever starts smoking, turn off the heat and wait for it to cool before you continue or you will have burned fried pickles and possibly a fire.
7. Fry until golden brown. This will only take a couple of minutes.
8. Enjoy with your favorite dip – we like to use thousand island dressing!
*Cajun Seasoning Blend
 Ingredients
(feel free to adjust these to your taste, especially the cayenne)
3 Tablespoons paprika
2 teaspoons cayenne pepper (double this if you like spicy)
1 teaspoon black pepper
1 teaspoon white pepper
1 Tablespoon oregano
2 Tablespoon + 1 teaspoon Kosher Salt
1 teaspoon garlic powder
1 teaspoon onion powder
2 teaspoons celery salt
1 teaspoon dry mustard
1 teaspoon thyme
Instructions
1. Mix all of the ingredients together in a small bowl. Stir them until they are well combined.
Store this spice mixture in an airtight container so it’s ready to use anytime. This Seasoning blend is not only great in this recipe, but is also yummy sprinkled on fish, chicken or beef :). I especially like grilled Cajun Chicken!
Alcapurrias

Alcapurrias – (alcapurrias recipe and video follow) – OK, I have been getting a lot of requests for this one so I’m going to do it….. although I was totally going to do it anyway :) because I love alcapurrias. This is yet another one of those delicious Puerto Rican foods that I am hopelessly addicted to. I think one of the things that I really love about them is all of the memories that I have associated with them. My awesome mother-in-law makes them every Christmas and then at some of the random family gatherings too. When we show up at the house, we are always welcomed by Salsa Music and the smell of Puerto Rican food. Sometimes my father-in-law, Carlos, is even playing along to the music on his Congas. If you get the smell of the alcapurrias and the sound of the Congas together, you know it’s going to be an extra special night full of remanissing about the island and looking at pictures because they are in “island mode”- I love it! Anyway, I always head straight for the kitchen – that’s where you generally find everybody (there and the pool if it’s hot out). But either way, Mirta (my mother-in-law) is always in the kitchen cooking up something amazing. I love to help her because one, I love to cook, and two, because whoever is in the kitchen helping gets to snack on the food while we cook. And this is super important if you want to actually get to eat one of the alcapurrias because they go FAST. Yes, she makes enough for everyone. But the alcapurrias never make it to the dinner table – or really to a plate of any sort. It’s more like as they finish cooking, one by one they are handed out on napkins and eaten. Come to think of it, I don’t think I’ve ever been there and seen a stack of them on a plate. They are always taken as they cook. It’s funny too, well, and a little sad because there is always someone who shows up in the kitchen too late to find that the last one has been eaten and no one saved them one. So sad. But, I digress. Anyway, for this recipe I’m going to give you a few choices of how to flavor your masa. I like mine all of these ways but usually do them the “au natural” way – my husband loves them like this because it “tastes like Puerto Rico” to him – of course, I agree.

Yield 18-20 large alcapurrias
(you can easily cut this recipe in half if you want)
Ingredients for the Masa
3 pounds tarro root
1 1/2 pounds yucca
2 green plantains
2 teaspoons Kosher Salt
Choice of one of these ways to flavor the masa
1/4 cup annoto oil (achoite oil)
optional 2 teaspoons coriander
or
1/4 cup olive oil
1-2 packages of sazzon 
or
1/4 cup olive oil
2 teaspoons coriander
2 teaspoons cumin
2 teaspoons paprika
2 teaspoons garlic powder
For the Filling
1/2 cup of raisins soaked in rum for 2-3 hours
1 cup sofrito (the fresh one that I make)
1/4 pound ground pork
1 1/2 pounds ground beef
1 ounce tocino
1 teaspoon Kosher salt
1/4 teaspoon pepper
1 teaspoon oregano
10 olives, minced
1 teaspoon capers (optional)
Instructions
1. Start with the tarro root. Slice off both ends and peel it. Place it into a large bowl of cool, salted water. This will keep it from discoloring. Next, slice off both ends of the yucca. Cut it long ways down the middle and then remove the stem/root thing that grows down the middle (see video). Place the yucca in the bowl with the tarro root. Lastly, peel the plantain. It is easiest to do this by cutting off both ends and then making a cut down the peel long ways and pulling the peel off.
2. Next, use the small side of a box grater to grate the taro root, the yucca, and the plantain. As you grate them, put them into a bowl with a piece of plastic wrap directly on top. Again, to keep them from discoloring.
3. Add the flavorings that you choose to the masa. Mix the masa until all of the ingredients are well combined. I use my hands to do this.
4. Cover the masa first with a piece of plastic wrap directly on top, and then another to cover the bowl. This will help prevent it from picking up any “refrigerator tastes”. Allow the masa to set up in the refrigerator for at least 2 hours. If you can do it overnight, it is better. Allowing it to set makes it easier to work with. Also, remember that your raisins (for the filling) need to soak in rum for at least 2 hours. They can soak longer, no problem.
5. Now it is time to make the meat filling. Start off with a little olive oil in the pan and turn your heat on medium high. Saute the sofrito in the olive oil with a little bit of Kosher Salt and pepper. Add all of the meats. Sprinkle with a little Kosher Salt and pepper. When the meat starts to turn brown with still a little pink (when it’s parcooked), add the oregano, olives, raisins and capers if you’re using them. Continue cooking the filling until the meat is done.
6. To fill the alcapurrias, flatten a small amount of the masa in your hand. Relax your fingers so that they form a cup/bowl for the filling. Place the filling in the middle of the masa. Fold it over kind of like a clam and seal “the clam” closed (see video). Roll it around gently in your hand and repair any holes with additional masa.
7. At this point, you can freeze your alcapurrias for later. If you don’t want to freeze them, it is time to fry them.
8. You can use a deep fryer or a deep pan on the stove. I use canola oil to fry mine and I fill the pan so that the oil will go just past half way up the alcapurria. The oil should be around 350°F for a fresh alcapurria and around 325°F if you froze your alcapurrias.
9. Cook them until they are golden brown on all sides rotating as necessary. Remove the alcapurrias from the oil and place them on a sheet pan or plate lined with paper towels to drain the excess oil. Immediatly sprinkle them with iodized salt.
10. Let them cool for a few minutes – they will be HOT. Now it’s finally time to enjoy your delicious alcapurrias!
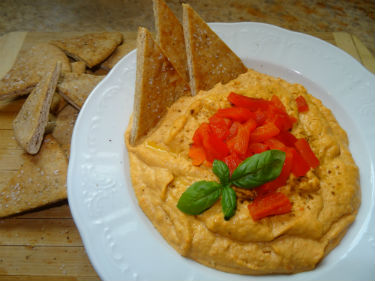
Roasted Red Pepper Hummus

Roasted Red Pepper Hummus Recipe – Hummus is such and easy thing to make at home and much more cost effective too. Plus, you don’t have to eat any preservatives which is always nice ;). I have a lot of nutritional information on my other hummus recipe as well as instructions to use dry chick peas if you don’t want to use canned. I hope that you give this roasted red pepper hummus a try, it’s super yummy!
 Ingredients
2 red bell peppers (reserve some for garnish)
1 can chick peas
1 teaspoon Kosher Salt
1/2 cup tahini paste
1 teaspoon cumin
1 Tablespoon garlic, minced
1/4 cup dry white wine (like Pinot Grigio)
OR
2 teaspoons lemon juice (do this to taste, this is a guideline)
1/2 teaspoon pepper (optional)
Instructions
1. Begin by roasting your bell peppers. You can do this by placing them on a sheet pan (cookie sheet) on the top shelf under the broiler in your oven. You can also place them on a grill. Rotate them as the sides blacken. It takes around one minute for this to happen. Once all of the sides are black, place the peppers into a metal or glass bowl and cover it with plastic wrap. Set this to the side and allow the peppers to steam for at least 15 minutes.
2. Once the peppers have steamed (and cooled a bit), peel them. Then deseed and destem them.
3. Dice one side of 1 pepper and set it to the side for garnish. The rest of the pepper pieces will be going into the food processor.
4. Add the remaining ingredients into your food processor along with the bell peppers (reserving the ones you diced for garnish). Pulse them a few times and then turn the food processor on for about one minute. Stop and scrape the sides and bottom of the bowl to make sure that you don’t have any chunks stuck to them. Also, taste the hummus for seasoning (salt and pepper), and make adjustments as necessary. Turn the machine on for 2-3 more minutes until you have the desired consistancy. Place the hummus in an airtight container with a layer of plastic wrap placed directly on the top. This will help prevent the top layer from drying out. Place in the refrigerator and allow to set for at least 3 hours to let the flavors develop.
5. When you are ready to serve your hummus. Pour your hummus into a serving bowl and lightly spray or brush the top with olive oil. This will prevent it from drying out on top and looking yucky. I like to use a 100% olive oil spray for this.
6. Garnish with a sprinkle of cumin and the bell peppers that you diced up. I also like to put a little sprig of basil in it just for a little added color – it makes the hummus look prettier :).
Goat Cheese Tartelettes with Fresh Fig Compote

Goat Cheese Tarts with Fresh Fig Compote – (recipe and video tutorial follow) – So, I’m nineteen weeks pregnant now and the cravings are going strong – lucky for you :). That means I’m in the kitchen making stuff that I don’t make on a regular basis, but more for special occasions. After all, twenty four goat cheese tarts is hardly good to put out at the dinner table for the kids. Although, now that I think about it, they may like the idea, they did destroy them pretty quickly. Anyway, this is a great dish to make as an appetizer for parties or to put out on the buffet. It can also be served as dessert and you can change the topping to anything that you want – ah, so versatile. They can be made ahead of time and they are delicious at room temperature. They are a little time consuming to make (this recipe will probably take you 45 minutes to an hour if you don’t recruit help), but very well worth it.
Ingredients for tart shell
1 1/2 cups A.P. Flour 
3 Tablespoons sugar
1/2 teaspoon Kosher Salt
10 Tablespoons butter (cold)
3 Tablespoons ice water
Ingredients for Fig Compote
6 figs
1/2 cup dry red wine
4 Tablespoons brown sugar
2 Tablespoons Balsamic Vinegar
Ingredients for Tart Filling
4 ounces cream cheese (room temperature)
4 ounces goat cheese (room temperature) 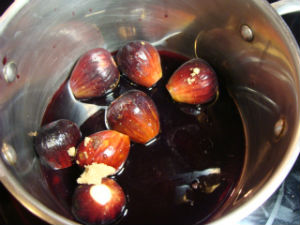
2 Tablespoons honey
1/8 teaspoon salt
2 eggs
Instructions for tart shells
1. Place your flour, sugar and salt into the bowl of a food processer. If you don’t have a food processer, you can do this by hand. Pulse/stir the ingredients to mix them evenly.
2. Add the butter and pulse a few times. If you are doing this by hand, use a fork or pastry cutter to incorporate the butter. You are looking for a texture that is similar to cornmeal with a small chunks of butter. When you have the correct texture…..
3. Add the water. I start by adding about three tablespoons and pulsing/stirring to combine. If the dough doesn’t come together into a ball, add the last tablespoon of water and stir/pulse. You should not need more then 1/4 cup (four tablespoons). 
4. Wrap the dough in plastic wrap and refrigerate for one hour. If you absolutely do not have time to do this, you can skip this step, but the shells will come out better and the dough will be easier to work with if you refrigerate it. Also, I like to double wrap mine so it doesn’t pick up any flavors from the fridge.
5. Remove the dough from the refrigerator, and unwrap it. Divide your dough ball into four equal pieces. Working with one piece at a time, roll the first piece into a “dough snake” (see video).
6. Divide your dough snake into 6 equal pieces by first cutting it in half and then cutting each half into thirds.
7. Working with one piece at a time roll the first piece into a ball. Then, mash that ball into a circle about 1/4 inch thick. This will be your mini-tart crust. Transfer the crust to the mini-muffin pan and shape it into one of the holes. Make sure that the dough is touching the bottom and the sides. Repeat steps five through seven with the remaining dough.
8. Once you have your mini-muffin pan completely full, dock all of the crusts. This means that you poke small holes in the crusts with a fork. Doing so helps keep the crust from getting bubbles in the oven.
9. Bake the crusts for ten minutes at 350°F. Remove from the oven and allow to cool. While your crusts are baking, you can start your fig compote – just set a timer so that you don’t forget about them :)
 Instructions for Fig Compote
1. Wash your figs.
2. Trim the tip of the stem end off of the figs.
3. Place figs in a sauce pan and add the wine, brown sugar, and the balsamic vinegar.
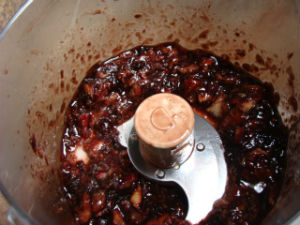
4. Place on high heat and bring to a boil. As soon as it starts to boil, reduce the heat to a light simmer. Allow the figs to simmer for about twenty minutes. Make sure you stir it every few minutes and watch the liquid. It should thicken into a syrup, when it does, it is done. You do not want all of your liquid to evaporate, so make sure to watch the figs and check on them every few minutes. Also, I use a high heat rubber spatula when I make this, that way I can scrape the bottom and sides well when I stir. Also, if your haven’t checked your tart shells, check them, they’re probably done :) While the fig compote is cooking, you can make your filling.
Instructions for The Filling 
1. Allow your ingredients to come up to room temperature. Then, cream the goat cheese and the cream cheese together. You do not have to get rid of every chunk at this point because you will be mixing after each additional ingredient.
2. Once you’ve gotten most of the chunks out, scrape the bottom and the sides of the bowl with a rubber spatula and then add the honey and salt. Mix until well combined. Scraping your bowl ensures that you will have a nice even texture in the tartelettes when they’re all done.
3. After the honey is mixed in well, scrape the bottom and sides of your bowl and then, add the eggs. Mix the eggs until combined. Scrape the bowl one more time making sure to get the sides and bottom. Then give your batter one final mix. You should mix it until it has a smooth even texture – you may still see a few cottage cheese size chunks, and that is OK.
4. Transfer your filling into a measuring cup or whatever you may have that is easy to pour out of.
 To Assemble Your Tarts
1. Pour the filling into the cooled tart shells. I like to pour some into each one before filling them all completely to ensure that I have enough batter and that they’re evenly filled.
2. Bake them at 350°F for about ten minutes until the middle is just set. This means that the middle should still jiggle a little when you shake the pan. If you over cook them, they will crack and they will have a drier feel to them.
3. Allow your tarts to cool and serve. You can either serve the compote on the side, or you can spoon a little on the tops. It is also pretty to put a little on the plate around the tarts :).
Enjoy!
Please enjoy this video tutorial!
Roasted Red Pepper Cheesecake

Roasted Red Pepper Cheesecake – (recipe with video tutorial follow) – If you’ve never had a savory cheesecake, let me tell you that you are in for a real treat! Oh, maybe I should explain what a savory cheesecake is. Well, a savory cheesecake is one that is not sweet. Sweet and savory are kind of like opposites. So, a sweet cheesecake would be served for dessert, and a savory cheesecake, saaaaay like a roasted red pepper cheesecake, would be served as an appetizer. We have some friends coming over this weekend and we’re going to go hiking and then grill some burgers, so I thought that this would be a great appetizer served with some crostini and and maybe some vegetables or crackers, or…maybe all three. And then, after I started thinking about what a great appetizer this was going to make to go with the burgers, I started thinking about the burgers. You should know at this point that one of the people coming over, my friend April, loves to have sauteed peppers and onions on her burger. So, I started thinking about April’s burger specifically – which kind of inspired me for how my burger is going to go down this weekend. It’s going to be the burger topped with a thin slice of the roasted red bell pepper cheesecake and maybe some bacon – oooo and some basil – oh yeah, we’re getting there now! Doesn’t that sound so good? I think so anyway. I’m like sitting here craving it and I haven’t even tried it yet. What was my point? Oh, my point is that not only does this make a great burger topping – aaaaa, I mean appetizer, but I think you could get creative with it. So like you could serve it as an appetizer, and then you could take any of the left over – assuming that there is left-over (you can always stash some early) and use it on hamburgers, or on sandwiches, or stuff it into a pita with some chicken and heat it up. Oh my yummy, I mean seriously. How good would a turkey, bacon sandwich be toasted with a slice of melty roasted red pepper cheesecake on top? Dude that sounds so good! So, I know what is going to happen if we have any left overs. The cheesecake serves around 18-20 people (as long as you don’t have a 16 year old eating machine running around like I do) and 12 of us are eating, so I have a good sporting chance at my sandwich dreams. It’s cool either way because I love this just as it is, served as an appetizer, I was just saying.
Ingredients
1 pound cream cheese
8 ounces goat cheese (I used Laura Chenel)
4 eggs
2 garlic cloves, minced
1 1/2 teaspoons Kosher salt
3/4 teaspoon black pepper, fresh ground if possible
1/2 teaspoon thyme (dried, ground)
*if you use fresh thyme, you’ll need 1 1/2 teaspoons
2 teaspoons sugar
1/4 c green onions, sliced thin (green parts only)
1 1/2 cups roasted red peppers, diced (about 4 peppers) 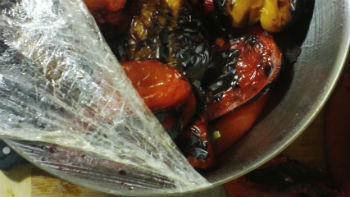
*please see my recipe and video tutorial of “How to Roast a Bell Pepper” if you don’t know how to roast your own bell peppers. You can also buy them in jars at the store, but you can roast your own at home for a fraction of the cost and they’re fresh and yummy!
For the Crostini
French Bread
Olive Oil
Kosher Salt
pepper
Instructions
1. Place the cream cheese into a large bowl and cream it for about one minute. Scrape the sides and bottom of the bowl with a rubber spatula (and your beaters or paddle attachment). 
2. Add the goat cheese into the cream cheese and mix them (with a mixer- either hand held or a stand mixer) until they are well combined and have an even consistency. Scrape your bowl with a rubber spatula again. Doing this helps to make sure you don’t end up with clumps of cream cheese or goat cheese in the end and also helps to ensure that you have a smoother texture when your cheesecake is all done.
3. Add the first two eggs and mix until combined. Then add the other two eggs and mix until well combined. Scrape the bowl again. Then mix again just to get rid of most of the chunks. You may still have a few little chunks in there, but don’t worry about them.
4. Add the garlic, Kosher salt, pepper, thyme, green onions and bell peppers to the cream cheese/goat cheese mixture. Stir these in by hand using your rubber spatula. 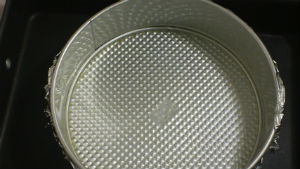
5. Line the outside of a ten inch spring-form pan with aluminum foil. Then place that pan into a larger roasting pan or large casserole dish. We will be cooking this in a water bath, so you need the larger pan.
6. Spray the inside of your spring-form pan with cooking spray.
7. Pour the red pepper cheesecake batter into the spring-form pan. Then add some water to the roasting pan – try to get the water even with the top of the red pepper cheesecake. However, if it starts floating around a lot, stop adding water because it will end up floating instead of being in the water bath where we want it.
8. Bake the cheesecake at 350°F for about 30 minutes – until the center is just set. If you over-bake it, it may get cracks. Remove the cheesecake from the water-bath – you can also remove the foil.
9. Allow the red pepper cheesecake to cool for about one hour and then place it in the refrigerator. If you place it into the refrigerator too soon, it will likely crack. So, be patient and let it cool.
10. Leave it in the refrigerator for at least five hours – overnight is better, to allow it to set up. 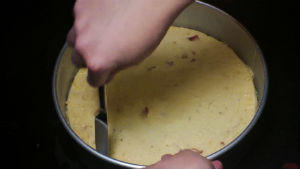
11. Once your cheesecake is totally set-up, run a knife around the edges and remove the outside of the spring-form pan.
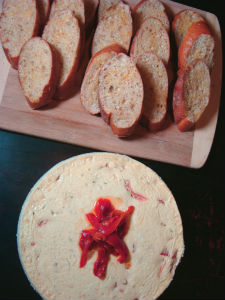
12. Garnish your beautiful cheesecake with some extra roasted red bell peppers and serve. I served mine with some french bread crostini on the side – so very delicious! Enjoy everyone!
**Oh, to make the crostini, slice your french bread about one inch thick, lightly brush it with olive oil and then sprinkle it with the salt and pepper. Bake it in the oven at 350°F for a few minutes until it gets toasty on the outside – you still want it to be soft on the inside. It should take anywhere from four to six minutes. OK, now enjoy :)
Please enjoy this how-to video (coming soon) for making Roasted Red Pepper Cheesecake!
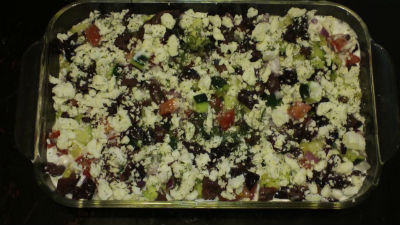
7 Layer Dip – Greek Style!

7 Layer Dip (7 layer dip recipe with instructions and video tutorial follow) – 7 Layer dip is one of those things that you find at like every get together you go to right? So, how about we put a fun little spin on it today! I took this over to my in-laws last week for the Fourth of July party and it was a super big hit. Everyone sat at the table ignoring the regular favorites like the french onion dip and the chips and salsa – not that it’s a competition, but if it were, the Greek Dip would have taken first place in the great chip and dip race to the empty bowl race thing :D! I also managed to smuggle a little into a to-go because I wanted to try it as a topping on a steak sandwich but I didn’t want to show up with an appetizer that was already eaten from. Yes, I know that it’s also tacky to take a to-go of the thing you brought, but only if someone sees you right? Plus, I really wanted to try it with the steak and, it was worth it. The point is that not only does this make a great dip, but, if you do have any left over, you have a sandwich for the next day. Just add steak or chicken or whatever and stick it in a pita or on some yummy French Bread. It’s sooooo very good!
Ingredients
2-3 cups Hummus
12 ounces Greek Yogurt, the plain kind (no vanilla or strawberry – ewww, funky dip :D)
1 whole tomato, diced
1 whole cucumber, diced
1 cup olives, chopped
2 oounes feta
1/4 cup red onion, chopped fine
1 teaspoon dried dill or 1 Tablespoon of fresh
Instructions
1. Spread the hummus into the bottom of a 7×11 inch pan. You can use store bought or follow the link to my recipe (it makes the perfect amount to make the dip so you don’t end up with a tiny container in the back of the refrigerator filled with three spoons of hummus that you’ll find in a month when it’s no longer identifiable. That happens to you sometimes too, right?
2. Spread a layer of the yogurt onto the hummus.
3. You can do this in any order depending on the colors you want on top, but I did a layer of cucumber, then tomato, olives, feta, onion then dill, you can also mix it all together in a separate bowl first and then put it on top. The other thing I did, is after I added my cucumber and tomato, I pushed down on them a little so when people dip or scoop, the toppings don’t all go jumping all over the place – ahhhhhh – tomato overboard, quick form a rescue squad – ahmmm no, not so much.
I served this with warm pita chips. You make these by starting with pita bread, lightly brush it with olive oil, sprinkle with salt and pepper and baking at 400°F until warm - three minutes or so will do it. Again, you can go to my hummus recipe for a more detailed recipe on the pita chips if you’d like.
Please enjoy this “how-to” video!
The Best Eggplant Caponata Ever

Eggplant Caponata – (recipe and instructions with video tutorial follow) – Eggplant caponata is one of my favorite summertime dishes. It is perfect for picnics, potlucks, and really any get together because it can be made ahead of time and is served at room temperature. Here are a few helpful hints for your eggplant caponata success. First of all, eggplant is in season during the months of July – October (in most areas). That means that this is when they taste the best. Choose an eggplant that is firm to the touch, and has a smooth, shiny skin. Avoid buying eggplants with brown or soft spots. You should also know that eggplant absorbs oil (and other liquids) fairly quickly and easily. That is why, for this recipe, I decided to add it in a little later – I wanted the liquid it was going to absorb to have lots of flavor. Also, I don’t peel my eggplant for this dish. You will find a lot of recipes that instruct you to peel the eggplant, or to cover it in salt and squish it to get the liquid out then rinse it (often done for frying and even then, generally not necessary). Don’t do any of those things when you make this. Just dice the eggplant and add it to the pan. Nothing complicated. I should note though that if you dice your eggplant ahead of time, it will start to oxidize (get brown spots), just like an apple does when you cut it and don’t eat it right away. If you get a few spots from cutting it too early, don’t worry about it, you won’t be able to tell in the finished dish. There are lots of varieties of eggplants and they range in color from white to a beautiful deep purple. In this case, I used a deep purple eggplant known as black beauty. What else, what else? Oh, eggplants and aluminum are not really friends and if you cook an eggplant in an aluminum pan, it will discolor it. It’s OK of course if the pan is lined on the outside with aluminum or if the interior layer of the pan has aluminum, I’m talking about if the part touching the eggplant is aluminum-it will discolor it. Sometimes, this does not matter at all though and there are lots of recipes out there where you wrap the eggplant in aluminum foil and grill or roast it. In other words, it’s not necessarily a big deal anyway, I just thought I’d let you know for future reference. And last but not least, here are a few extra facts that you can share to look super smart at the dinner table. Eggplant is part of the nightshade family (genus Solanum (tomatoes and potatoes are also classified in this genus) and although it is treated like a veggie, it is in fact a fruit – a berry to be exact and it is native to India. Pretty cool huh?
 Ingredients
1/2 cup olive oil
1 yellow onion, diced
2 ribs celery, sliced 1/4 inch thick
1 carrot, sliced 1/4 inch thick
1/2 cup golden raisins
10 green olives, minced
1 Tablespoon capers
1 medium eggplant, medium dice
1/4 teaspoon chili flakes
1/2 teaspoon cinnamon
1/2 teaspoon cocoa powder
1/4 teaspoon thyme, dried ground
1 Tablespoon sugar
3 Tablespoon balsamic vinegar
2 (14.5 ounce) cans diced tomatoes
1 (6 ounce) can tomato paste
Kosher Salt
black pepper
1/2 cup pine nuts
basil for garnish
Instructions
1. In a med pot (mine is 5 qt), heat your olive oil.
2. Add the carrots, celery, and onion, sprinkle with about 1 tsp Kosher salt and 1/2 tsp pepper. Stir and saute for about 5 minutes.
3. Add the raisins, olives, capers, eggplant, and chili flakes. Sprinkle with about 1/2 tsp salt and saute for about another 5 minutes.
4. Add the cinnamon, cocoa powder, thyme, sugar and balsamic vinegar and stir.
5. Add the tomatoes and simmer until the eggplant is done.
6. Add the tomato paste and stir to combine.
7. Simmer for about 10 minutes – the veggies should be getting soft.
8. Taste it and decide if it needs more salt or pepper.
9. Remove it from the heat and add the pine nuts, allow to cool to room temperature.
10. Spoon over crostini (see note) and garnish with fresh basil chiffonade.
*crostini – crostini (plural for crostino in Italian) are small slices of bread that are usually toasted. I personally start with a nice french or Italian Loaf, slice it 1/2 inch thick or so, brush it lightly with olive oil, sprinkle it with Kosher salt and pepper then bake it at 400°F for around 10 minutes – just keep checking them until they’re toasty on the outside and still soft on the inside.
Please enjoy this how-to video!