


Here are some really yummy appetizers! Of course, you don’t have to keep them strictly in the appetizer category. I love some of these recipes just to munch on or even to have as a side dish! The dips can also be used as some really great sandwich spreads. I secretly hope for left-over dips just for that reason. They usually end up getting completely destroyed though so if you want to have some the next day, I suggest having a secret stash :D! There are lots more recipes to come everyone!
Recipes
Goat Cheese Tartelettes with Fig Compote
The Best Eggplant Caponata Ever
Tostones con Salsa de Mojo – Fried Plantains with a Garlic Oil – sort of
Stuffed Mushrooms – (whole wheat)
Rellenos de Papa – Puerto Rican Goodness!
Tostones con Salsa de Mojo – Fried Plantains with a Garlic Oil – sort of

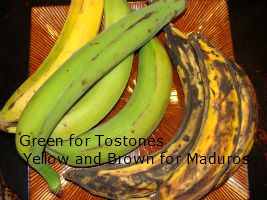
Tostones – Tostones or fried plantains are to Puerto Rican food what french fries are to American food. Wait, wait, wait, I don’t want to offend anyone. I’m not saying that they are the same food, or that they taste the same, just that they are generally served with the same kinds of foods. They are also a tasty replacement for fries in a lot of cases. At home, we eat them with hamburgers, our Cuban sandwiches, pernil, Puerto Rican Rice and Beans, fried eggs, and other stuff too (but do you really want to read a list right now), you get the idea. Here in the states, when I’m at home, I never really eat fast food, but when we go to Puerto Rico, I love to go through McDonald’s because they have tostones – are you listening McDonald’s? Can we get some tostones added to the menu here in AZ :D? Anyway, I think once you try these, you’ll be hooked because they are super delicious. Happy Cooking!
 Ingredients
*There are no measurements for this recipe, just read the explanation for each one and you’ll know how much to use.
green plantains – Each plantain will make four or five tostones, to give you an idea of how many you need – my husband eats like four, my older girls and I eat around three each, the little ones have one or two, and my 16 year old eating machine eats like seven or eight or 15 :) or really until we tell him “chill out on the tostones and save some for everyone else”!
water – Use enough to cover the sliced plantains.
salt – It can be iodized or Kosher salt, but iodized is best to sprinkle on the tostones when they’re done.
garlic, minced – Again, the amount is up to you, I use one garlic clove per plantain.
oil – for frying, I use canola oil which is fairly healthy as far as oil goes, it’s made from canola seed (as if you didn’t know that already :D)
iodized salt – for salting at the end
 Instructions
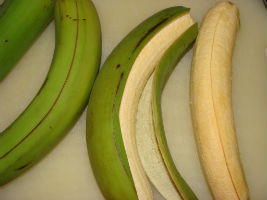
1. Peel the plantains, this can be a little tricky if you’ve never done it before, they do not peel the same as a banana, what you want to do is lay the plantain down on a cutting board, cut off the very top and the very end, then slice down the plantain lengthwise just through the peel, then use your fingers to kind of pull the peel away.
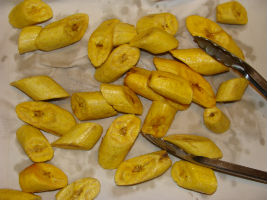
2. Slice the plantains on a diagonal about one inch thick, (you should get four or five slices) it is important to slice them on a diagonal because you will be mashing them later and it will make it easier. 
 3. Place the plantains into a large bowl and cover them with salt water – how salty should your water be? Well, you want it to taste like the ocean (see my salt article), then add the garlic cloves and stir them around a little, instead of making your salt water separately, you can also just add the water, salt and garlic right on top of the plantains and hope for the best (that’s what I do) – but if it’s your first time making this, I recommend making the water separate so that you have a good idea of how much salt to add next time
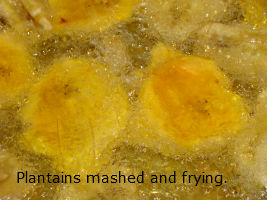 .
.
4. Let them soak for 15 minutes.
5. Drain them and dry them well-SAVE THE WATER-I do this by taking them out with tongs and putting them on a sheet pan lined with a cloth napkin, I then use another cloth napkin to dry them, remember, you are going to be frying these and water and oil are not friends, the water will make your oil pop out at you – aaaahhhhhh, and it will also make the oil break down faster.
6. Fry in the canola oil, heated to 350°F, for about seven minutes, if you don’t have a thermometer, look for the plantains to get bubbles all around them when you add them to the oil, they should also make that Kssssshhhhhh frying sound when you put them in, if your oil starts to smoke at all, it is way to hot, turn off the heat and let it cool off, do not move the pan unless you absolutely have to, if you are deep frying, you don’t have to mess with them while they’re frying, if you are pan frying them (they should still be covered in oil), turn them over half way through the frying time (it’s easier to use tongs then a spoon for this).
7. Remove them from the oil and place them on either absorbent paper towels, or a cloth napkin, I like to use a cloth napkins because some paper towel brands stick to the plantains.
8. OK, this is the mashing step, you can do this a few different ways, you can either place the plantains into a tostonera and close it which is the easiest way and the way I do it, if you do not have a tostonera though, you can use a paper bag, just place the paper bag on a flat surface, lay the plantain on top, fold the bag over it and push down at an angle with the heel of your hand, you can also use a cloth napkin in the same way, I have also seen this done using two plates but I think that way seemed the most difficult. If you are not using a tostonera, make sure you are super careful because they are hot, don’t forget, they were just in hot, hot oil. You can let them cool down for a few minutes if you want, it won’t hurt anything. 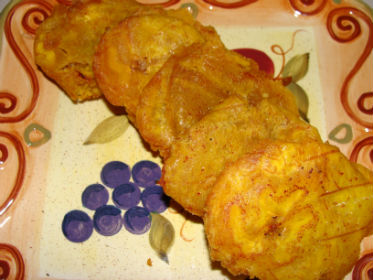 9. Dip them in the salt/garlic water that you saved, dip quickly, not like you would do a cookie into milk but like a fast dip.
10. Dry them off really good again like we did in step five.
11. Return them to the cooking oil, this time you want your oil at 375°F.
12. Cook them until they are crisp and golden, remove them from the oil and sprinkle them lightly with iodized salt, iodized is better for fried foods, again, if you haven’t read my salt article, now’s as good a time as any.
13. Garnish with mojo (my favorite), or hot sauce or ketchup and enjoy!
Mojo Sauce – Mojo is the delicious sauce that you put on top of the tostones. There are lots of different versions, the most important things to have in there are the oil and the garlic. I think beyond that you can use your imagination. I have tried adding cilantro, lime juice, orange juice, and olives just give you a few ideas. Here is the way I make it most often. This makes enough for around 20 tostones, depending on how much you use.
 Ingredients for Mojo
1 teaspoon red wine vinegar
1/2 cup olive oil
15 cloves of garlic, minced
1/2 teaspoon Kosher salt
1 teaspoon oregano dry or 1 Tbsp fresh oregano
Instructions for Mojo
1. Place the vinegar into a small mixing bowl.
2. Slowly drizzle in the olive oil while whisking.
3. Add the garlic, salt and oregano and stir.
4. Garnish your tostones and enjoy!
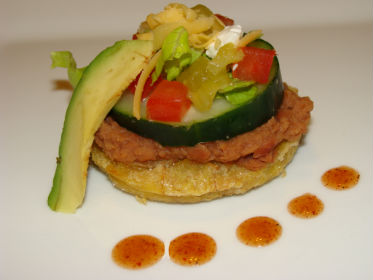
*Just as a kind of little end note here, tostones make great bottoms to appetizers, I like to put “taco toppings” on them, but stack them nice and pretty. You can use them in place of crackers, or bread in your favorite tapa or canape recipes too.
**Also, you can make extra of these and freeze them, just do steps 1-10 and then freeze them individually. When you are ready to eat them you can put them into the hot oil (still frozen) and just continue with step 11.
Please Enjoy this How-To Video!
Do you want more info on the health benefits of Canola Oil?
Caramelized Onion Dip

Caramelized Onion Dip- I think that just about every get together/party or whatever that I have ever been to had some kind of chip dip. Usually in the form of some type of dried soup mix or dressing powder dumped into a tub of sour cream. Admittedly, it’s not too bad. However, I think we can do better. So I came up with a pretty simple recipe. It takes a little time because of caramelizing the onions, but it’s still an easy recipe. Plus, it’s delicious. My husband is so funny, because when I asked him what he thought, he said “It tastes like a chef made onion dip”. And I said back “one did :D” . Then he said, “People will have to get used to it, it doesn’t taste like it’s been processed with chemicals. It’s better though”. I guess it may be one of those you had to be there moments because it’s not as funny typed out :)! Anyway, this is definitely better the next day so try to make it in advance. That way the flavors can develop. If you can’t make it the day before, at least give it a few hours before you serve it. Also, if you’re one of those people that’s grossed out by double dipping (like I am), I would suggest either providing the little disposable plastic cups next to the dip so people can make their own little personal cups, or dividing it into three or four serving dishes and putting out one at a time. Only putting out a little at a time is always a good idea anyway when you have something that should be kept cold. It looks prettier to have a full dish all the time too ;)! Enjoy everyone and Happy Cooking!
Ingredients
1 onion, diced -I ended up with around 2 cups diced (I used a brown onion, yellow would be good too)
1 teaspoon olive oil
dash pepper
1 teaspoon Kosher salt
4 garlic cloves, minced
1 cup mayo (you can replace this with yogurt if you’d like to stay super low fat)
2 cups yogurt, plain, fat free
1/4 cup green onions, sliced fine, green parts only
1/2 teaspoon thyme
Instructions
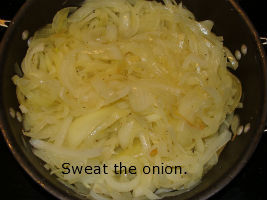
1. In a medium saute pan, add the olive oil, onions, dash of pepper and Kosher salt.
2. Caramelize your onions. If you are unsure of the best way to caramelize your onions, please check out my article “How to Caramelize Onions“.
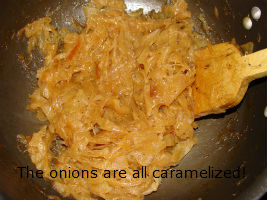
3. When you reach the step in caramelizing your onions that you turn the heat down, add your garlic and stir it up.
4. In a bowl, combine your mayonnaise, yogurt, green onions, and thyme. Cover and put in the fridge until your onions are ready.
5. After your onions are nice and caramelized, remove them from the heat.
6. Spread your onions onto a plate to help them cool faster.
7. Add your cooled onions into the yogurt/mayo mixture and stir.
8. Cover your dip and put it back in the fridge. It is best to make it the day before you plan on serving it, if you don’t have the time to make it a day ahead, it should be made at least two to three hours in advance. This is because the flavor gets better if you let it set for a while.
9. Serve with your choice of chips, or veggies (this is a really healthy veggie dip if you replace the mayo with yogurt). I served mine with Chips (Kettle Brand Sea Salt) and Veggie Straws.
yield – 3 1/2 c

Stuffed Mushrooms – (whole wheat)
")
Stuffed Mushrooms – If you ever need a really easy appetizer that everyone will love, this is it! I learned how to make a version of these in Culinary School. This really came in handy, because the owner of the wine bar where I got my first Chef position wanted them on the menu. It was one of the foods on our menu that we almost always sold out of towards the end of the night. From the first time I made stuffed mushrooms, they became one of my “go-to” recipes. Just the other day we went over to a friend’s house for dinner. They never ask us to bring anything, but I generally insist (I don’t want someone else to have all the fun cooking :D). Anyway, they were making steaks and grilled veggies, so I wanted to make something that would compliment the menu that they had planned. Stuffed mushrooms go great with steak as an appetizer or as a side (which they ended up being). They are also great for get togethers where you put out a lot of finger foods for people to munch on. Stuffed mushrooms are very versatile and once you are comfortable with the basic recipe, you can start to make other versions on your own, like crab or shrimp stuffed mushrooms-YUMMY! Don’t be afraid to experiment, just add a little of your own special ingredient to the recipe below and have fun! Happy Cooking!
 Ingredients
24 ounces Crimini mushrooms
Kosher salt
2 Tablespoons lemon juice
1 Tablespoon olive oil
1/2 cup shallot
1 teaspoon Kosher Salt
1/4 teaspoon pepper
mushroom stems (from your mushrooms), chopped (I trim the ends if they’re dry or dark brown)
1/4 cup green onions, sliced thin, green part only
2 Tablespoons parsley (flat leaf), chopped lightly 
3 Tablespoons butter (omit this if you are trying to keep it vegan and use extra stock)
1 cup whole wheat Italian bread crumbs (you can use store bought or make your own, recipe follows)
1/4 cup stock, I use beef, but you can use veggie if you want to keep this a vegetarian recipe
2 ounces Gruyère Cheese (you can substitute Swiss or Provolone)
Instructions
1. Wash your mushrooms by putting them in a bowl and covering them with water. Swirl them around a little with your hand and drain them in a colander. Remove the stems and set them to the side.
2. Place the mushrooms into a large pot (I use my 8 quart) and fill with cool water.
3. Add the salt and 2 Tablespoons of lemon juice and turn it on high to bring it to a boil,  when they start to boil, turn off the heat.Llet the mushrooms stay in the water for about 1 minute. Remove them from the water and allow them to drain/cool on a sheet pan – stem side down.
4. In a separate pan, sweat your shallots with the olive oil and a 1 teaspoon of Kosher salt and 1/4 teaspoon pepper.
5. Add the mushroom stems and stir to combine. Continue to cook on medium heat until the mushrooms are soft.
6. Add the green onions, parsley and butter.
7. Once the butter is melted, add the bread crumbs and stir well.
8. Add the stock, stir and remove from the heat.
9. Allow to cool enough for you to handle the stuffing.
10. Stuff about one Tablespoon of the filling into each mushroom.
11. Sprinkle the tops with Gruyère Cheese. 
12. Place under a broiler until the cheese is melted and brown and bubbly-mmmmmmm!
13. Enjoy your mushrooms!!!!!
How to make your own whole wheat bread crumbs :).
Ingredients for Bread Crumbs
8 slices of whole wheat bread
2 Tablespoons olive oil
Kosher Salt
pepper
1 Tablespoon dried oregano
1/4 teaspoon dried thyme
 Instructions
1. Pre-heat your oven to 300°F.
2. Brush the bread lightly with olive oil.
3. Sprinkle it with Kosher salt and pepper.
4. Place in the oven on a sheet pan at 300°F until toasted, about 10 minutes or so.
5. Remove the toast from the oven.
6. Place the toast into a food processor with the dried herbs.
7. Pulse to desired consistency.
8. Store your breadcrumbs in an airtight container for up to one month.
Rellenos de Papa – Puerto Rican Goodness! – Recipe

Rellenos de Papa is a delicious Puerto Rican dish. It translates to stuffed potatoes. This is one of those things that shows up at most family gatherings as an appetizer. It is not really formally served, it’s more like as soon as they come out of the pan, there is someone there waiting with a plate or napkin to take them. Little birds is what I call these people because of my baby girl. She always comes up to me while I’m cooking and opens her mouth and grunts until I give her a bite of something – but in a cute way :). When all of the filling is gone and there are no more potatoes to stuff, there is always one person who comes wandering into the kitchen saying “I smell something good, are you cooking Rellenos de Papa”? Sadly, the answer is “we were”. I know what your thinking. “Why don’t you just make more”. Tried that. We always run out. It’s because they’re awesome :P and warm your tummy :D! So, here’s the recipe, just don’t expect them to make it to the table! Happy Cooking!
 Ingredients for the Meat Filling
1 pound ground beef (I use 93/7, the 93 represents the percentage of meat, and the 7 represents the percentage of fat-the package should be labeled)
2 cups sofrito
2 Tablespoons olive oil
2 teaspoons Kosher salt
1/2 teaspoon pepper
Instructions for the Meat Filling
1. Make your sofrito. Do steps 1-5 for the potatoes now too.
2. Saute the meat in the olive oil with the salt, pepper and sofrito. Just put it in all together and mix it up really good and let it cook until most of the juice is gone and the meat is brown.
3. Drain any excess grease if you didn’t use 93/7 or at least 90/10 meat.
4. Allow to cool and put in a container, put it in the refrigerator while you finish your potatoes. You can also make this ahead of time and keep it in the refrigerator. It will stay good for 4 days, but don’t wait that long because then if you have left over rellenos de papa their meat will only be good for what is left of the 4 days – I hope that makes sense to everyone! :)
Ingredients for the Potatoes

2 pounds potatoes, scrubbed clean
Iodized salt
1 bay leaf
2 teaspoons Kosher salt or more to your taste
3 Tablespoons cornstarch
2 eggs
Instructions for the Potatoes
1. Scrub your potatoes clean.
2. Cut them up into pretty big chunks (I cut mine long ways once and then three times sideways).
3. Put them into a large pot (I use an eight quart) and cover them with water.
4. Add your salt (the iodized-I use 1/4 cup to seven quarts of water) and your bay leaf.
5. Bring the potatoes to a boil.
6. Allow them to cook until they are very soft. If you stab one with a paring knife, it should slide back off. You are looking for the same consistancy as when you make mashed potatoes.
7. Drain the potatoes and spread them on a sheet pan to cool.
8. Put your cooled potatoes into a large bowl.
9. Use a mixer to mash your potatoes, taste them and decide if you want to add the additional salt.
9. Add the eggs and cornstarch and mix well to combine.
10. Get out 3 plates.
11. Line one plate with paper towels or a cloth napkin if you have one, this one is for the cooked rellenos de papa, put it by the stove.
12. Set two plates whereever you will be forming the potato balls. One is to set the rolled potato balls on before cooking, one is to put cornstarch on to dip your hands in.
13. Fill your pan half the height of your potato balls (check out the video) – about 2 inches deep.
14. Put your meat and potatoes by your cornstarch plate.
15. Cover your palms in cornstarch.
16. Spread a small amount of the potato mixture into your palm.
17. Place a spoon of meat into the center.
18. Bring the potato mixture over the meat to cover the filling (again, see video, it’s not hard to do, just hard to explain :D).
19. Fry them at about 375° until they’re golden all over.
Please enjoy this “how-to” video!
Hummus with Warm Pita Chips – Recipe

Hummus with Warm Pita Chips (hummus recipe and video tutorial follow) – Hummus is one of the absolute easiest things in the world to make – if you have a food processor :)! This makes a really great appetizer for a party or for your family. It is also a nice healthy snack. It goes well served with pita chips, or some nice crudite-pronounced crew-di-tay (raw veggies). You can make it a day or two in advance and it will keep in the fridge for about four days after the day you make it. I like to put it on the dining table while I cook dinner for the kids to munch on with crudite. This helps with the “Mom, when’s dinner going to be done” question and also helps to ensure they get a good dose of veggies with their dinner – very important! You will also notice that I use canned chickpeas in this recipe. Using dried ones will provide more nutrition, canned is faster. I included how to prepare the dried chickpeas after the recipe so you have the option to do it either way. I also love to talk to my family about food origin and love the opportunity to teach them about different countries and their food cultures. Hummus comes from the Middle East-there are a few theories about exactly where, but Israelis and Palestinians commonly consume it. Food history is super interesting and I highly recommend checking some out! In the mean time – have some hummus! Happy cooking!
Ingredients
1 can (15 oz) chickpeas/garbanzo beans *see note about using dried chickpeas-much healthier
1/2 cup tahini paste
1-2 cloves garlic (you can adjust the amount according to your own taste)
1 teaspoon cumin
2-3 Tablespoon lemon juice (fresh squeezed if possible)
1 teaspoon salt
Instructions
1. Pour the chickpeas into a strainer and drain and rinse your chickpeas until the bubbles are gone-it is very important to get rid of the bubbles or you’ll give everyone gas *see note on using dried chickpeas.
2. Place the chickpeas into a food processor and puree. If you have time after this step allow to chill one hour (it helps the texture), if you don’t have time, don’t worry, it’s cool, just move onto the next step.
3. Add the tahini paste, garlic, cumin, lemon juice and salt.
4. Puree to desired consistency-if it is to thick, add a little water and puree some more (keep in mind that it may thicken up a little upon standing).
5. Serve with delicious warm pita chips – recipe follows.
Canned Chickpeas -vs- Regular – let’s compare some labels
omega-3 – canned chickpeas contain around 48% less omega-3 fatty acid
Niacin- 50-75% less in canned chickpeas
Folate- 50-75% less in canned chickpeas
amino acids- 35% less in canned chickpeas
Sodium- canned contain about 52% more
All that said, it’s OK to use canned if you just want a quick snack and weren’t planning ahead. Don’t let me make you feel guilty, I use canned about half the time too. :) One thing to keep in mind though is that canned have more of tendency to cause gas. If you’re having a snack by yourself, I suppose this makes no difference. If you are entertaining a bunch of people, you a may want to take it into consideration! :)
How to cook your dried Chickpeas.
1. Spread one cup dried chickpeas out on a plate.
2. Check through them for damaged chickpeas, yucky ones, and pebbles-remove the unwanted ones.
3. Put them in a bowl and fill it with water, swirl them with your hand (the water will cloud up), strain them and repeat-do this until the water stays pretty clear.
4. Soak in clean water with 1 Tbls of baking soda overnight.
5. Drain and place back in the bowl with clean water.
6. Soak the chickpeas for an additional three hours.
7. Place them in a large pot with 1/8 teaspoon baking soda, bring them to a boil and cook for 45 minutes.
8. Drain them and put them back into the pot. Cover them with water.
9. Bring the chickpeas to a boil and cook them until you can easily mash one between your fingers.
10. Remove the peels and foam that rise to the top during cooking and discard them.
11. Drain the chickpeas (save one cup of water for thinning the hummus if needed (it has more flavor then out of the tap)) and allow the chickpeas to cool.
12. Continue with the recipe above.
Why all the soaking and draining?
The answer is simple and not so simple. The simple answer-you don’t want to give everyone gas. The not so simple answer-beans contain oligosaccharides. This is a sugar that, because of its large molecular size, our bodies don’t break down. It makes it way through our small intestines where most sugars are absorbed and into our large intestine. When it makes its way into our large intestine, the bacteria that live there have a small party (they never get sugar, so it’s a treat). They process the oligosaccharide, this produces gas-not so good. The sugar is water soluble though – Yay! That means that if you soak your beans and change the water, you pour the oligosaccharide down the drain. This is also why it’s important to change the water. The water can only “hold” so much. It’s kind of like when you dissolve salt in water for a brine, if you put in too much, it doesn’t all dissolve. Also, don’t cook the beans in the soaking water. It defeats the purpose!
Warm Pita Chips
Ingredients
2 pieces pita bread
1 Tablespoon olive oil (enough to brush on pita)
1/2 teaspoon Kosher salt
1/4 teaspoon black pepper
Instructions
1. Pre-heat your oven to 400°F.
2. Lightly brush the pita bread with olive oil.
3. Sprinkle it with salt and pepper.
4. Cut it into triangles.
5. Bake the pita at 400° until it’s warm-three minutes or so.
6. Serve the warm pita with your delicious homemade hummus.
Please enjoy this “how-to” video!
The Best Potato Skins! – Recipe

Potato skins are one of my very favorite junk foods. :D! They are sooooo gooood, and you can fill them with whatever you happen to have in the fridge! This is a great way to get rid of left overs too, especially meat and veggies! We have a family junk food night about once a month and these are often included. They are also really great for big get togethers because they can be assembled ahead of time and refrigerated or even frozen and then baked as needed. When I make them I always try to make a few extra and freeze them for my son. He is a 16 year old eating machine and this gives him something he can easily bake in the toaster oven for a quick after school snack. Also, I know what I put in them at home and I don’t worry about all the extra funky chemicals that are sometimes added to the store bought or the restaurant versions (which sometimes come to the restaurant frozen anyway). I am going to give you a basic recipe and then you can change it as you see fit. Your imagination is the limit as far as what to put in them. Please feel free to experiment. We have filled them with crab and havarti with cream cheese, steak and green bell peppers with provolone and lots of other fun combos. Have fun, and happy cooking!
Ingredients
*note-The quantities are super approximate because you can fill the skins as much or as little as you want. I just wanted to give you a general shopping list. Don’t get hung up on measuring! 
5 potatoes
1 Tablespoon canola oil (plus more if you’re frying-see note on lower fat potato skins)
iodized salt
black pepper (fresh ground if possible)
1 small can cheddar cheese (the funky but delicious canned kind – like Campbell’s – you can also use Velveeta (melted))
6 slices bacon (good quality, I use apple-wood smoked)
3 cups cheddar cheese (a good quality one, shredded – I use Tillamook Sharp Cheddar)
3 Tablespoons chives or green onions, chopped
1 cup sour cream or yogurt
Instructions 
1. Wash all potatoes thoroughly.
2. Pre-heat your oven to 425°F.
3. Lightly cover the outside of the potatoes with canola oil *see note on a lower fat potato skin.
4. Place in a roasting pan, cover the pan with foil and bake for about 1 hour-until they are tender.
5. While your potatoes are cooking, chop and cook your bacon, shred your cheese, open the canned cheese, and chop the chives.
6. Remove the potatoes and allow them to cool.
7. Cut the potatoes in half long ways and use a spoon to scoop out some of the flesh-save what you scoop out for another use (see video).
8. Heat the canola oil (about 1 inch deep) in a wide pot – you can also use a deep fryer. *You can also bake instead of fry for this step, see note on lower fat potato skins.
9. Fry the skins by gently placing them in the oil, using tongs, first skin side down for about 30 seconds, then skin side up until golden (about 30 seconds to one minute).
10. Remove from the oil and place skin side up on a sheet pan and allow to drain and cool for about one minute.
11. Sprinkle lightly, all over with iodized salt and pepper.
12. Fill the skins by spooning some of the canned cheese into the center, follow with some bacon, then top with the shredded cheddar. *see note for making ahead of time
13. Place them back into the oven on a sheet pan until the cheese is melted.
14. Remove them from the oven and allow to cool for a few minutes.
15. Garnish the skins with the sour cream or yogurt and chives or green onions and enjoy!

*For a lower fat version-In step three use olive oil and also sprinkle the potatoes with kosher salt and pepper. For step eight, brush the skins with olive oil and sprinkle with salt and pepper then place back in the oven for about ten minutes, just until they start to crisp up a little- don’t allow to dry out. Continue with step 12. You can also use lower fat cheeses and fat free yogurt instead of sour cream.
**For making ahead of time-After filling the skins, place on a sheet pan and cover tightly with plastic wrap-you can make these one day ahead and keep refrigerated. If you would like to store them longer, you can freeze them by gently pushing the shredded cheese down, covering them in plastic wrap, and placing flat in the freezer. Once they are completely frozen you can put them in a gallon freezer bag or freezer safe container. They will keep in the freezer for up to three months
Please enjoy this “how-to” video!