


Yay, my very favorite time of the year has finally arrived! I’m so excited! We have so much fun in our house at this time of year. It helps to have our awesome five kids. We do tons of crafts and baking and playing games. My kitchen and hallway end up covered in pictures and projects that the little ones have made and the weather cools off. Oh, and everyone starts burning fires at night and the air smells so amazing all the time. Then all of the baking we do makes the house smell so warm and inviting – like cookies :). Not to mention that I love shopping for Christmas. I have the worst time trying to keep everything a surprise. I start shopping so early because there is so much to do. Then I spend all the time leading up to Christmas trying to resist the temptation of showing the kids their presents early and re-wrapping them. I’m so terrible at keeping surprises. If you have a good one don’t tell me because I get excited like I’m going to pop if I don’t tell. I’m the opposite with secrets though - huh, go figure. Anyway, YAY the holidays are here and here are some of my favorite recipes for this time of year. I hope you love them. Who knows, maybe you’ll even find a new family tradition or two :D
White Chocolate Peppermint Cookies
Pumpkin Pecan Bread Pudding with a Sherry Cream Sauce
Ninjabread Men – Gingerbread with a Kick – WA-GA!
Grandma’s Apple Pie (Plus My Healthier Version)
Christmas Cookies (traditional and whole wheat)
Pumpkin-Crumb Muffins (Whole Wheat) with Cream Cheese Filling
Cranberry-Pecan Muffins (Whole Wheat)
Pecan Pie – Grandma’s (Oh yeah!)
Christmas Vacation Inspired Eggnog

What is up everyone? I’m super excited to share today’s recipe with you because today’s recipe is inspired by one of my very favorite Christmas movies, Christmas vacation. For this recipe, I really wanted to channel my inner Griswald and get inside of Clark’s head and try to figure out what he would have asked Ellen to make for him. Because I don’t really feel like Clark would be in the kitchen busting this out but I do feel like he had a special little Christmas idea in his head and I think that Ellen would make it for him. So after days of thinking about this, I came up with what I think would have been Clark’s ideal eggnog. I can’t wait for you to try it!
Christmas Vacation Inspired Eggnog a.k.a. Clark’s Eggnog
Ingredients
5 cups milk
1/2 teaspoon cinnamon
1/2 teaspoon nutmeg
12 egg yolks
1 1/4 cups sugar
pinch of salt (1/8 – 1/4 teaspoon)
1 1/2 teaspoons vanilla extract
3 cups heavy cream
2 1/2 cups Malibu Pineapple Rum
1.Place 5 cups of milk along with your spices into a pot and onto the stove and bring it to a simmer. Cool to 140°F.
2. In a large bowl, place your egg yolks, sugar and salt. Mix them together until they are thick. I use my hand mixer for this.
3. Place your milk mixture (or part of it) into a something you can pour from like a measuring cup. Slowly add your milk mixture into the egg yolks while mixing. See video.
4. Return milk and egg mixture to the stove and bring it up to 160°F – you can go up to 180°F if you want to live on the edge but don’t go any higher or you’ll have scrambled eggs :)
5. Remove from the heat and add your cream, vanilla, and alcohol. Chill for at least 3 hours and serve.
Spiced Pecans

Spiced Pecans – (recipe and instructions along with a video tutorial follow) – OK, I’m going to warn all of you ahead of time. These things are seriously addictive. Like crack addictive. I had to laugh at my husband last night when I told him I was making spiced pecans. He’s so cute because he had been wanting them lately and when I told him that I was making them he was like “You’re making the spiced pecans :D!” And I said “yeah”. And he said “Like, the ones :D”. And I said yeah”. And he said “Well, like how many are you making? :D” And I said “I’m making two pounds”. And then it was so cute because he got a very concerned look on his face and he said “Well, do you think that’s going to be enough?” And I laughed and said “Enough for what, it’s two pounds, what we’re you planning on doing with them?” And he said, “Well, you know, munching.” And I was like “a yeah, it’s two pounds”. I don’t know, maybe you had to be there. I was just surprised at the amount of excitement that I was getting over the spiced nuts. They are really super good though. And then you had to see his face when I told him that I was giving away three mason jars of them to go with a few peoples Christmas Cookies that they ‘re getting. Very sad face. Then I told him I’d make him two more pounds that he could hoard all to him self – a secret spiced pecan stash if you will, and that made him happy. So, anyway, spiced nuts are really great for the Holidays (Christmas, Thanksgiving, New Years) kind of time just to set out for people to munch on, but don’t stop there. I love to add these spiced pecans to salads. There is a salad that I make anytime I get the “salad job” at a get together. I use mixed greens, orange wedges, goat cheese and these pecans. Then I top it with an orange vinaigrette. So very yummy! They also make a welcome addition to a cheese plate. And, of course, you can bake with them. Oooo, or add them to a pasta dish. That would be yummy. I think I may try that this week since I already have the nuts made and everything. I’m making crab ravioli with Alfredo sauce tomorrow and I may throw some in – just to give you an idea. So, anyway, here’s the recipe. Happy Cooking everyone!
Ingredients
2 pounds of Pecans
1 1/2 cups sugar 
2 Tablespoons olive oil
1 1/4 teaspoons Kosher salt
1/2 teaspoon black pepper
3/4 teaspoon cayenne
3/4 teaspoon allspice
1 Tablespoon Cumin
1 teaspoon chili powder
1 teaspoon ginger
3/4 teaspoon coriander
1 Tablespoon Cumin
1/2 teaspoon cardamom
1/2 teaspoon nutmeg
Instructions
1. Bring a large pot of water to a boil. Also, pre-heat your oven to 350°F.
2. While you’re waiting for your water to boil, place the sugar, olive oil, salt, pepper and spices into a large bowl. Stir them up really good. I use a rubber spatula and kind of mash the places where the oil is to break it up. Stir it until everything is evenly combined.
3. When your water comes to a rolling boil, pour your pecans in. Stir them up and leave them in there for one minute. Then drain them in a colander. Don’t leave them in there any longer then one minute. This is called “blanching your pecans”. “Blanch” is a culinary term that means to boil quickly (as in for a short amount of time but not necessarily one minute). It is often used to remove the skin from fruits or vegetables. There, now you’ve learned something today :D.
4. Once you’ve drained your pecans, put them in the bowl with the sugar and spice mixture.
5. Stir them until the sugar has “melted” onto the pecans and is sticking. Make sure you are getting the sugar/spice mixture from the bottom of the bowl too. Stir until the pecans are well coated.
6. Spread the spiced pecans onto a sheet pan (cookie sheet).
7. Bake them at 350°F until there is barely any liquid left on the pan, stirring them every 5 minutes during baking. Mine took around 20 minutes of baking. So I took them out of the oven and stirred them four times including the last time I pulled them out. Don’t skip the pulling them out and stirring them because the poor little spiced pecans that are hanging out on the sides will burn and then they won’t taste as yummy.
8. Remove them from the oven and let them cool completely before storing them. You don’t have to do anything fancy, just leave them on the sheet pan to cool.
9. Store your delicious spiced pecans in an airtight container.
Please enjoy this how-to video!
White Chocolate Peppermint Cookies

White Chocolate Peppermint Cookies – (white chocolate peppermint cookies recipe and instructions follow) – If you know me at all by now, you know that I have kids. One of them being a two year old. Do any of you have a two year old in the house? If so, you are totally going to empathize with this. We put up our Christmas Tree a few days ago right, so, we started off with you know like a normal tree. Decorated from the bottom to the top. Like ya do, you know. Anyway, my very awesome two year old, Alicia, is fascinated with the tree, of course. And with the ornaments, of course. And especially with the candy canes – yes, of course. So, I hear myself say at least 20 times a day – “no, no, no, those are to look pretty, not to throw/eat” (depending on what she grabbed). Well, ten broken candy canes later…and several thrown ornaments (shatter proof, yay :D), I have re-decorated our tree. Yep, it’s naked from two year old reaching height down. It’s still pretty though – at least half way up and to the top. No, I take it back. The bottom is still pretty too. That’s only because we have one of those super dope white Christmas Trees- yes a fake tree, allergies. And, my husband always wanted a white tree growing up but his parents thought that they were ugly so he never got one – :(, sad, I know. What was my point? Oh, broken candy canes. So Tia, my four year old (being never discouraged) saw the pile of broken candy canes and her little face lit up and she said – “Oh Mommy, I have the best idea. We could make cookies out of the candy canes”. Great idea Tia. So, after a little adjustment to her original idea of candy cane marshmallow cookies – which probably would be good too. We decided to make white chocolate peppermint cookies. Oh yeah! And, they are super duper tasty. Happy Cooking everyone!
Ingredients
Dry Ingredients
2 cups AP flour (all purpose flour) 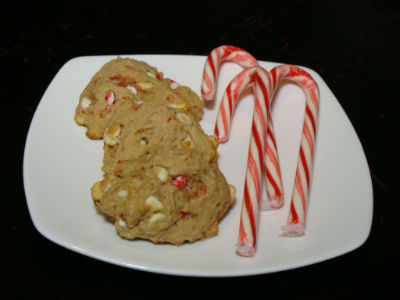
2 cups whole wheat flour *see note
1 1/2 teaspoons baking soda
1 1/2 teaspoons baking powder
1 teaspoon Kosher salt
2 sticks (16 Tablespoons) butter
1 cup brown sugar
1/2 cup Splenda *see note 2
3 eggs
1 Tablespoon Vanilla
1 cup plain yogurt (I use fat free)
1/2 cup crushed candy canes (around 6 big ones)
2 cups white chocolate chips
Instructions
1. Bring all of the ingredients up to room temperature. At the very least, make sure the butter is room temperature.
2. In a small bowl, combine all of the dry ingredients. That’s the flours, baking powder, baking soda, and salt. Stir them together.
3. In a large bowl (use you stand mixer if you have one because the dough gets very stiff ), cream the butter, brown sugar, and splenda. Scrape the bowl (sides and bottom) with a rubber spatula.
4. Add in the eggs and mix to combine. Scrape the bowl with a rubber spatula.
5. Add in the vanilla and mix to combine.
6. Add in half of the dry ingredients and mix to combine. Start on a low speed so that the dry ingredients don’t poof out at you in a big cloud. Also, only mix it until it is combined. You don’t want to over-mix your dough. It makes your cookies tough.
7. Add in the yogurt and mix to combine. Scrape the bowl. Make sure you get the bottom really well (sometimes the dry ingredients or clumps of butter like to hide down there and not mix in well).
8. Add the rest of the dry ingredients and mix to combine. The dough should be pretty stiff once you get the rest of the dry ingredients in there.
9. This is a good time to pre-heat your oven. I usually don’t do it at the beginning of the recipe only because I live in AZ and it makes the house hot. Plus, why waste all that electricity right? Oh, it needs to be 350°F.
10. Add in the white chocolate chips and the candy cane pieces. Mix the dough with a rubber spatula. Again, make sure that you are scraping the bottom of the bowl and the sides really well. Your going to get a good arm work out here because like I said, the dough should be pretty stiff. Stir it and fold it until you are sure that the chips and the candy cane pieces are mixed in nice and even.
11. Line your sheet pans (cookie sheets) with parchment paper (waxed paper). You can also use a silpat if you have one but they will cook a tiny bit faster on the silpat so watch them. Also, I highly recommend not skipping this step because the candy cane bits melt and they will stick to your pan like crazy and then you’ll be scrubbing pans which is not fun … at least to me.
12. Drop your dough onto the lined sheet pans about a Tablespoon at a time. They need to be around two inches apart. They don’t spread very much though (as long as you’re not making any changes to the recipe (like in the notes)).
13. Bake at 350°F for about 14-15 minutes until they are light golden brown.
14. Remove from the oven and allow the cookies to set on the pan for about one minute.
15. Transfer the cookies with the paper onto a cooling rack. So, basically, just carefully slide the whole paper off of the pan and onto the cooling rack.
16. Allow the cookies to cool before you take a bite. Trust me, you do not want to bite into a piece of hot molten candy cane. It will burn you for sure. It’s hot melted sugar – ouch!
17. Once they are cool enough to eat, eat ‘em, they’re yummy! Enjoy! Oh, also, I’m not exactly sure why, but these cookies taste better the next day, at least to me, kind of like spaghetti. Wait, they don’t taste like spaghetti, they just taste better the next day- like spaghetti does :) – Yeah, so enjoy!
*note 1 – You can replace the whole wheat flour with AP flour, but it will change the texture slightly and the cookies will spread more. You can help this by putting in 2 Tablespoons less of the plain yogurt.
*note 2 – You can replace the Splenda with white sugar. It shouldn’t change anything except your cookies may brown a little faster…..and the amount of calories of course. But go for it if you want to. :)
Hot Homemade Apple Cider

Hot Homemade Apple Cider (recipe and instructions along with a video tutorial follow) – Does anything scream fall more then a cup of delicious warm homemade apple cider? You know besides the smell of fires, the leaves changing, the pumpkin everything and the cool crisp air :) OK, so maybe the homemade apple cider just joins in the screaming of fall. But either way, I love it and I love making it for my family. If you know me at all, then you already know this, but I love the smells of fall. So, of course, one of my other very favorite things about this recipe is the way that it makes my whole house (along with my neighborhood I think) smell like the fall. Plus, when I make stuff like this, it makes me feel extra motherly – kind of like I get mom bonus points, because I feel like I’m making memories with my kids. I always hope that one day they’ll grow up and tell their future husbands or wife that their mom used to make homemade apple cider in the fall and it would make the whole house smell amazing. Or, better yet, they’ll load up all 20 of my future Grand kids (yes, I’m hoping for tons of Grand kids one day) and bring them over because Grandma (that’ll be me one day God willing) is making homemade apple cider. I mean seriously, how cool would that be? Also, this is one of the traditions in my family that my husband and I started with our kids. Neither of us grew up with the homemade apple cider in the house – not that we were deprived or anything, we just had busy parents. I have the very great privilege of being at home with my babies and I feel super crazy blessed and want to make the most of it. So I think it’s nice to have these kinds of “old fashioned” traditions around, so we do. Hooray for the Holidays – woo, excuse me, I got a little excited :D One last thing, this recipe is like crazy easy, and hot apple cider is good for you (see note at the end of the recipe) so give it a try.
Ingredients
water, preferably filtered
12 apples, quartered and cored
any kind of apples are fine, I’m using the following
2 Red Delicious 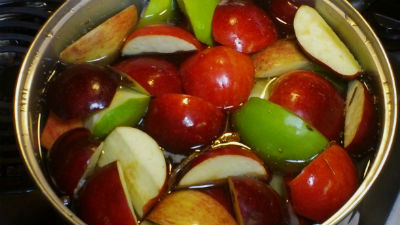
2 Granny Smith
3 Cameo
5 Johnathan
1/2 cup honey
3 cinnamon sticks
3 cardamom pods
5 whole allspice
3 whole cloves
1/4 – 1/2 teaspoon nutmeg, preferably fresh
zest of 1 orange
Instructions
1. Wash your apples. Cut each of your apples into quarters and remove the cores.
2. Place the apples into a large pot. I use my 8 quart pot.
3. Add the honey and spices as well as the orange zest. If you want to make sure that your apple cider has no bits of spices in the final cider, you may want to consider using a spice sachet for this. What you need to do to make a spice sachet is wrap the spices in cheesecloth kind of like you’re making a little bag out of the cheesecloth. Once you have them wrapped, tie the top of the cheesecloth with butcher string to keep it from opening. This way, when it is time to strain your apple cider, you can leave the pulp and get all of the spices out easily by just removing the whole sachet. If you will be using a fine mesh strainer (to get a no pulp apple cider) then the sachet would be pointless. I don’t do one, I just strain mine. I just wanted to give you the option. 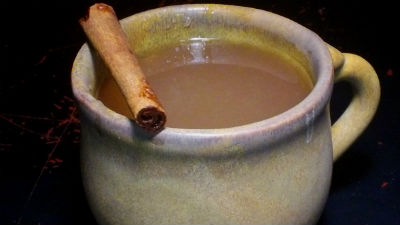
4. Add the water. You will want the water to be about four inches above where the apples come to in your pot. Apples float so see where they come up to on your pot and then add the water to make it four inches over the “apple line”.
5. Bring the mixture to a boil. Allow it to continue to boil for one hour. Do not boil this on high or it will likely start boiling over. It doesn’t have to be a rolling boil, just a light boil. Every 25 minutes or so, check on your apple cider and kind of press on the apples with a large slotted spoon or spatula. As they soften, they will turn into a pulp. Also, this is going to make your house smell so amazing.
6. After it has boiled for about an hour, reduce the heat and cover the pot. I put my lid at a bit of an angle so the steam can still escape a little.
7. Allow it to simmer, covered, for another two hours. I still check on my apple cider about every half hour and press on the apples to break them up into pulp.
8. Drain your apple cider. You have a couple of choices here. If you want your apple cider to be pretty much pulp free, use a fine mesh strainer to strain it. You can also use a colander lined with cheesecloth if you don’t have a fine mesh strainer. If you want it to have pulp (which is the way I prefer my apple cider), use a colander to strain it. Just make sure to watch for bits of the spices, you want to make sure to get them out so no one ends up with a big chunk of allspice or something in their mouth. Also, if you want to be sure that no spices bits will be left behind. You can choose to make a spice sachet for your spices in step 3.
9. Once you have strained the apple cider, it is ready to serve. You can store any left over in the refrigerator for up to four days – if it lasts that long. Make sure to cool it properly before placing it in the refrigerator. And just as a note, it is also yummy when it is chilled.
Apple Cider isn’t just yummy, apple cider is good for you too!
Apple cider is high in vitamins A, C and E. It is also high in iron, and potassium. Apple cider contains flavonoids. These are an antioxidant that inhibit the growth of certain types of cancer cells. If you leave the pulp in your apple cider, then it will also contain quite a bit of fiber. Apple cider has also been shown to reduce the risk of heart disease. Not to mention that cinnamon has it’s own anti-bacterial properties. There is a ton of information out there about the nutrition in apple cider. All you have to do is Google something like “vitamins in apple cider” and you’ll get like a million sites with more info.
Please enjoy this how-to video!
Southwestern Pumpkin Soup

Southwestern Pumpkin Soup (recipe follows) – I decided to make Southwestern Pumpkin Soup for two very simple reasons. One, because I love, love, love pumpkin. Like a lot. Including pumpkin soup. I wait the whole year for Fall to roll around so I can get some pumpkin. One year I even thought I’d be smart and buy a bunch of pumpkin while it was around and then I could have it all year. Guess what, it didn’t work. All that happened is that I thought “Yay, I have a huge supply of pumpkin and now I can eat all I want”. Then I did. Then I ran out really fast. Don’t get the wrong idea, I know I’m making it sound like I bought like 20 cases of canned pumpkin, but it was more like eight cans. I thought that seemed like plenty, easily one pumpkin thing a month. But, like I said, it didn’t work out the way I had planned. That’s OK anyway, I’ve kind of since figured out that the anticipation is half of the fun. Who was it that said “Hunger is the best sauce”? Cervantes maybe? Anyway, that’s the first reason for the pumpkin soup. And the second reason explains why it’s “southwest” pumpkin soup. Simple really, I live in the Southwest. I found the inspiration for the “southwest” part of the pumpkin soup in my beautiful surroundings. Plus, every year for Thanksgiving, I’ve always done the more traditional dishes – well, traditional American along with a little mix of traditional Puerto Rican (for my hubbie and kiddies). But I think I’m going to do a fun Southwest theme this year and use this for the first course. I’m still thinking about the rest of the meal. I think it’s going to involve chipotle in some way. I’ll let you know. Enough about that though, let’s concentrate on the recipe at hand – delicious Southwest Pumpkin Soup!
 Ingredients
1/2 teaspoon olive oil
3 strips bacon (apple-wood smoked preferred)
1/2 large shallot, minced
3 cups chicken stock (you can also use canned broth)
1 (15 ounce) can pumpkin puree
1 cup heavy whipping cream
1/2 teaspoon chili flakes
1 teaspoon cumin
1/2 teaspoon coriander 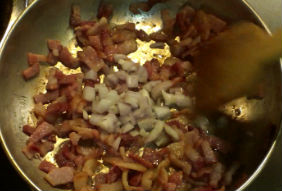
1 teaspoon chili powder
1/4 teaspoon nutmeg
1/2 teaspoon Kosher Salt
1/4 teaspoon black pepper
3 tablespoons brown sugar (dark is better)
garnish options
cilantro
creme fraiche (or plain yogurt or sour cream)
cheddar cheese 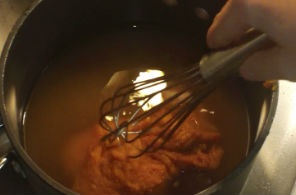
Instructions
1. Slice the bacon into small pieces. Saute it until it’s almost done the way you like it, then add the shallot. I like the bacon to be crispy for this, but I know some people don’t like crispy bacon, so, to each his own. If you like your bacon super crispy, cook it a little longer before you add the shallot so you don’t burn your shallot. Make sure your shallot gets at least a minute or two in the pan though. If it’s getting too dark too quick, turn the heat down or off.
2. When the bacon and shallot are done, remove them from the pan and put them to the side. They will be garnish later. Pour the grease out of the pan, but don’t worry about the tiny bit that’s left behind. This is a good and yummy thing and it’s going to add flavor. Return the pan to the heat.
3. Add about 1/4 cup of the chicken stock into the saute pan. Scrape up all of the brown goodness that the bacon left behind. Pour this liquid into a small bowl and place it in the freezer to cool. The idea here is that we are going to kind of “extract” the bacon flavor without putting the grease into our final product. So when you put the small bowl of the 1/4 cup of chicken stock with the fond (that’s the brown goodness) into the freezer to cool, the bacon grease will separate and be easy to remove when we’re ready for it. Just as a note here, you can skip this step entirely and just move on to the next step. However, you will be missing out on a beautiful smoky background flavor in your soup. It really adds a nice richness. 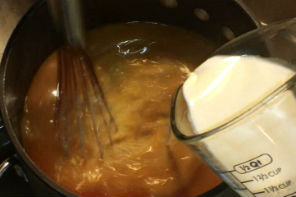
4. In a separate pot, bring the rest of your chicken stock to a simmer. Reduce the heat to medium.
5. Whisk in the can of pumpkin.
6. Whisk in the chili flakes, cumin, coriander, chili powder, nutmeg, black pepper and the brown sugar.
7. Allow the soup to simmer for 15 – 20 minutes.
8. Remove the soup from the heat. Whisk as you add in the heavy whipping cream. Do not do this if your soup was above a very light simmer. It can make your soup “break”. That means it will separate and curdle and it won’t be pretty. Also, once you add the cream, do not take it above a light simmer. If your soup was boiling or simmering like crazy, just let it cool for a few minutes. Ideally, it will be under 190°F. But, like I said, as long as it was only simmering, don’t worry about it, just take it off the stove and add your cream. This really isn’t as difficult as I think I may be making it sound, I just want you to understand what happened if your soup should curdle so you know what to correct for next time. 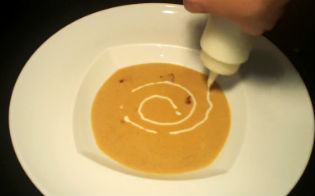
9. Check on your small bowl of chicken stock and bacon goodness from earlier. Remove as much grease as you can and add it into the soup.
10.If necessary, return the pot to the stove and place the heat on low to bring the soup up to serving temperature. This generally won’t be needed, but just in case :). Remember, don’t take the soup above a simmer at this point because it may “break”.
11. Taste the soup and decide if it needs some more salt or pepper but keep in mind that you’ll be garnishing with the bacon and that will add more salt flavor.
12.Place your soup into the serving bowls with a spoon of the bacon and shallot from earlier then add any of the extra garnishes that you choose.
How to video coming soon!
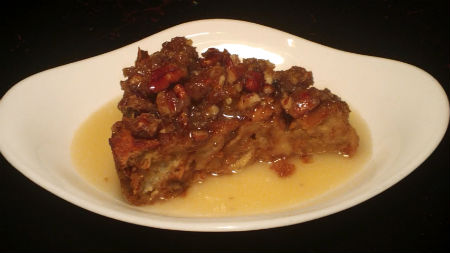
Pumpkin Pecan Bread Pudding with a Sherry Cream Sauce

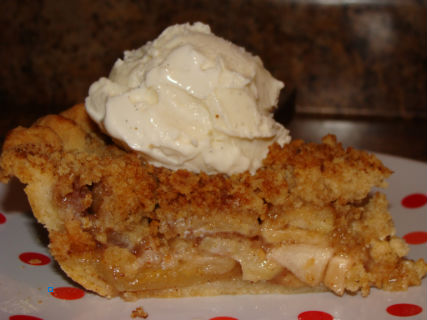
Pumpkin Pecan Bread Pudding with a Sherry Cream Sauce – (recipe follows) – What can be said about Pumpkin Pecan Bread Pudding except for……YUM! I mean seriously – YUMMY! Are you guys pumpkin fans out there? I know I am, like a huge fan. I’d do a commercial for pumpkin right now (that’s supposed to be funny, you’d have to have seen the stand up where the guy is talking about doing a commercial for chicken – did you see that one? If you did then, hahahahahaha, funny right, if not then I just wasted like ten seconds that you can’t get back and well, sorry :D). Funny, I’m funny. Wow, I guess the sugar and coffee kicked in. So, anyway, this really is super yummy and you can make it as fancy or not fancy as you like depending on how you serve it. Either way, it’s going to make your house smell like the holidays while it bakes and give everyone who eats it nice warm full tummies. That’s always nice right? Not to mention that this comes out beautifully moist. Also, this is just a nice option to have instead of pumpkin pie (believe it or not, some people don’t like pie)! Yeah, I know :). Or, serve both, that’s what I’d do. Ah, yes, I love you too pumpkin pie. When I make this bread pudding, I like to add a crumb topping and also the sauce, but you can skip either or both of those because it is fabuloso on it’s own. It is also really, really good with vanilla ice cream – what isn’t? OK, enough chit chat LET’S DO THIS!
 Ingredients
For the Bread Pudding
5 eggs
2 cups half and half
1 (15 ounce) can pumpkin puree
1 cup brown sugar
1 teaspoon nutmeg
1 teaspoon cinnamon
1 teaspoon allspice
1/2 teaspoon cloves
1/2 teaspoon mace
1 1/2 teaspoons vanilla extract
1/2 cup golden raisins, optional
1/2 cup roasted pepitas, optional
10 cups cubed bread, French Bread, Italian, or challah all work well
 For the Crumb Topping
1/2 cup Brown sugar
1/4 cup butter (1/2 stick)
1 cup pecans, broken up
For the Sauce
1/2 cup butter (one stick)
1 cup sugar
1/4 cup half and half
1/3 cup Sherry
Instructions
1. Prepare your baking dish by giving it a nice coat of butter. You can also use a cooking spray, but the butter will add a little extra yumminess.
2. In a medium bowl, whisk the eggs. Add the half and half and whisk them together. Add the pumpkin and whisk it in well. Then add the brown sugar, spices, and vanilla extract and whisk it all up.
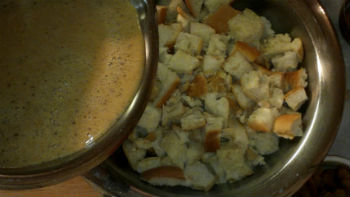
3. Place your bread cubes into a large bowl. Pour the egg mixture over the bread cubes. Add the pepitas and raisins. Fold it all together, be gentle.
4. Pour your mixture into your prepared baking dish. Smooth it out so it’s flat. Allow this to stand for about 20 minutes. This lets all the goodness soak into the bread. Also, turn your oven on to 350°F while your bread is waiting. 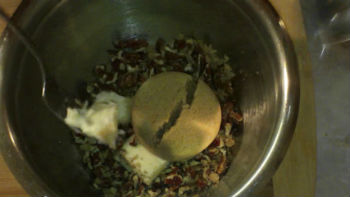
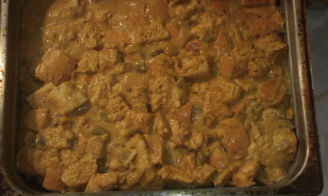
5. In a separate small bowl, combine the ingredients for the crumble topping and mash them together. You can use a fork or spoon, but I just use my hands to smash it all together. Sprinkle the crumble on top of the bread pudding.
6. Bake your bread pudding at 350°F until a toothpick inserted into it comes out clean. This will take about 30 minutes.
7. During the last five or so minutes of baking, make your sauce.
Instructions for the Sauce
1. In a small saucepan, melt your butter over low heat.
2. Add the sugar and stir, then add the Sherry and stir it with a rubber spatula.
3. Cook gently until the sugar is dissolved. This takes five to seven minutes over medium-low heat.
4. Add the half and half and stir.
5. Pour the sauce over the pumpkin pecan bread pudding and serve. You can also serve the sauce on the side so everyone can decide if they want it or not.
Please enjoy this how-to video!
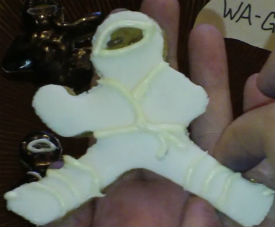
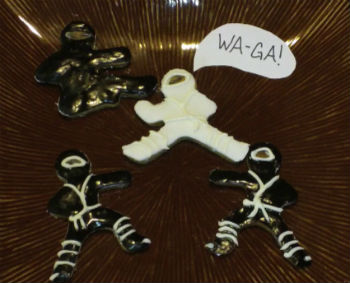
Ninjabread Men – Gingerbread with a Kick – WA-GA!

Ninjabread Men (recipe follows) – Last year I was surfing around on Amazon and I came across the coolest thing ever. Ninjabread Man Cookie Cutters. I know, super cool, right? So, upon finding said cookie cutters, I placed them in my Amazon shopping cart and much to my dismay I was rejected. Has this ever happened to you? You’re all excited about some cute purchase and snatch, it’s stolen out of your cart because you didn’t check out quick enough and the last one sold. It’s rare, I know, but it’s happened to me twice. That’s right twice. So, anyway. This year, I was super determined to get my cookie cutters. I actually thought about them several times during the year. (What’s wrong with me)? And the other day, I was on Amazon again and I happened to remember my beloved ninjabread man cookie cutters so I put in my search and guess what – OH YEAH, they were available. P.S. on that though, one of the sellers was already down to 2 sets and this is September. So I jumped on it and ordered my very own set. And, (sing this part like a bratty kid) ? they came in the mail on Wednesday, they came in the mail on Wednesday, they came in the mail on Wednesday?, Yay! I’m so happy! Now, I have my inspiration for a new recipe. So, I’ve been working on this for 2 days now and I have come up with this - Ninjabread Men – Gingerbread with a Kick – WA-GA (that’s my kick sound like in a video game or on a Karate movie). And what do I mean by gingerbread with a kick? What is the difference between gingerbread men and Ninjabread men? Ninjabread men have a kick – YEAH! At least that’s how I envision them. Oh, that’s not a good explanation. What I mean to say is that the Ninjabread men are spicy. MMMMMM, spicy and sweet together in a cookie at last. Don’t worry everyone, fear not the spicy cookie, because they are killer! LOL, killer, get it killer, because they’re ninjabread men, nnninjabread men. This next line is to be read in a high pitched and slow voice ready - I’mmm funnnyyy! So, let’s bake people! Woooooh!
Ingredients 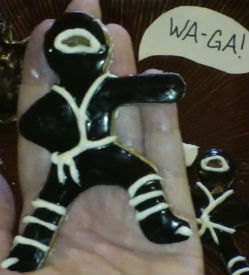
Make sure you read the instructions before you start!
5 cups AP flour
1 1/2 teaspoons salt
1/2 teaspoon baking soda
4 teaspoons ginger (dried, ground)
2 teaspoons cinnamon
3/4 teaspoon ground cloves
1/2 teaspoon nutmeg
1/2 teaspoon black pepper
1/2 teaspoon cayenne
1 teaspoon mace
In a separate bowl
16 Tablespoons (2 sticks) butter, at room temperature 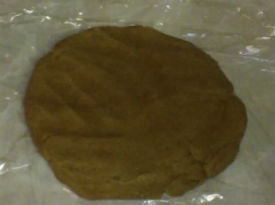
2/3 cup brown sugar (Light or dark will work, but dark will add more flavor).
2 large eggs
2/3 cup molasses
Instructions
1. In a small bowl, mix together your dry ingredients (the flour, ginger, cinnamon, cloves, salt, baking soda, black pepper, cayenne and mace)
2. In a separate and larger bowl, cream together the butter and sugar.
3. Add the eggs and mix well.
4. Add 1/3 of your dry ingredients and mix. 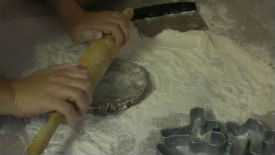
5. Add half of the molasses and mix. Scrape your bowl and paddle/beaters.
6. Add another 1/3 of your dry ingredients and mix. Scrape the bowl and paddle/beaters.
7. Add the other of half of the molasses and mix. Scrape the bowl and paddle/beaters.
8. And finally, add the remainder of the dry mix and mix it. Remove the dough from the bowl.
9. Divide your dough into four equal pieces. Shape and flatten each of your four pieces into disks that are about one inch thick. Wrap them tightly in plastic wrap and place them in an airtight container (like a gallon baggie or a plastic container).
10. Place them in the refrigerator for at least four hours and up to two days. Remember, the longer 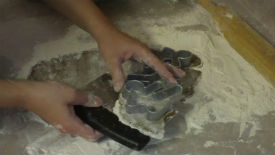
you let your dough set the more flavor it will have, so, give the spices a chance to do their job :). You can also freeze your dough at this point for up to three months. This is a great way to get a jump start on all of those Christmas Cookies that you’ll be baking!
11. When you are ready to bake your Ninjabread Men – WA-GA, pre-heat your oven to 350°F.
12. Remove one disk of dough from the refrigerator. Unwrap it and place it on a well floured surface. Also, be sure to put flour on your rolling pen, cookie cutters, and bench knife or spatula.
13. Roll your Gingerbread, make that Ninjabread Men out to about 1/4 inch thick.
14. Use a floured Ninjabread Man cookie cutter to cut your cookie dough into ninja shapes (isn’t  this fun (punch, kick – WA-GA))! You can take all the dough scraps and press them together and re-roll them.
15. Carefully, very, very carefully, move your ninjas to a prepared cookie sheet. I use a bench knife to move mine, you can also use a spatula. This helps them keep their shape. I’m using my silpat to bake mine on, but you can also use parchment paper (do not use any grease, butter or cooking spray, only the parchment or silpat).
16. Bake at 350°F for 9-11 minutes. They should look dull and dry when they’re done. DO NOT OVER-BAKE! They will dry out super easy, so be careful! They should be soft when they’re done. If they come out crispy, you baked them too long – unless you like them crispy, then, good job!
17. Slide the papers onto your cooling racks to cool your little ninjas. Again, be careful! 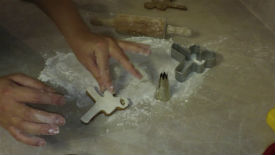
18. When they are totally cool (like me), you can decorate them. I’m doing mine with butter-cream and fondant on top just so they can have they’re little ninja suits, but you can use royal icing or just butter-cream or raisins or candy – the list goes on and on. Use your imagination and have fun – WA-GA! *If you’d like to see how I did my decorating, I invite you to watch the “how-to” video at the bottom.
19. Oh, you can store these in a airtight container between sheets of parchment paper for a couple of days. If you don’t want your decoration to smear, use the royal icing because it will harden. Also, if you do make royal icing, I recommend using pasteurized egg whites or coddling your eggs. WA-GA – that’s just plain fun, seriously, try it!
 Please enjoy this “how-to” video!
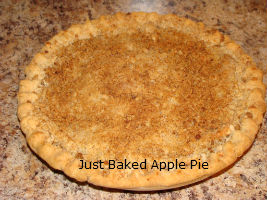
Grandma’s Apple Pie (Plus My Healthier Version)
")
Grandma’s Apple Pie – Grandma’s apple pie is a tradition at every get together our family has from Thanksgiving and Christmas to The Fourth of July! It is also one of the things she made every time we went over for the weekend even on non-holidays for my spoiled :) brother (just kidding Kevy, you know I love you)! I have no idea how old this pie recipe actually is but Grandma has told me she has been making it this way for 60 years, so it’s at least that old. It is a simple version of apple pie. One that really shows off how beautiful good apples can be. So, it is important to use high quality apples because they are definitely the main flavor component – as they should be. When I make my apple pie, I use organic apples. I think it makes a huge difference in the end flavor. I also use several different varieties to get a nice range of flavor and texture. Grandma uses McIntosh or Jonathan almost exclusively. I am going to give you Grandma’s recipe exactly how she makes it and am going to follow with the healthier version that I make for my children now. I hope you love them both! Happy Cooking!
 Ingredients for Grandma’s Traditional Apple Pie
Grandma’s Pie Crust
Ingredients
1 cup plus 2 Tablespoons AP flour
1/2 teaspoon salt
7 Tablespoon lard (like Crisco)
3 Tablespoon cold water
Instructions for Crust
*I do this whole process in my food processor. Instead of mash, mash, mash in step 3, you pulse, pulse, pulse :D!
1. Place flour and salt into a medium mixing bowl, stir to combine.
2. Add the lard a spoon at a time. 
3. Use a fork to mash the lard into the flour (cut the lard into the flour), to do this you pretty much just mash the chunks of lard with the fork and then coat them with flour and then mash again and coat again until you end up with something that resembles corn meal with little baby pea size chunks of lard covered in flour in it.
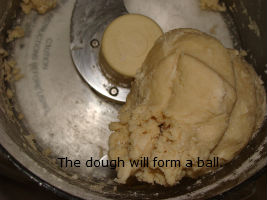
4. Add the cold water and stir, your dough should come together and form a ball – if it doesn’t come together into one happy clump, add another Tablespoon of water and that should do it. Generally though, you won’t have to.
5. Place your dough onto a floured surface and roll it out to 1/4 inch thick.
6. Put it into your pie pan and make it pretty, then dock it (that means poke some holes in it with a fork).
7. Put your crust to the side for now.
Ingredients for Filling
5 1/2 -6 cups apples, peeled and sliced 1/4 inch thick (Grandma’s written recipe says 4 cups, but this is one of those recipes that if you haven’t made it with Grandma, it doesn’t come out the same – so 5 1/2 – 6 cups)
1/2 cup sugar
1 teaspoon cinnamon
3 Tablespoons AP flour
Instructions for Filling
1. In a small bowl, add the sugar, cinnamon, and flour and stir to combine.
2. Place the apples in a large bowl and pour the flour mixture on top.
3. Toss the apples to coat with the flour mixture.
4. Set apples to the side.
 Ingredients for the Crumb Topping
1 cup AP flour
1/2 cup brown sugar
1/2 cup butter
Instructions for the Crumb Topping
*Again, this can be done in the food processor using pulse.
1. Place your flour into a small mixing bowl.
2. Add the brown sugar and stir to combine.
3. Add the butter into the bowl in slices.
4. Mash the butter in with a fork (cut the butter into the flour) until it has that cornmeal/baby pea texture like the crust.
5. Set your crum topping to the side.
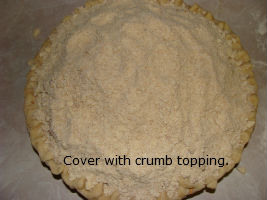
Assemble and Bake Your Pie
1. Pre-heat your oven to 350°F.
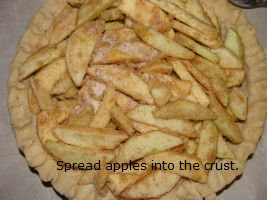
2. Pour your apples into the crust, spread them out to make them even (they should be higher then the crust edge, they’ll cook down).
3. Carefully pour the crumb topping over the apples, try to keep it as even as possible.
4. Bake at 350°F for 45-50 minutes.
Please enjoy this video tutorial (note that I “spice it up” a bit in the video)!
And now, my healthier version :D!
 Pie Crust
Ingredients for “Poured” Pie Crust
1 cup whole wheat flour
1 teaspoon splenda
1/4 cup olive oil (you can also use canola if you’re worried about the taste)
1/4 cup milk
Instructions for the “Poured” Crust
1. Mix the flour, salt, and splenda together in a bowl.
2. Add the oil and stir until well combined.
3. Add the milk and stir until combined (the crust should come together into a ball).
4. Place crust into an 8″ pie pan and use the palm of your hand to spread across the bottom.
5. Work the crust up the sides of the pan (try to keep it all even).
6.Once you have it all spread, dock it (poke some holes in it with a fork).
7. Add your filling.
*there is a “how to” video of the poured pie crust on my Quiche Lorraine recipe
**This is not Grandma’s crust!!!
Ingredients for Filling
5 1/2 – 6 cups apples, peeled and sliced 1/4 inch thick (I use a variety such as 2 Granny Smith, 1 Gala, 1 McIntosh, 1 Fuji, I always include the Granny Smith, but the others I change up so feel free to use your favorite)
1/4 cup Splenda
1/4 cup brown sugar
1 teaspoon cinnamon
3 Tablespoon AP flour, you can replace this with 2 Tablespoons of Tapioca Flour, but it does affect the flavor a little.
Instructions for Filling
1. In a small bowl, add the Splenda, brown sugar, cinnamon, and flour and stir to combine.
2. Place the apples in a large bowl and pour the flour mixture on top.
3. Toss the apples to coat with the flour mixture.
4. Set apples to the side.
 Ingredients for the Crumb Topping
1/2 cup rolled oats
1/2 cup whole wheat pastry flour
1/2 cup brown sugar
1/2 cup butter
Instructions for the Crumb Topping
*I do this whole process in my food processor. Instead of mash, mash, mash in step four, you pulse, pulse, pulse :D!
1. Place your flour and oats into a small mixing bowl.
2. Add the brown sugar and stir to combine.
3. Add the butter into the bowl in slices.
4. Mash the butter in with a fork (cut the butter into the flour) until it has that cornmeal/baby pea texture like the crust.
5. Set to the side.
Assemble and Bake Your Pie
1. Pre-heat your oven to 350°F.
2. Pour your apples into the crust, spread them out to make them even (they should be higher then the crust edge, they’ll cook down).
3. Carefully pour the crumb topping over the apples, try to keep it as even as possible.
4. Bake at 350°F for 45-50 minutes.
Champagne and Sparkling Wines

It’s that time of year again everyone, Yay!!! Time to break out the Champagne and Sparkling wines (not that I wait until this time of year)! :D ! I’m super excited anyway though! I just love how happy and fuzzy everyone is right now! Is it all the drinking :)?I have a very deep love and passion for wines too. I know they can be a little intimidating or confusing for a beginner though (I was there once too). So, here’s a quick Champagne/Sparkling Wines 101!
What is the difference between Champagne and a Sparkling Wine?
Champagne is both a province and a wine. To be called “Champagne”, the wine must come from the Champagne region of France. Yes, I realize that you have seen a wine with the word Champagne on it that wasn’t French. This happens for two reasons. The most common is that there are French Champagne houses in California – ones that began in France or are owned by one in France. The other is that the producer doesn’t care that Champagne is a province where Champagne comes from and they put it on their label anyway probably in hopes of getting a higher price for their product. I’ve read that there is an international treaty that prevents places other then Champagne from using the name Champagne, I don’t think this is entirely accurate though. However, within the European Union, only wines from the Champagne region can use the name.
Where do the bubbles come from?
So, in really simple terms. Winemakers take grape juice and add yeast (or use the natural yeast that is already there). They put it in a barrel. The yeast “eats” the sugar in the juice. The yeast then “poos” alcohol, bubbles, and heat – but in a good way. This is the easiest way for me to look at it. This is the first fermentation. This is how a still wine (wine without bubbles) is created. The still wine then goes through a second fermentation to add the bubbles. Generally the winemaker will add more sugar and yeast to start the second fermentation. This second fermentation will have one of three fancy names.
1. Methode Champenoise (method Shahm-pen-WAHZ)- this is the traditional French method. The first fermentation takes place in the barrel, the second in the bottle. During the second fermentation the bottles are kept on a rack that keeps them angled down. They are turned 1/4 turn or so daily. This process is called riddling in English or remuage (pronounce reh-moo AHJ) in French. Riddling helps the sediment (little dead yeast corpses) find their way to the neck of the bottle. When the fermentation is done, they freeze the neck and pop off the bottle cap that is there for the second fermentation. The ice cube pops out (there is a lot of pressure there), they top it off and they put a cork in it. They then put that pretty foil wrapper around the top (to hide inconsistent liquid levels) and label it. Pretty simple right?
2. Methode Traditionale – this is the same as Methode Champenoise, only we use this term in America.
3. Charmat (pronounce shar mah) Process (also called Cuve Close, bulk method, tank method)- in this process, the bubbles are added basically the same as they are in soda. The fermentation is done in bulk in big steel tanks. This results in bigger bubbles and is usually used for less expensive wines. These wine are generally good choices for mimosa, Bellini and punches. If you’re going to cover the flavor anyway, why spend a ton of money?
If your bubbles are small and flow upward in a continuous stream you probably have a wine produced by Methode Champenoise. If your bubbles are large and float more random, they were probably made via the Charmat Process. Small scratches in your glassware can also effect the bubbles. We used to scratch a small x at the bottom or our wine glasses in the restaurant because it makes the bubbles flow from the bottom and kind of spiral up. It’s prettier ;).
How do I know if it’s going to be sweet or not?
Read the label silly :). This is a list from driest to sweetest.
Brut (rhymes with root) – driest
Extra Dry – a little less dry then Brut (I don’t know why, and yes, it doesn’t make sense)
Sec – dry
Demi Sec – off dry
Doux – Sweet
By the way, I think I should mention here that the wine term dry means there is no sweetness or sugar. I think a lot of people confuse this with tannic. Tannic is when it dries your mouth out, like if you put a tea bag in your mouth (try it) it makes your mouth feel dry like it’s sticking to itself. Also fruity does not equal sweet. A wine can be totally dry and still be fruity. Again this has nothing to do with the sugar level and everything to do with the other acids present in the wine. We’ll save all that for another day though. So just to be ultra super clear, a wine cannot be dry and sweet at the same time. OK :) .
What do Blanc de Blancs and Blanc de Noir mean?
Blanc de Blanc – This means white wine from white grapes. In other words, it’s likely made from Chardonnay grapes. These are very versatile and good with lots of foods.
Blanc de Noir – This is white wine made from black (red) grapes. Most likely from Pinot Noir or Pinot Meunier grapes.
If you come across a sparkling rose, it is most likely a blanc de blancs with an addition of still pinot noir just before corking.
What is NV or MV?
NV stands for non-vintage, and MV stands for multi-vintage. They are the same thing. If you are drinking a non-vintage wine, this means it is a mix of different harvest years. Champagne is almost always blended both of harvest years and of grapes to maximize complexity and consistency. Each component brings a unique character to the finished wine. The non-vintage is usually the “calling card” of a producer. Non-vintage also usually makes up the bulk of their production. If there is no date on the label, you’re drinking non-vintage.
What is Vintage?
When a growing season makes beautiful grapes, producers like to bottle them as a vintage. A vintage comes from one growing season and is not blended from multiple seasons of grapes. It shows off the characteristics of a specific year. They are more rare and more expensive. I wouldn’t say that they are always better though, just different. If you are drinking a vintage, there will be a date on the label.
What should I use to make mimosas, Bellini and punches?
I have had people tell me that if you wouldn’t drink it alone, don’t use it as a mixer or to cook. I have to disagree very strongly with this. I recommend using a less expensive sparkling wine as a mixer somewhere in the five dollar range. I might even go as high as seven dollars. If you are pouring a 40 dollar bottle into a punch bowl, you are wasting it! Sorry, but you are. The taste is hidden behind all the juice and whatever else you have in there. You lose the flavors that you paid extra for. The same goes for cooking, please don’t use a beautiful 40 dollar bottle of wine in a sauce, it is going to cook and you are going to lose all the subtle flavors that made it worth 40 dollars in the first place! Save your nice wine to drink by itself or with some delicious food that compliments it!
This should be enough info to get you through the wine store and past the snobby sales person. So, get out there and pop those corks, and next time don’t wait all year!
Christmas Cookies – Recipe

Christmas Cookies – For this recipe, I’m going to give you two different versions. To be honest, they taste almost exactly the same. Why am I giving you two versions that taste the same? One is a healthier whole wheat and low sugar version and one is a more traditional version. I make the whole wheat for my family, but I know some people are going to want the white flour version they grew up with. Again, I would like to say that they taste almost identical (my kids ate both when I was testing these recipes and didn’t even notice). So even though they’re both my recipes, I’m going to recommend the whole wheat version. I think eating healthy is important. If you can get a whole wheat, lowered sugar cookie past the kids unnoticed why wouldn’t you? These are lots of fun to decorate too! You can use a store bought icing if you want, but the home-made one is easy to make. So, on that note, crank up the Christmas music, pour some eggnog and make some memories (and some cookies). I hope you enjoy making these as much as we did! Happy Cooking!

Ingredients
1 cup butter
1 cup sugar
2 egg yolks
1 Tablespoon orange zest
1 Tablespoon vanilla
1 teaspoon lemon extract
2 Tablespoon milk
3 cups flour
1 teaspoon baking powder
1/2 teaspoon salt
Instructions
1. Pre-heat your oven to 400°F.
2. In a small bowl, combine the flour, baking powder, and salt. Stir to combine.
3. In a large bowl, cream the butter and sugar.
4. Add the egg yolks, orange zest, vanilla, lemon extract and milk to the butter mixture and mix to combine.
5. Add the flour mixture into the butter mixture 1/2 at a time mixing in between additions to combine.
6. Wrap the dough tightly in plastic wrap (I double wrap mine and put it in a gallon baggie to keep it from tasting like whatever’s in the fridge).
7. Chill for at least 2 hours or overnight. You can also freeze the dough at this point.
8. Roll out the cookies onto a lightly floured surface to 1/4 inch thick.
9. Cut the dough into shapes and place them onto an ungreased cookie sheet.
*I use a spatula to move the cookies with a lot of detail in their shape and then remove the cutter once they’re on the pan.
10. Bake your pretty little cookies at 400°F for 6-7 minutes – do not brown them.
yield 12-15 cookies depending on shape and size
Whole Wheat Sugar Cookies
Ingredients 
1 cup butter
1/2 cup sugar
1/2 cup splenda
1 egg
1 Tablespoon orange zest
2 teaspoons vanilla
2 teaspoons lemon extract
2 Tablespoons frozen orange juice concentrate (thawed)
3 cups whole wheat pastry flour
1 teaspoon baking powder
1/2 teaspoon salt
Instructions
1. Pre-heat your oven to 400°F.
2. In a small bowl, combine the flour, baking powder, and salt. Stir to combine.
3. In a large bowl, cream the butter, sugar and splenda.
4. Add the egg, orange zest, vanilla, lemon extract and orange juice concentrate to the butter mixture and mix to combine.
5. Add the flour mixture into the butter mixture 1/2 at a time mixing in between additions to combine.
6. Wrap the dough tightly in plastic wrap ( I double wrap mine and put it in a gallon baggie to keep it from tasting like whatever’s in the fridge). You can also freeze your dough at this point.
7. Chill for at least 2 hours or overnight.
8. Roll out the dough on a lightly floured surface to 1/4 inch thick.
9. Cut the dough into shapes and place them onto an ungreased cookie sheet.
*I use a spatula to move the cookies with a lot of detail in their shape and then remove the cutter once I have them on the pan.
10. Bake your Christmas Cookies at 400°F for 6-7 minutes – do not brown.
yield 12-15 cookies depending on shape and size  Frosting
2/3 cup butter (room temperature)
3 teaspoons vanilla
1/4 to 1/2 cup milk
6 cups powdered sugar
1. Cream the butter in a medium bowl for about 30 seconds.
2. Add the vanilla and 1/4 cup of milk and mix to combine.
3. Add the powdered sugar half at at time and mix in between additions. Use the additional milk to thin the frosting as necessary.
4. Add the color according to the package directions.
5. Decorate your cookies (I used piping bags for most of my decorating).