


Welcome to my food journal! This is officially on the net as of Oct. 24th 2011! I will try to put new entries in my journal once a week if possible – some of them may take a little longer. My journal is where I will be writing about anything going on in my culinary world. This includes recipes from my home, restaurant and event reviews, some basic culinary information that I want to share with you, and whatever else may come to mind. The food journal will always have the last ten things I put on the site in it, just not categorized. Everything will be in it’s own category on the menu bar as well. This is the best place to look if you want to see my latest post, because it will always be at the top. You can use the search tool to look for a specific subject by typing key words into the search bar. You can also go to the index on the menu bar for a list of everything on the site. If there is something you would like to know about that I haven’t posted or if you have a question, please feel free to contact me and I will try to answer as soon as possible. I love to share my food and knowledge, and I put this site up for us!
Here are my 5 most recent entries!
If you would like to see a list of all of my recipes, lessons and reviews, please go to the index on the menu bar.
Pastelon
Spicy Cajun Shrimp over Linguini

This is one of my husband’s very favorite dinners and it can be made in 20 to 30 minutes. I make my own Cajun Seasoning, (recipe at this link https://youtu.be/F0QfO3Mgw7o ) but you can use one bought from the store….although it may not come out quite the same. As with most of my recipes, there is a tutorial on my YouTube Channel – and it can be found at this link https://youtu.be/GIGgoivMIzE
Ingredients
2 Tablespoons Cajun Seasoning

20 Shrimp (peeled and deveined)
3 Tablespoons Olive Oil
1/4 cup white wine
1 Tablespoon garlic, minced
1 small shallot, sliced thin (about 1 -2 Tablespoons)
15 Cherry Tomatoes
water if needed
1 teaspoon lemon zest
2 Tablespoons butter
9 ounces frozen spinach (thaw and squeeze out excess liquid)
8 ounces linguini
Instructions
1. Start a large pot of well salted water to boil. I use an 8 quart pot with almost 1/4 cup of iodized salt in it just to give you an idea.
2. Sprinkle the shrimp with the Cajun Seasoning and toss them around until they are well coated. Set them to the side. Also, while you’re waiting on your water to come to a boil, get all of your other ingredients ready.
3. Place the 3 Tablespoons of olive oil into a large braiser pan or a saute pan if you don’t have a braiser.
4. When your water comes to a boil, add the noodles and also put your shrimp into the hot olive oil. Cook the shrimp on both sides (about 2 minutes per side depending on the temperature of your pan and shrimp) DO NOT OVERCOOK!
5. Remove your shrimp from the pan and deglaze it with the white wine, be sure to scrape up any bits left from the shrimp or seasoning.
6. Add the garlic, shallot and tomatoes to the pan and saute until they are fragrant, about 1 minute. If the pan gets too dry add a bit of water to prevent burning.
7. Add one teaspoon of lemon zest, stir and remove from the heat.
8. Add in the butter stirring constantly, then add the spinach. The spinach should be at room temperature. Also, make sure to super squeeze out all of the excess water.
9. Add the linguini and toss.
10. Serve with the shrimp on top. I garnished mine with a sprig of thyme too. Enjoy!
Pumpkin Bacon Doughnuts

These pumpkin bacon doughnuts combine two of my favorite flavors, pumpkin and bacon……..mmmmmm, together at last and in a doughnut. YES!  Ingredients
Dry
3 1/2 cups Self- Rising Flour
1/2 teaspoon of salt
(For the salt, I used 1/4 teaspoon smoked sea salt and 1/4 teaspoon iodized. For a more traditional doughnut, use all iodized).
2 teaspoons pumpkin pie spice
Wet Ingredients
1 cup sugar
1/4 cup bacon grease
2 eggs
1 1/2 teaspoons vanilla
1/2 cup sour cream
1/3 cup buttermilk
15 ounces pumpkin puree
Glaze
2 cups powdered sugar
milk, buttermilk, or cream to desired consistancy
Sugar Topping
1 cup sugar
2 teaspoons pumpkin pie spice
Garnish
1/2 pound bacon, cooked and chopped
Instructions
1. Mix all of your dry ingredients into a small bowl and stir until well combined.
2. In a large bowl, cream the sugar and bacon grease. Add the eggs and vanilla and mix until combined. Stop and scrape the bottom and sides of your bowl.
3. Mix in the sour cream. Add the pumpkin puree and mix until well combined.
4. Add 1/3 of the flour mixture. Only mix this until the flour is barely combined. Overmixing will cause tough doughnuts. Add 1/2 of the buttermilk and mix. Continue to alternate the flour mixture and buttermilk until all of the ingredients are used.
5. Cover the dough and let it rest in the refrigerator for 3 hours.
6. Once the dough has rested you can either fry it as is and make fritters or you can make the doughnuts. To make the fritters, simply drop large spoons of the dough into hot oil and turn them half way through cooking. When they are done, place them on paper towels for a minute to drain and then roll them in the sugar mixture while they’re still hot.
If you want to make the doughnuts…..
7. Place the dough onto a well floured surface and sprinkle some flour on top. Work additional flour into the dough until it is stiffer (see video).
8. Cut out the doughnut shapes and fry them in the hot oil. Turn them half-way through cooking.
9. Let them cool enough to handle them. Dip one side into the glaze and then into the crumbled bacon.
Enjoy!
How to Make Pumpkin Puree

How to make pumpkin puree – Looking around my house right now is kind of making me laugh at myself. This year I got this idea in my head to decorate with real fall/winter produce – beautiful pumpkins (sugar pie and Jarrahdale), butternut , spaghetti and acorn squash are lining every shelf in the room lol. I think that I may have went just a little bit overboard……well, maybe not. I do have a very serious pumpkin addiction lol so this may work out perfectly. Anyway, that’s not why I started writing this :)Today, I wanted to share with everyone an easy way to make your own pumpkin puree. Not only is it easy but it is nutritious and gives you a little more play in your recipes. Some of you may not know this but pumpkins have slightly different flavors and textures depending on the variety. For this recipe, I used a sugar pie pumpkin which has a dense flesh with a strong “pumpkin flavor”. It is also less watery then the larger varieties that are used for carving. I also really love the creamy texture and subtle melon aroma and fruity flavor of the Jarrahdale. The Jarrahdale are also less “stringy” then other varieties. For me, both make a great pie. When you choose your pumpkin, look for one that is heavy for it’s size. I have also been told to look for a matte color on the outside. A shiny outside is an indication that it could have been picked too early or that it is waxed. 
Making your own puree is easy.
Ingredients
pumpkin
water
That’s it, no preservatives :)
Instructions
1. Cut the pumpkin in half and remove the seeds.
2. Remove the stem.
3. Cover tightly in foil.
4. Bake on a sheet pan at 350°F until it is fork tender. I like to do the first 20 minutes foil side down and the rest of the roasting foil side up. My pumpkin took around 45 minutes.
5. Allow the pumpkin to cool completely and then scoop the flesh into a food processor. Add about a Tablespoon of water and pulse it a few times. Open the food processor, check for large pieces and push them to the bottom. Also, add more water if necessary to get a smooth puree. The amount of water you need will vary depending on how soft it was to start. I used about 1/4 cup of water in all.
6. At this point, I like to separate mine into 15 ounce portions and freeze it in gallon baggies for later use.
Pastelon

Pastelon – (recipe and video tutorial follow) – This recipe is one that I had a ton of fun making because we had family in town from Puerto Rico (Tia Lucy and Joey). I had never actually had Pastelon until we made it together, I had only heard how delicious it was. I have also had quite a few requests for this recipe to my site and to my YouTube channel. So, I’m really glad that I was finally able to make it. Tia Lucy and Joey are super fun to cook with too. And it’s extra cool because Tia Lucy was a professional cook in Puerto Rico for almost 35 years – she’s retired now. Anyway, this Pastelon recipe is awesome and I just want to say thank you to Tia Lucy and Joey for teaching me how to make this super yummy dish. Xavier thanks you too – that’s one more Puerto Rican dish that I get to make for him ;)
Ingredients
8 plantains – very ripe
olive oil 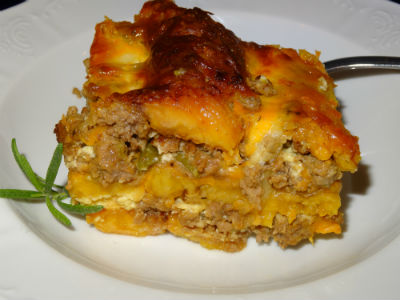
2 cups sofrito, my recipe
2 pounds ground beef
2 Tablespoons garlic, minced
Kosher Salt
Pepper
Achiote Oil (recipe follows)
3/4 – 1 pound green beans
1/2 pound mozzarella cheese, shredded
1/2 pound chedder cheese, shredded
8 eggs
1/2 cup heavy cream
1/2 cup milk (preferably whole)
canola oil
Instructions
1. Begin by peeling you plantains and slicing them into strips long ways. You should try to get four strips per plantain. Set these to the side when you are done. I put them on a sheet pan so that they don’t break up and they have plenty of room. I also put them back onto the same pan after I fry them.
2. Place about 2 Tablespoons of olive oil in a large pan then saute the two cups of sofrito with 1/2 teaspoon salt and 1/4 teaspoon pepper for a couple of minutes. Add the beef, garlic, 1 1/2 teaspoons salt and 1/4 teaspoon pepper and continue cooking until the meat is almost brown. While you are cooking your meat, begin frying the plantains in canola oil. They should be fried until they are golden but not a dark brown.
3. Add the Achiote Oil to the beef mixture. Also, mix the cheeses together in a seperate large bowl.
4. Once the beef is brown (done), add the green beans and continue cooking until they begin to get tender. Taste the mixture and decide if it needs more salt or pepper.
5. In a small bowl, combine the eggs, heavy cream and whole milk along with a about 1/2 teaspoon of salt and a little pepper.
6. Once everything is done, it is time to assemble your Pastelon.
7. Begin by buttering the pan. Then build the layers in this order – first, 1/3 of the egg mixture, then a layer of plantains, then cheese mixture, beef, another layer of plantains, another 1/3 of the egg mixture, then more cheese, more beef, next, one last layer of plantains. Finish with a layer of cheese and then the remainder of your egg mixture.
8. Bake at 350°F for about 20 minutes or until it’s all melty and good.
9. Allow to cool for a few minutes and enjoy!
Achiote Oil
1 cup canola oil
1/2 cup achiote seeds (annoto seeds)
1. Combine the seeds and the oil in a small saute pan (skillet). Place on medium heat and stir frequently. Allow to cook until you have a deep orange color. Do not allow to boil.
Fried Pickles

Fried Pickles – (recipe and video tutorial follow) – About a year ago, I tried my first fried pickle. My husband had went out to this restaurant for a work meeting that day and brought home his left overs. He was super excited and said “you’ve got to try these, they are so good!” So I was like OK, I like trying new things and I took a big ole’ bite of my first fried pickle. And, it was delicious. A couple of bites in though, it was a little too spicy for me (yes, I’m a baby when it comes to spicy stuff). So, I decided to make my own recipe that would be more to my taste. Of course I didn’t want to totally get rid of the spiciness (my husband and kids love spicy), but I just wanted to be able to get through a whole pickle without my mouth feeling like it was on total fire. Also, we decided that we wanted to make our pickles two different ways, regular (like the restaurant served), and extra crunchy. Here is the recipe that I came up with – it works for both the regular (a little crisp) fried pickles and the crunchy fried pickles. If you want regular crispiness, stop where it says to in step five. Also, if you would like to have your pickles a little more spicy, you can adjust the cayenne in the Cajun Seasoning. I would try them this way first though so that you have a gauge of how spicy they already are. Also, I love these served with Thousand Island Dressing or Ketchup. You can also dip them in Ranch, but I think it’s a little overpowering for this recipe – do what you like best though, you’re the one eating it :)
Ingredients
1 cup A.P. Flour
3/4 cup cornstarch
3 Tablespoons Cajun Seasoning (*recipe follows)
3 eggs
1 cup milk
2 cups panko bread crumbs (if making extra crunchy)
20 pickle spears (refrigerated are best)
Instructions for Fried Pickles
1. Drain your pickles. It is easiest to do this by lining a sheet pan with paper towels and placing the pickles on the paper towels.
2. In a dish large enough to dip your pickles easily (I use an 8 x 8 baking dish) mix your flour, cornstarch and Cajun Seasonings. Stir them up well to combine evenly.
3. In a separate bowl, also big enough to dip your pickles easily, whisk your eggs and milk together (you can use a fork if you want to, no big deal).
4. On a plate, lay out the 2 cups of panko (again, if making the extra crunchy).
5. Working one pickle at a time, start by rolling your pickle in the flour mixture. From there, dip the pickle
into the egg mixture, then back into the flour mixture. Stop here and fry them if you want them to be “regular crispy”, otherwise ……… then, one more time into the egg mixture and finally, roll the pickle in the panko. To get the panko to stick better, gently press down on it as you bread your pickle.
6. Carefully place the pickles into your hot frying oil. The oil should be between 350°F and 375°F. The best way to tell if your oil is at the right temperature is to look for the bubbles. When you add a pickle, you should get lots of bubbles all around it. If your oil ever starts smoking, turn off the heat and wait for it to cool before you continue or you will have burned fried pickles and possibly a fire.
7. Fry until golden brown. This will only take a couple of minutes.
8. Enjoy with your favorite dip – we like to use thousand island dressing!
*Cajun Seasoning Blend
 Ingredients
(feel free to adjust these to your taste, especially the cayenne)
3 Tablespoons paprika
2 teaspoons cayenne pepper (double this if you like spicy)
1 teaspoon black pepper
1 teaspoon white pepper
1 Tablespoon oregano
2 Tablespoon + 1 teaspoon Kosher Salt
1 teaspoon garlic powder
1 teaspoon onion powder
2 teaspoons celery salt
1 teaspoon dry mustard
1 teaspoon thyme
Instructions
1. Mix all of the ingredients together in a small bowl. Stir them until they are well combined.
Store this spice mixture in an airtight container so it’s ready to use anytime. This Seasoning blend is not only great in this recipe, but is also yummy sprinkled on fish, chicken or beef :). I especially like grilled Cajun Chicken!
Alcapurrias

Alcapurrias – (alcapurrias recipe and video follow) – OK, I have been getting a lot of requests for this one so I’m going to do it….. although I was totally going to do it anyway :) because I love alcapurrias. This is yet another one of those delicious Puerto Rican foods that I am hopelessly addicted to. I think one of the things that I really love about them is all of the memories that I have associated with them. My awesome mother-in-law makes them every Christmas and then at some of the random family gatherings too. When we show up at the house, we are always welcomed by Salsa Music and the smell of Puerto Rican food. Sometimes my father-in-law, Carlos, is even playing along to the music on his Congas. If you get the smell of the alcapurrias and the sound of the Congas together, you know it’s going to be an extra special night full of remanissing about the island and looking at pictures because they are in “island mode”- I love it! Anyway, I always head straight for the kitchen – that’s where you generally find everybody (there and the pool if it’s hot out). But either way, Mirta (my mother-in-law) is always in the kitchen cooking up something amazing. I love to help her because one, I love to cook, and two, because whoever is in the kitchen helping gets to snack on the food while we cook. And this is super important if you want to actually get to eat one of the alcapurrias because they go FAST. Yes, she makes enough for everyone. But the alcapurrias never make it to the dinner table – or really to a plate of any sort. It’s more like as they finish cooking, one by one they are handed out on napkins and eaten. Come to think of it, I don’t think I’ve ever been there and seen a stack of them on a plate. They are always taken as they cook. It’s funny too, well, and a little sad because there is always someone who shows up in the kitchen too late to find that the last one has been eaten and no one saved them one. So sad. But, I digress. Anyway, for this recipe I’m going to give you a few choices of how to flavor your masa. I like mine all of these ways but usually do them the “au natural” way – my husband loves them like this because it “tastes like Puerto Rico” to him – of course, I agree.

Yield 18-20 large alcapurrias
(you can easily cut this recipe in half if you want)
Ingredients for the Masa
3 pounds tarro root
1 1/2 pounds yucca
2 green plantains
2 teaspoons Kosher Salt
Choice of one of these ways to flavor the masa
1/4 cup annoto oil (achoite oil)
optional 2 teaspoons coriander
or
1/4 cup olive oil
1-2 packages of sazzon 
or
1/4 cup olive oil
2 teaspoons coriander
2 teaspoons cumin
2 teaspoons paprika
2 teaspoons garlic powder
For the Filling
1/2 cup of raisins soaked in rum for 2-3 hours
1 cup sofrito (the fresh one that I make)
1/4 pound ground pork
1 1/2 pounds ground beef
1 ounce tocino
1 teaspoon Kosher salt
1/4 teaspoon pepper
1 teaspoon oregano
10 olives, minced
1 teaspoon capers (optional)
Instructions
1. Start with the tarro root. Slice off both ends and peel it. Place it into a large bowl of cool, salted water. This will keep it from discoloring. Next, slice off both ends of the yucca. Cut it long ways down the middle and then remove the stem/root thing that grows down the middle (see video). Place the yucca in the bowl with the tarro root. Lastly, peel the plantain. It is easiest to do this by cutting off both ends and then making a cut down the peel long ways and pulling the peel off.
2. Next, use the small side of a box grater to grate the taro root, the yucca, and the plantain. As you grate them, put them into a bowl with a piece of plastic wrap directly on top. Again, to keep them from discoloring.
3. Add the flavorings that you choose to the masa. Mix the masa until all of the ingredients are well combined. I use my hands to do this.
4. Cover the masa first with a piece of plastic wrap directly on top, and then another to cover the bowl. This will help prevent it from picking up any “refrigerator tastes”. Allow the masa to set up in the refrigerator for at least 2 hours. If you can do it overnight, it is better. Allowing it to set makes it easier to work with. Also, remember that your raisins (for the filling) need to soak in rum for at least 2 hours. They can soak longer, no problem.
5. Now it is time to make the meat filling. Start off with a little olive oil in the pan and turn your heat on medium high. Saute the sofrito in the olive oil with a little bit of Kosher Salt and pepper. Add all of the meats. Sprinkle with a little Kosher Salt and pepper. When the meat starts to turn brown with still a little pink (when it’s parcooked), add the oregano, olives, raisins and capers if you’re using them. Continue cooking the filling until the meat is done.
6. To fill the alcapurrias, flatten a small amount of the masa in your hand. Relax your fingers so that they form a cup/bowl for the filling. Place the filling in the middle of the masa. Fold it over kind of like a clam and seal “the clam” closed (see video). Roll it around gently in your hand and repair any holes with additional masa.
7. At this point, you can freeze your alcapurrias for later. If you don’t want to freeze them, it is time to fry them.
8. You can use a deep fryer or a deep pan on the stove. I use canola oil to fry mine and I fill the pan so that the oil will go just past half way up the alcapurria. The oil should be around 350°F for a fresh alcapurria and around 325°F if you froze your alcapurrias.
9. Cook them until they are golden brown on all sides rotating as necessary. Remove the alcapurrias from the oil and place them on a sheet pan or plate lined with paper towels to drain the excess oil. Immediatly sprinkle them with iodized salt.
10. Let them cool for a few minutes – they will be HOT. Now it’s finally time to enjoy your delicious alcapurrias!
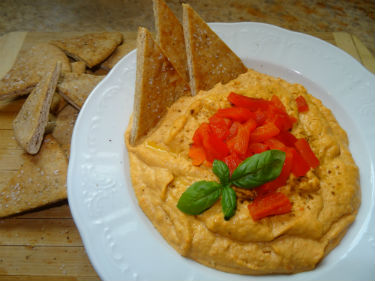
Roasted Red Pepper Hummus

Roasted Red Pepper Hummus Recipe – Hummus is such and easy thing to make at home and much more cost effective too. Plus, you don’t have to eat any preservatives which is always nice ;). I have a lot of nutritional information on my other hummus recipe as well as instructions to use dry chick peas if you don’t want to use canned. I hope that you give this roasted red pepper hummus a try, it’s super yummy!
 Ingredients
2 red bell peppers (reserve some for garnish)
1 can chick peas
1 teaspoon Kosher Salt
1/2 cup tahini paste
1 teaspoon cumin
1 Tablespoon garlic, minced
1/4 cup dry white wine (like Pinot Grigio)
OR
2 teaspoons lemon juice (do this to taste, this is a guideline)
1/2 teaspoon pepper (optional)
Instructions
1. Begin by roasting your bell peppers. You can do this by placing them on a sheet pan (cookie sheet) on the top shelf under the broiler in your oven. You can also place them on a grill. Rotate them as the sides blacken. It takes around one minute for this to happen. Once all of the sides are black, place the peppers into a metal or glass bowl and cover it with plastic wrap. Set this to the side and allow the peppers to steam for at least 15 minutes.
2. Once the peppers have steamed (and cooled a bit), peel them. Then deseed and destem them.
3. Dice one side of 1 pepper and set it to the side for garnish. The rest of the pepper pieces will be going into the food processor.
4. Add the remaining ingredients into your food processor along with the bell peppers (reserving the ones you diced for garnish). Pulse them a few times and then turn the food processor on for about one minute. Stop and scrape the sides and bottom of the bowl to make sure that you don’t have any chunks stuck to them. Also, taste the hummus for seasoning (salt and pepper), and make adjustments as necessary. Turn the machine on for 2-3 more minutes until you have the desired consistancy. Place the hummus in an airtight container with a layer of plastic wrap placed directly on the top. This will help prevent the top layer from drying out. Place in the refrigerator and allow to set for at least 3 hours to let the flavors develop.
5. When you are ready to serve your hummus. Pour your hummus into a serving bowl and lightly spray or brush the top with olive oil. This will prevent it from drying out on top and looking yucky. I like to use a 100% olive oil spray for this.
6. Garnish with a sprinkle of cumin and the bell peppers that you diced up. I also like to put a little sprig of basil in it just for a little added color – it makes the hummus look prettier :).
Coleslaw

Coleslaw Recipe
5 cups cabbage, shredded
1 cup carrots, shredded
3 Tablespoons sugar
1 cup mayonnaise
2 Tablespoons vinegar (I like apple cider vinegar best)
1. Shred your cabbage and carrots using either a food processor fitted with the large shredder attachment, or a box grater (large hole side)
2. Combine your cabbage and carrots into a large bowl.
3. In a seperate bowl, combine the sugar, mayonnaise, and vinegar. Stir well to combine.
4. Pour the mayonnaise mixture over the cabbage/carrot mixture and fold to mix.
5. That’s it, you’re done. This is best if served about one hour after making.
Chili Mac

Chili Mac -(Recipe with video tutorial follow)- This is one of those dinners that everyone in the family loves, from our 18 year old (our oldest) to our 3 year old. It’s comfort food, food that fills your tummy and makes it all warm and yummy feeling. You know, comfort food. It’s also a great recipe for busy mom’s (or busy anyone for that matter). It’s fairly quick and easy to make, pretty nutritious (I can’t call it totally nutritious, after all, it has mac and cheese in it :), but still) and really delicious. What more can you ask for? So, enjoy!
Ingredients 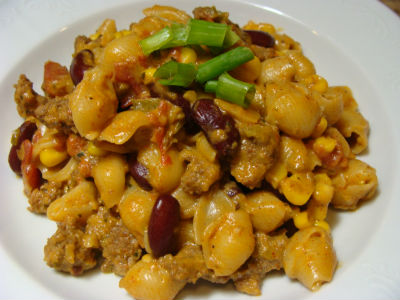
1 family size package of the creamy style mac and cheese
iodized salt (regular table salt will work)
2 Tablespoons olive oil
or
2 cups sofrito
1 teaspoon dried thyme
1 Tablespoon chili powder
1 (16 ounce) can dark red kidney beans (drained and rinsed)
1 (15 ounce) can diced tomatoes with the juice
10 – 12 ounce frozen corn
Optional Garnishes
sour cream
green onions
Instructions
1. Prepare the mac and cheese according to the package instructions except, add 1 Tablespoon of salt (preferable iodized) to the water.
2. While the mac and cheese is cooking, in a separate pan, heat 2 Tablespoons of olive oil.
3. Add your minced veggies/sofrito to the hot oil. Sauté for about 1 minute.
4. Add one pound of ground beef. I use a lean ground beef for this so that the fat does not have to be drained. If you look at the package of beef, you will see a number like 85/15 or 90/10. These numbers represent the fat to meat ratio. So if you are buying 85/15, you have 85% meat and 15% fat and you will end up with a lot of grease in the pan. If you use a lower fat meat like the 90/10 or the 93/7, you will have a lot less fat and it will not be necessary to drain the fat out of the pan.
5. When your meat is brown, sprinkle it with the thyme and the chili powder. Stir it to evenly coat the meat.
6. Once the meat is evenly coated, add the kidney beans and the tomatoes. Stir until everything is well combined and allow the beans and tomatoes to get heated through.
7. Add the frozen corn, stir, and allow the corn to get heated all the way through.
8. Gently fold in the prepared mac and cheese, being gentle is important so that you don’t tear your noodles (it will be prettier if you don’t tear them).
9. Serve your delicious chili mac with your favorite garnish. I prefer to use sour cream and green onions. My husband and son like to spice it up with some hot sauce. Enjoy!
Please enjoy this how to video!
Goat Cheese Tartelettes with Fresh Fig Compote

Goat Cheese Tarts with Fresh Fig Compote – (recipe and video tutorial follow) – So, I’m nineteen weeks pregnant now and the cravings are going strong – lucky for you :). That means I’m in the kitchen making stuff that I don’t make on a regular basis, but more for special occasions. After all, twenty four goat cheese tarts is hardly good to put out at the dinner table for the kids. Although, now that I think about it, they may like the idea, they did destroy them pretty quickly. Anyway, this is a great dish to make as an appetizer for parties or to put out on the buffet. It can also be served as dessert and you can change the topping to anything that you want – ah, so versatile. They can be made ahead of time and they are delicious at room temperature. They are a little time consuming to make (this recipe will probably take you 45 minutes to an hour if you don’t recruit help), but very well worth it.
Ingredients for tart shell
1 1/2 cups A.P. Flour 
3 Tablespoons sugar
1/2 teaspoon Kosher Salt
10 Tablespoons butter (cold)
3 Tablespoons ice water
Ingredients for Fig Compote
6 figs
1/2 cup dry red wine
4 Tablespoons brown sugar
2 Tablespoons Balsamic Vinegar
Ingredients for Tart Filling
4 ounces cream cheese (room temperature)
4 ounces goat cheese (room temperature) 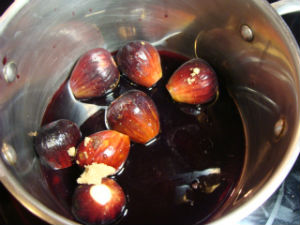
2 Tablespoons honey
1/8 teaspoon salt
2 eggs
Instructions for tart shells
1. Place your flour, sugar and salt into the bowl of a food processer. If you don’t have a food processer, you can do this by hand. Pulse/stir the ingredients to mix them evenly.
2. Add the butter and pulse a few times. If you are doing this by hand, use a fork or pastry cutter to incorporate the butter. You are looking for a texture that is similar to cornmeal with a small chunks of butter. When you have the correct texture…..
3. Add the water. I start by adding about three tablespoons and pulsing/stirring to combine. If the dough doesn’t come together into a ball, add the last tablespoon of water and stir/pulse. You should not need more then 1/4 cup (four tablespoons). 
4. Wrap the dough in plastic wrap and refrigerate for one hour. If you absolutely do not have time to do this, you can skip this step, but the shells will come out better and the dough will be easier to work with if you refrigerate it. Also, I like to double wrap mine so it doesn’t pick up any flavors from the fridge.
5. Remove the dough from the refrigerator, and unwrap it. Divide your dough ball into four equal pieces. Working with one piece at a time, roll the first piece into a “dough snake” (see video).
6. Divide your dough snake into 6 equal pieces by first cutting it in half and then cutting each half into thirds.
7. Working with one piece at a time roll the first piece into a ball. Then, mash that ball into a circle about 1/4 inch thick. This will be your mini-tart crust. Transfer the crust to the mini-muffin pan and shape it into one of the holes. Make sure that the dough is touching the bottom and the sides. Repeat steps five through seven with the remaining dough.
8. Once you have your mini-muffin pan completely full, dock all of the crusts. This means that you poke small holes in the crusts with a fork. Doing so helps keep the crust from getting bubbles in the oven.
9. Bake the crusts for ten minutes at 350°F. Remove from the oven and allow to cool. While your crusts are baking, you can start your fig compote – just set a timer so that you don’t forget about them :)
 Instructions for Fig Compote
1. Wash your figs.
2. Trim the tip of the stem end off of the figs.
3. Place figs in a sauce pan and add the wine, brown sugar, and the balsamic vinegar.
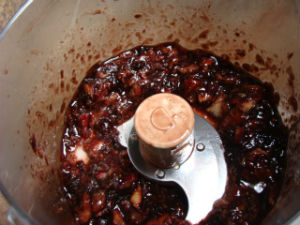
4. Place on high heat and bring to a boil. As soon as it starts to boil, reduce the heat to a light simmer. Allow the figs to simmer for about twenty minutes. Make sure you stir it every few minutes and watch the liquid. It should thicken into a syrup, when it does, it is done. You do not want all of your liquid to evaporate, so make sure to watch the figs and check on them every few minutes. Also, I use a high heat rubber spatula when I make this, that way I can scrape the bottom and sides well when I stir. Also, if your haven’t checked your tart shells, check them, they’re probably done :) While the fig compote is cooking, you can make your filling.
Instructions for The Filling 
1. Allow your ingredients to come up to room temperature. Then, cream the goat cheese and the cream cheese together. You do not have to get rid of every chunk at this point because you will be mixing after each additional ingredient.
2. Once you’ve gotten most of the chunks out, scrape the bottom and the sides of the bowl with a rubber spatula and then add the honey and salt. Mix until well combined. Scraping your bowl ensures that you will have a nice even texture in the tartelettes when they’re all done.
3. After the honey is mixed in well, scrape the bottom and sides of your bowl and then, add the eggs. Mix the eggs until combined. Scrape the bowl one more time making sure to get the sides and bottom. Then give your batter one final mix. You should mix it until it has a smooth even texture – you may still see a few cottage cheese size chunks, and that is OK.
4. Transfer your filling into a measuring cup or whatever you may have that is easy to pour out of.
 To Assemble Your Tarts
1. Pour the filling into the cooled tart shells. I like to pour some into each one before filling them all completely to ensure that I have enough batter and that they’re evenly filled.
2. Bake them at 350°F for about ten minutes until the middle is just set. This means that the middle should still jiggle a little when you shake the pan. If you over cook them, they will crack and they will have a drier feel to them.
3. Allow your tarts to cool and serve. You can either serve the compote on the side, or you can spoon a little on the tops. It is also pretty to put a little on the plate around the tarts :).
Enjoy!
Please enjoy this video tutorial!